Pega
Tutorial
&
Interview
Questions
BPM (Business Processes Management)
BPM is a Management Philosophy. It focuses on Business Processes and Sub-Processes of an
Industry with the behavior of Systems and Individuals within it. It models the processes and sub-
processes visually and uses advanced Information Technologies to solve the business problems. It
strives for better performance, easy to change and quality software.
Built for Change
Time to Market
BPM is about people and the way they work together (their business process) and their
performance objectives.
Benefits of BPM
0
Best suited for Workflows kind of software.
1
Increase ROI.
2
Robust and Quality Software
3
Agility and Facilitates quick change
4
Highly Iterative
5
Speed To Market
6
End To End Process and Performance Monitoring.
Important Blocks in BPM (Pega)
BRE, BAM, Integration Engine, Interfaces for Development and Maintenance.
0
Difference between Pega BPM Suite and other BPM Suites is Business Rules Engine and
Business Activity Monitoring (BAM)
1
Many Process Commander applications provide business process management and
automation through six functional capabilities, informally known as the Six R's:
1
Receiving — Accepting and capturing the essential data describing work from multiple sources in
multiple media and formats, from keyboards, scanners, and external systems.
2
Routing — using characteristics of the work and knowledge about the workforce to make
intelligent matches and assignments.
3
Reporting — providing real-time visibility of work in progress, work completed productivity,
bottlenecks, and quality.
4
Responding — Communicating status, requests for information, and progress to the work
originator and to other people involved in the work, by email, fax, written mail, and other means.
5
Researching — Accessing external systems and databases through connectors to support
analysis and decision making.
6
Resolving — through automated processing and automated support of users, completing the
work and updating downstream systems promptly.
1
Business Rules
Business rules whether stated implicitly or explicitly contains all your organization business
knowledge. A collection of your organization business policies, constraints, Computations,
reasoning capabilities etc.
Business Rules Engine
A business rules engine is a software component that allows business rules to be recorded in a
non-procedural, non-programming form, and uses advanced software techniques to compute the
consequences and results of rules.
The PegaRULES component of PegaRULES
Process Commander provides a powerful rules
engine supporting business process
management, and other applications through
services.
Developed in Java, highly scalable and reliable,
PegaRULES supports declarative rules,
multithreaded execution and a large number of
industry interfacing and standards.
The business rules engine can be embedded or
called from another system using Service JSR94
rules.
PegaRULES database
The rules, transactions, and other data supporting a Process Commander system are stored in
one or more Oracle, IBM DB2 or Microsoft SQL Server databases. (Consult the Platform Support
Guide for an exact current list of supported vendors and products.)
The database that contains the rules — all the instances of concrete classes derived from the Rule-
base class — is known as the PegaRULES database. This database is also sometimes identified as
the rulebase, but it contains more than rules.
Classes that are mapped to the PegaRULES database are known as internal classes. Concrete
classes that correspond to rows of an external database are known as external classes.
Application Lists Rule-Sets and Access Group lists Application. We can have more than one Access
Group for a particular Operator ID. These Access Group can have different Applications/WorkPools
with them. Therefore with one Operator, we can switch workpools as well as Applications.
RULESET:
A RuleSet name is an instance of the Rule-RuleSet-Name rule type. Each RuleSet defines a
major subset of rules in the PegaRULES database, because every instance of every rule type
references or "belongs to" a RuleSet. A RuleSet name is a major aspect in:
2
5888
Access control
5889
Grouping interrelated rules
5890
Managing the rules
5891
Rule resolution and versioning
5892
Moving applications — sets of rules — from one Process Commander system to
another. On rule forms, the RuleSet name appears at the upper right.
The term RuleSet sometimes refers to the name instance and sometimes informally refers to the
contents of that RuleSet — all the instances of Rule- classes associated with that RuleSet.
The Rule-.pyRuleSet property, present in every rule instance, records the RuleSet name to which the
instance belongs.
Process Commander itself consists of several standard RuleSets
RuleSet Name rules are part of the SysAdmin category. A RuleSet rule is an instance of the Rule-
RuleSet-Name class.
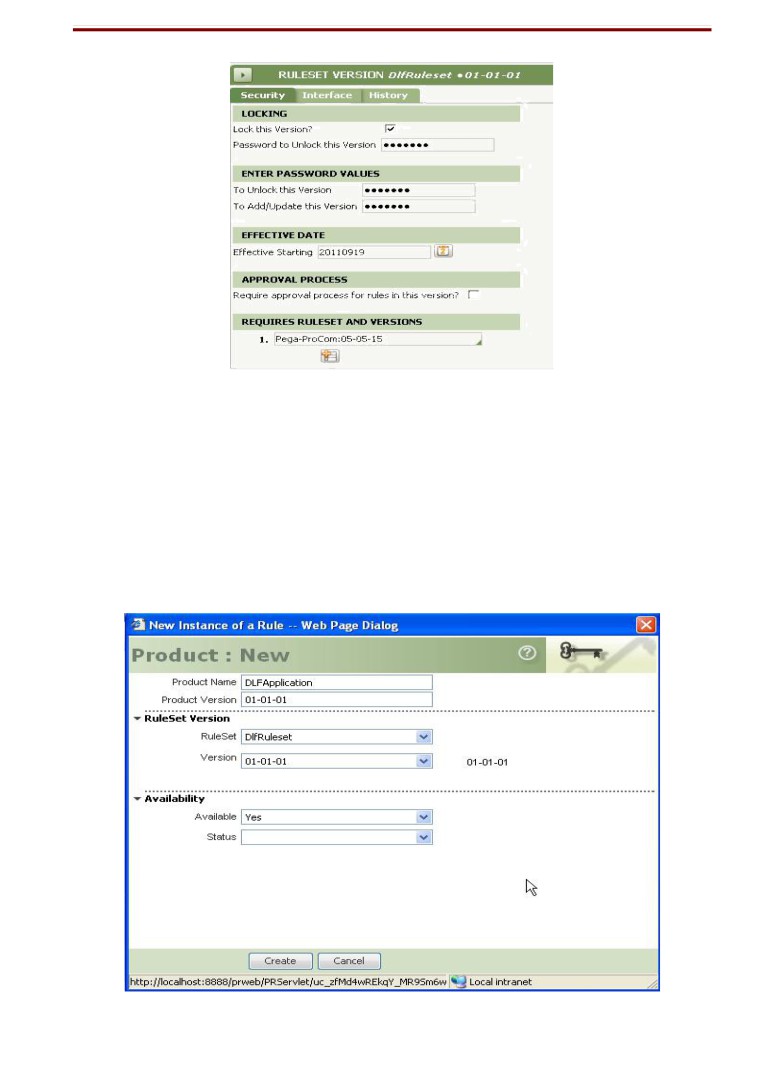
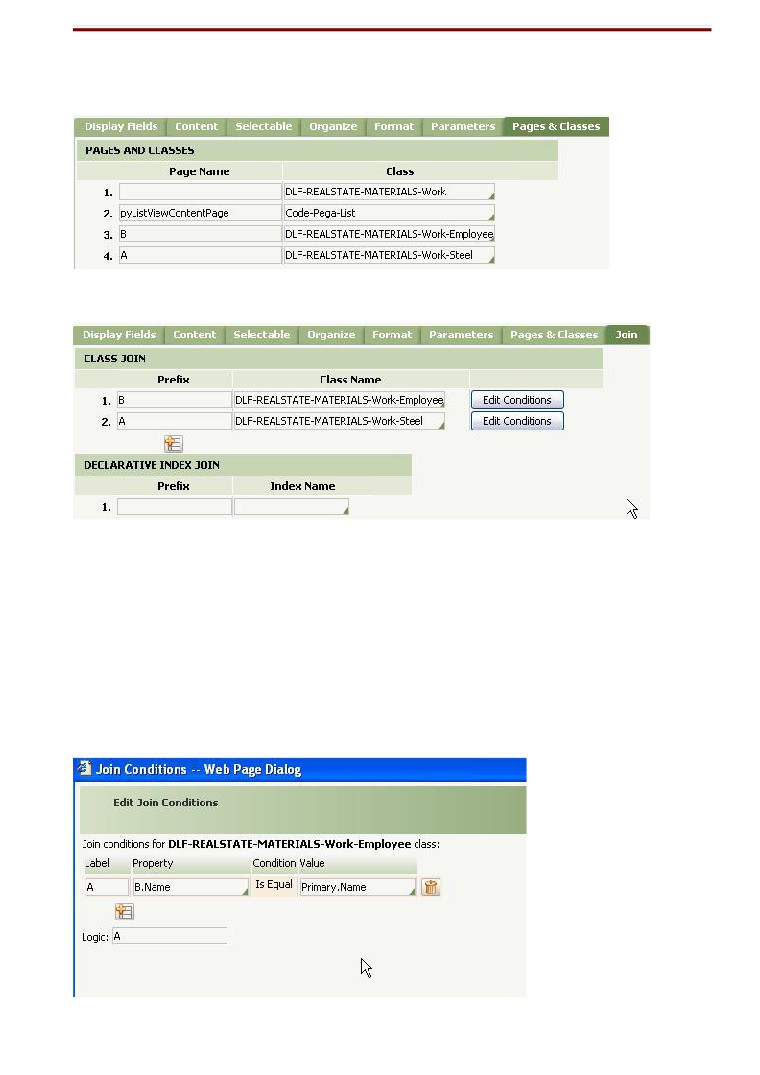
Creating Rule-Set, Organization and Division.
23 Go to PegaSample -> New -> Organization -> Organization. Give name and save
24 PegaSample -> New -> Organization -> Division, Organizational unit. Give name and save
25 Rule-set : - PegaSample -> New -> SysAdmin -> RuleSet. Give name, version and save. We
can give pre-requisite ruleset there (PegaProcom)
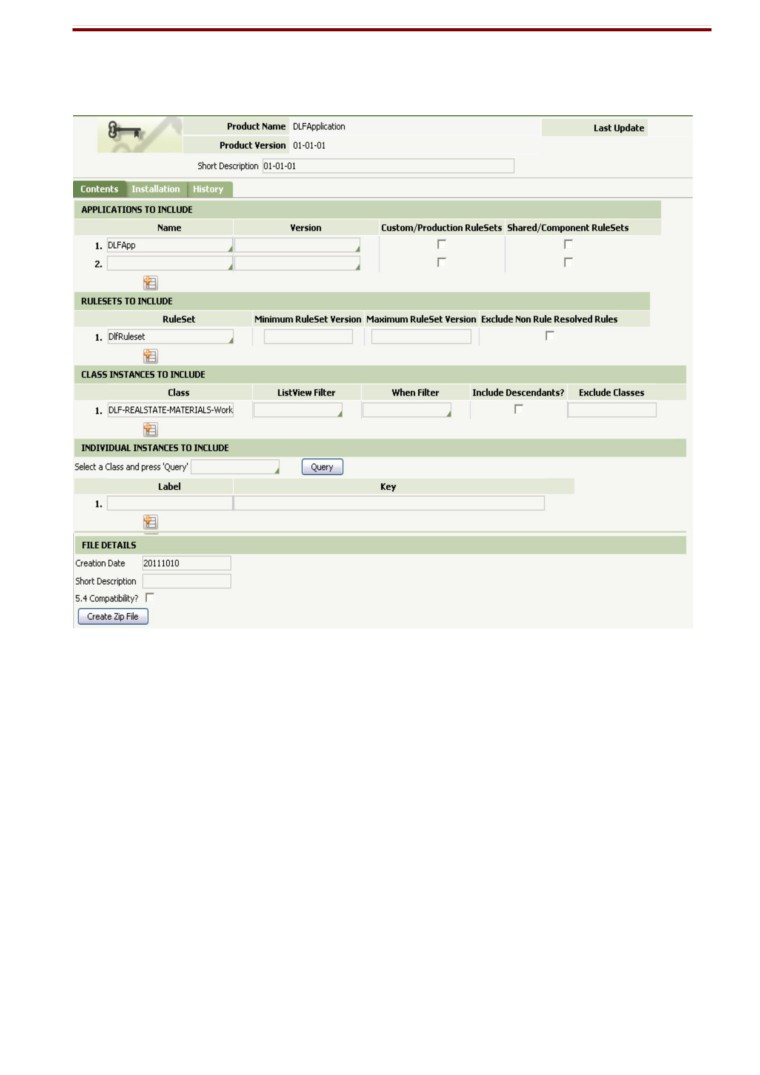
Creating Application, Access group, OperatorID.
Application: PegaSample -> Application Design -> Application. Give first version as 01.01.01
Built-in application = PEGARules. Application RuleSets = <Rule-set>:01-01 (major
and minor version)
Access group: PegaSample -> New -> Security -> Access Group. Access group name =
<application
Name>: Developer or <application name>: manager
Define roles, Default portal layout, work pool (default workpool is PegaSample)
(PegaRULES: SysArch4 in roles for developer)
PegaSample -> New -> Organization -> Operator ID. Operator ID can be
Provide the access group to it. Also under tab Work settings, change the Organizational
unit. Under advanced tab, you can change password.
3
Base classes.
Organization -> Data-
Division -> Data-
Unit -> Data-
Ruleset -> (Rule-)
Advantage of ruleset
5888
Access control
5889
Migration
5890
Rule resolution
5891
rule version
Ruleset is derived from Pega Procom derived from PegaRules
Access Group - Data-Admin-Operator-AccessGroup
Operator Id - Data-Admin-OperatorID
Pattern Inheritance
Process Commander provides two kinds of class inheritance, known as directed inheritance
and pattern inheritance. During rule resolution, pattern inheritance causes a class to inherit rules
first from classes that match a prefix of the class name.
About Classes
0
Instances of concrete classes derived from the Assign-base class and the Work- base class
1
When any object is held in memory, it has an XML (extensible Markup Language) format
visible on your clipboard as pages and property name-value pairs. When stored into the
PegaRULES database, the persistent object instance becomes a row in a SQL-based
relational database table.
2
Always the class group has direct inheritance with work- class
3
Class group and work classes (class type) are always concrete.
4
Class type or work class had direct inheritance with work-object-
5
The Class group becomes the workpool (in Access group)
6
Every class has to be with direct inheritance with some class. Pattern inheritance is optional. If
a class is not given a direct inheritance, then it will have the direct inheritance with the pattern
inheritance class.
Access Group --- has Application name in it.
Application Name -> RuleSet in it.
Operator ID - has access groups and Organizational unit in them.
4
Each sub-class of class group is associated with its parent class via a key, which is stored in property
inside the classes.
The primary key for the work object is defined in class group (work-pool). Eg: pyID
Class Group:
This is the first concrete class in the class structure. It supports the creation of work objects.
The work classes are concrete classes inherit from it. It normally groups the classes to be stored in a
single Database table, with a unique ID which is normally pyID. It also serves as the role of workpool.
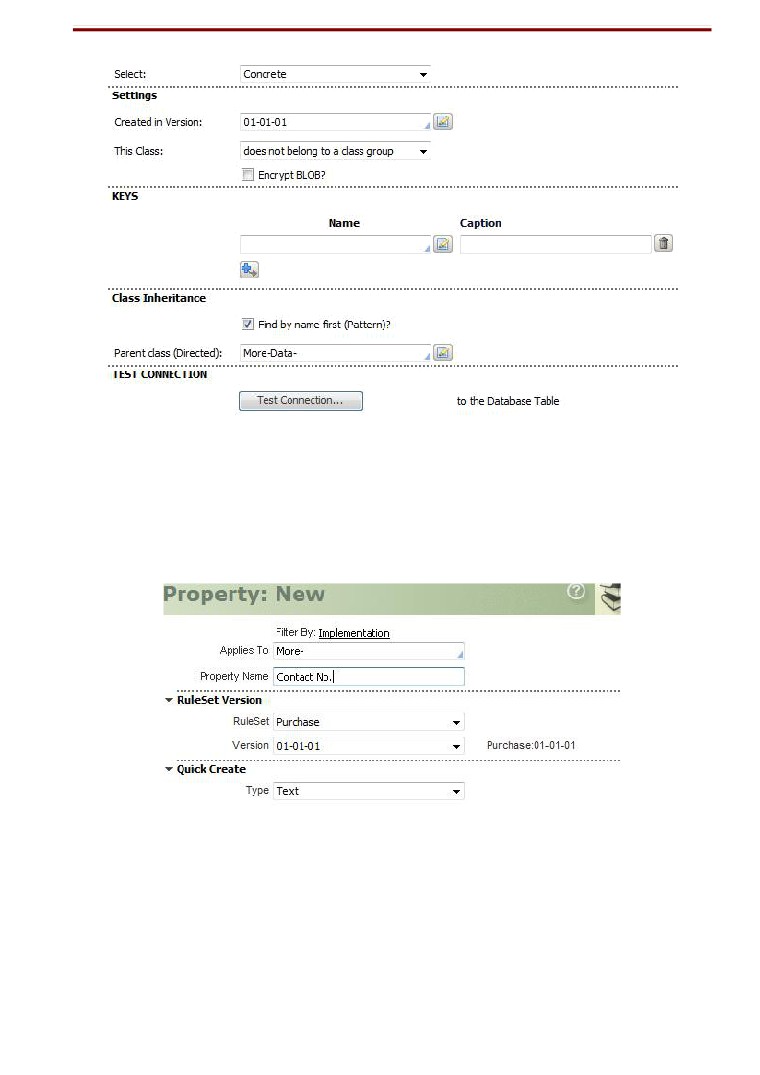
Creating Class
PegaSample -> New -> SysAdmin -> Class. Give the class name. Rule-set and save. Give
info in History.
Version, rule-set etc. save it.
0If Class is class group, select it and give its parent class as Work-
1If Class is class type, select it and give its parent class as Work-
Object-Now, select the workpool in access group as the class group
Mapping pc_work table with class group (Work pool)
The class group created is default mapped with pr_other table in database (where PegaRules are
present).
We manually map the class group with pc_work table.
e.g : More-retail-purchase-work (class group) -> new -> sysAdmin -> Database Table.
Give class name as: More-Retail-Purchase-Work and save.
In the form:
5
Defining work pool in Access Group
Define the work pool in Access group -> the class group
Creating Data classes:
Data-
(Direct inheritance with @baseclass)
More-Data- (Pattern inheritance with More- class)
More-Data-Items (Concrete class and doesn’t belong to class group)
Click right on More- -> new -> sysAdmin classes.
First create abstract class More-Data-, give parent class as Data-
Save it.
Then create class More-Data-Items
Similar as above. See the below pic.
6
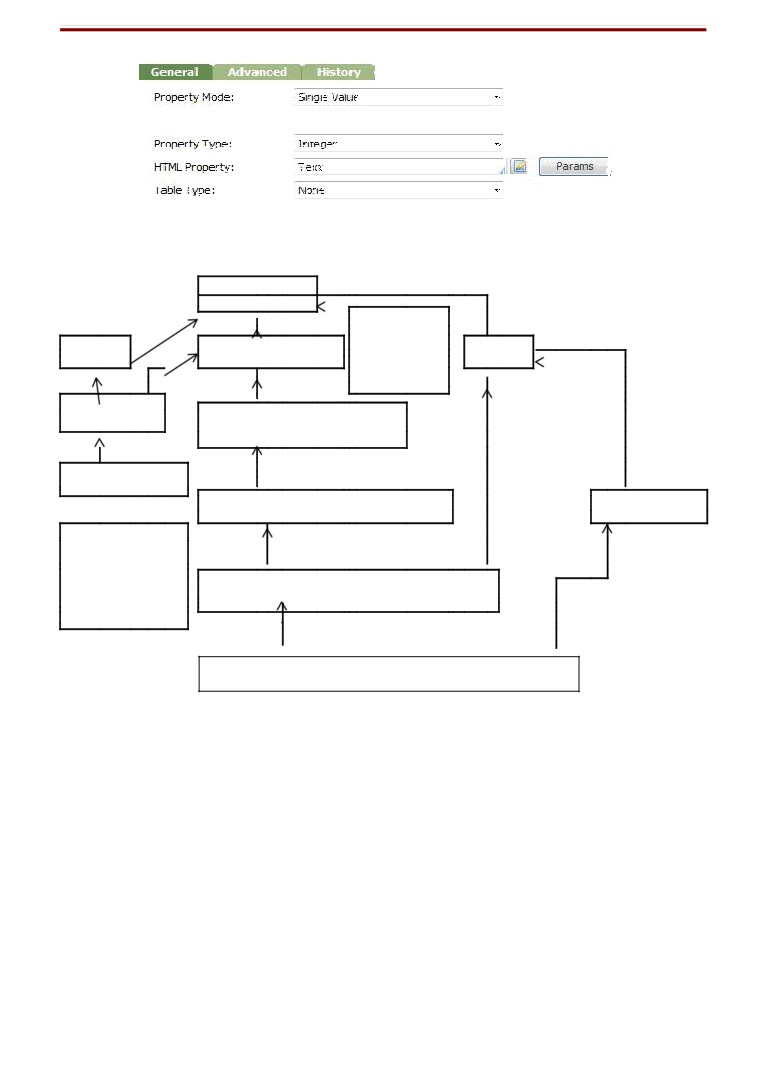
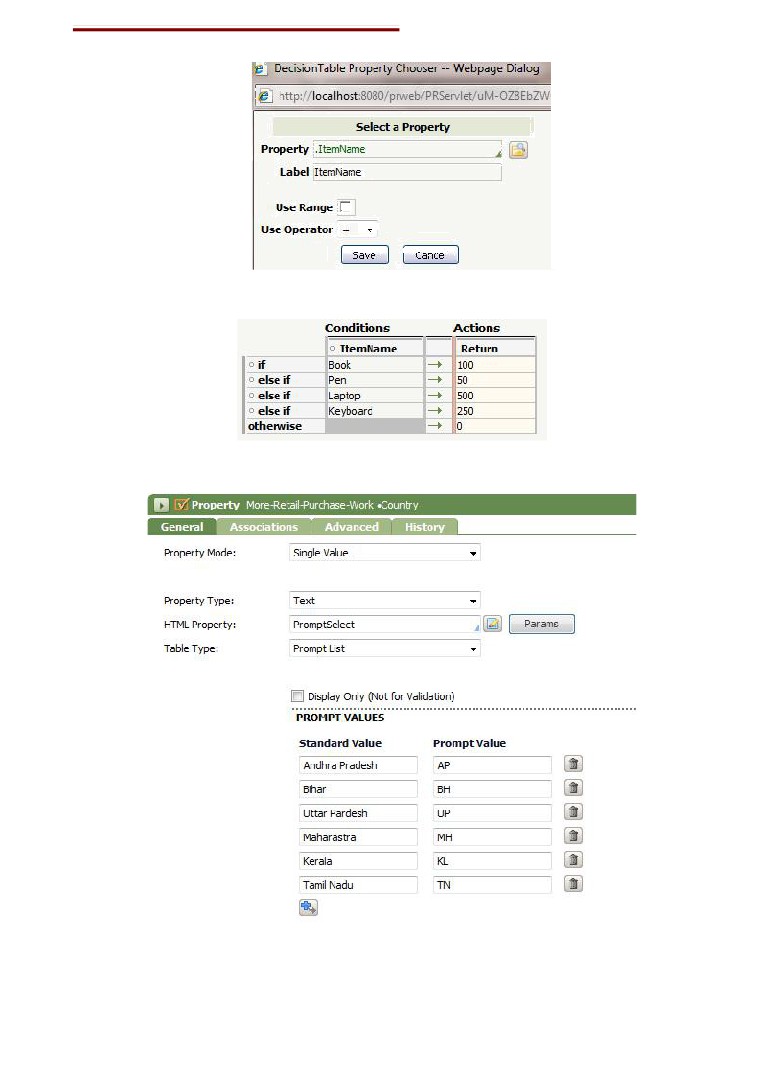
Creating Properties:
For common properties, like here in more departmental store, we have customer name, contact and
email-id as common for all departments and hence we will create these properties at More-
Right click more-> new -> Data model -> Property.
Then save it
7
Example of CITI Bank Cards dispute dept
@baseclass
Properties
DATA-
CITI-
(Org)
- Name
Work-
- AcNo
CITI- DATA-
CITI - Finance-
(Divisn)
CITI-DATA- Items
CITI - Finance-Cards -
(Unit)
Work-Object-
Properties
CITI - Finance Cards-
Work
(Class group)
- TransactionID
CITI - Finance- Cards -Work-CardDispute (Class type)
Parent Classes for different classes
Organization
---
Data-Admin-Organization
Division
---
Data-Admin-OrgDivision
Organizational Unit
---
Data-Admin-OrgUnit
AccessGroup
---
Data-Admin-Operator-AccessGroup
OperatorID
---
Data-Admin-Operator-ID
Class Group
---
Data-Admin-DB-ClassGroup
Database table
---
Data-Admin-DB-Table
RuleSet
---
Rule-Ruleset-Name
8
Application
---
Rule-Application
Class
---
Rule-Obj-Class
Harness
---
Rule-HTML-Harness
Section
---
Rule-HTML-Section
Flow
---
Rule-Obj-Flow
Property
---
Rule-Obj-Property
When
---
Rule-Obj-When
Map
---
Rule-Obj-MapValue
Decision Tree
---
Rule-Declare-Decision Tree
Decision Table
---
Rule-Declare-Decision Table
Work-
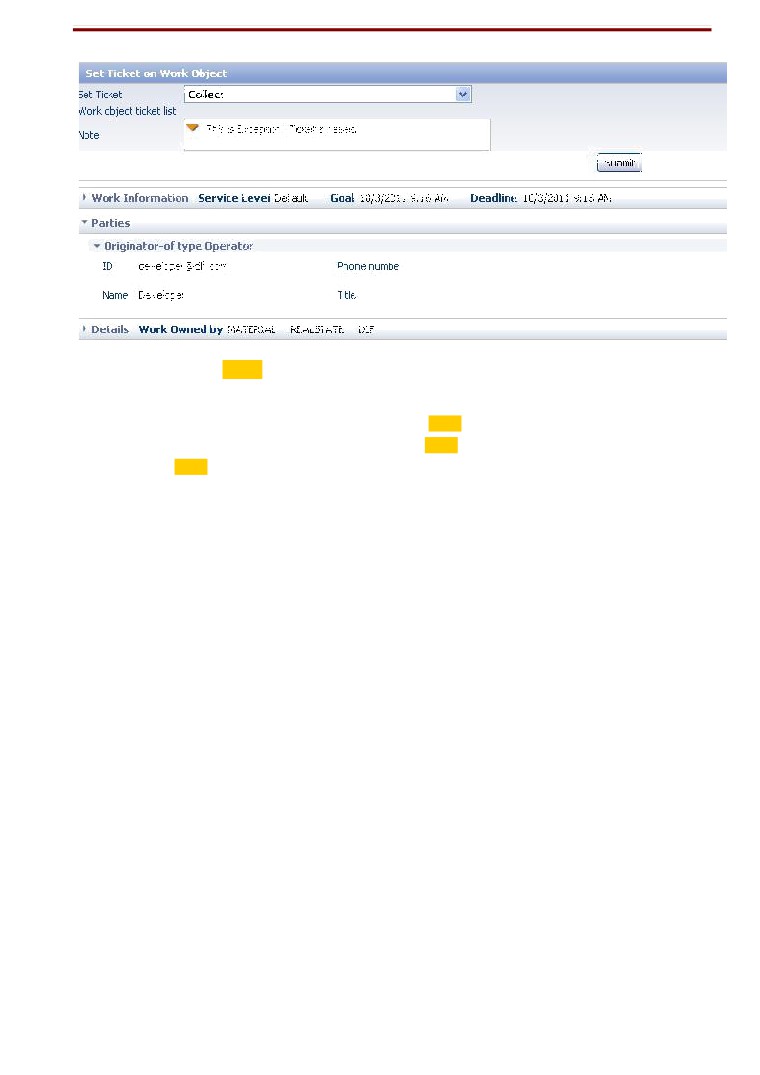
pyStatusWork -> Property To Track Work Object Status.
New -> The Activity that creates a new Work Object.
NewDefaults/NewInternalDefaults -> The Placeholder Activities that is called when a new work
object is created.
They are blank activities.
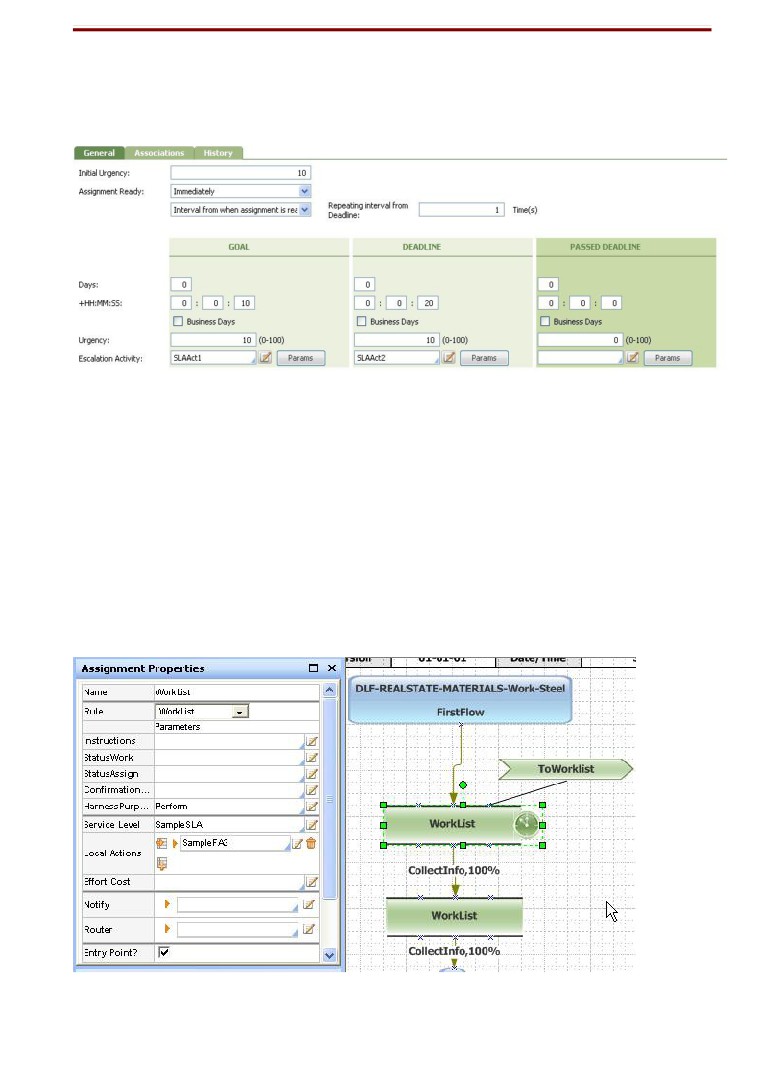
Default -> Default SLA in WorkObject. It defines 2 days and 5 days as goal and deadline time. No
escalation Activity.
pyDefault -> Models
: the property in W.O that stores the WorkParty for the W.O. It.s a page group type.
Show-Harness: Activity that shows harness for display w.o forms.
.pyRuleSet: Property inside each rule describing which rule-set it belongs.
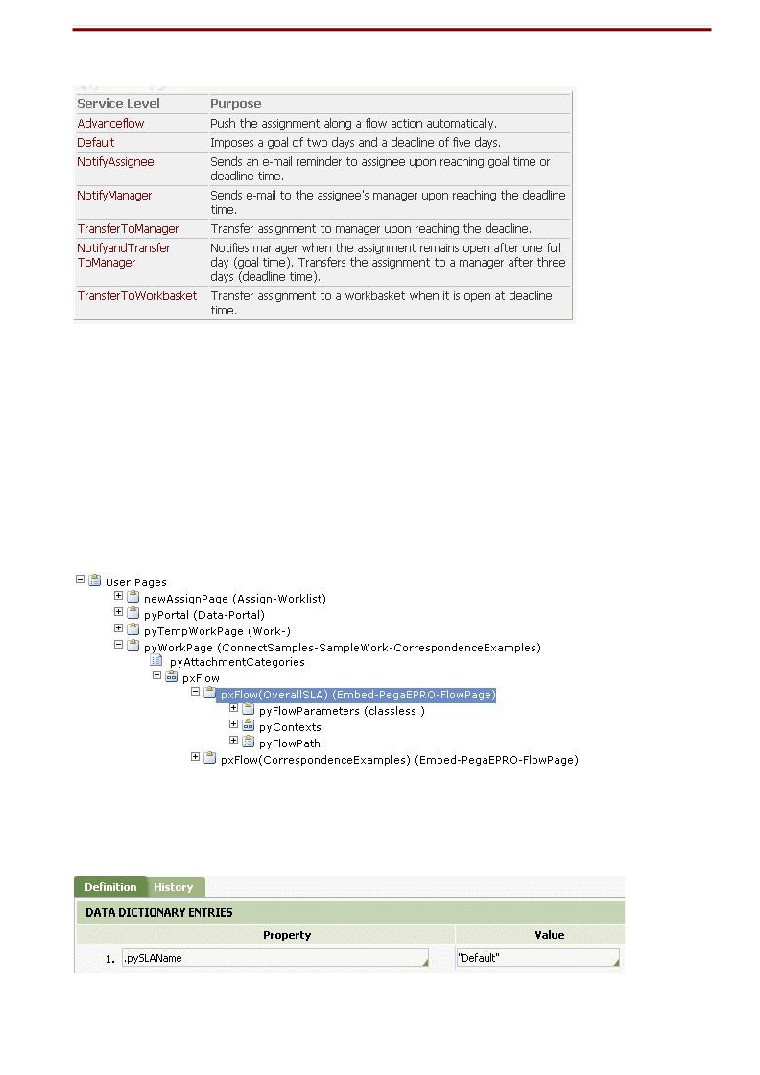
.pySLAName: Property to define a W.O SLA. Set through model
GenerateID: Activity that generates work id prefix for W.O
0
Concrete Classes mapped with pegaRules database are internal classes.
1
Concrete Classes mapped with external database are external classes.
A decision table/tree can be referenced in flows/activities/declare expressions. In declare
expressions we can call D.trees/D.table/Map.
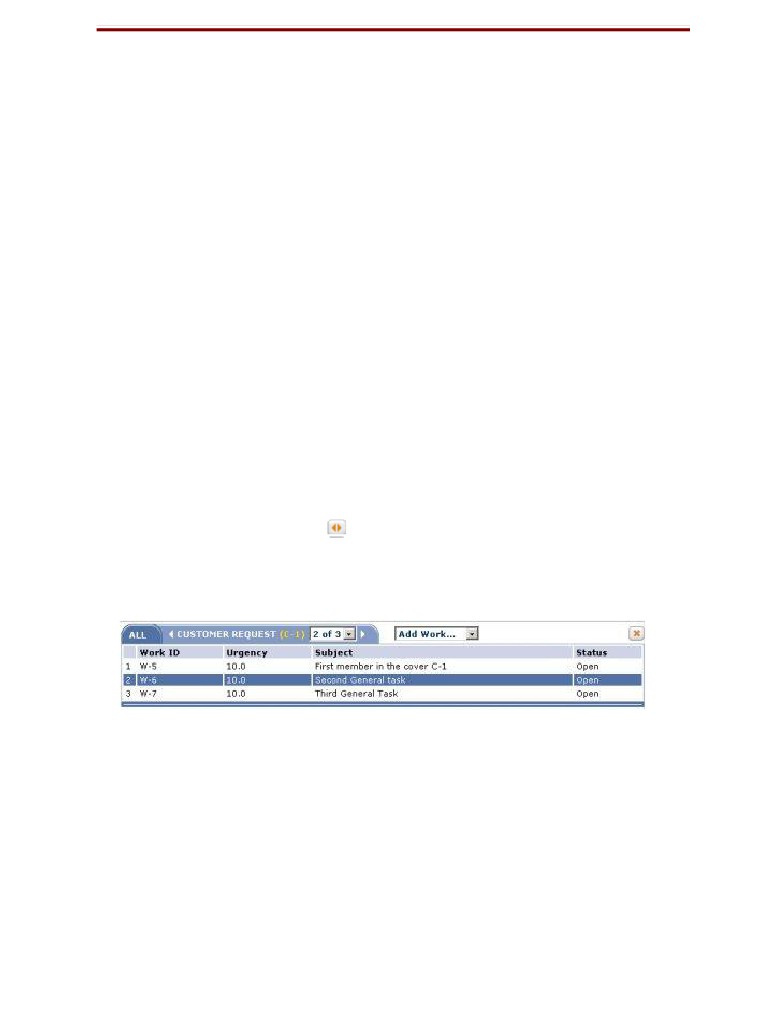
A worklist appears in My Work in Progress Area.
9
Inheritance in Pega
23 Class Inheritance.
24 Ruleset inheritance
25 RuleSet Version Inheritance.
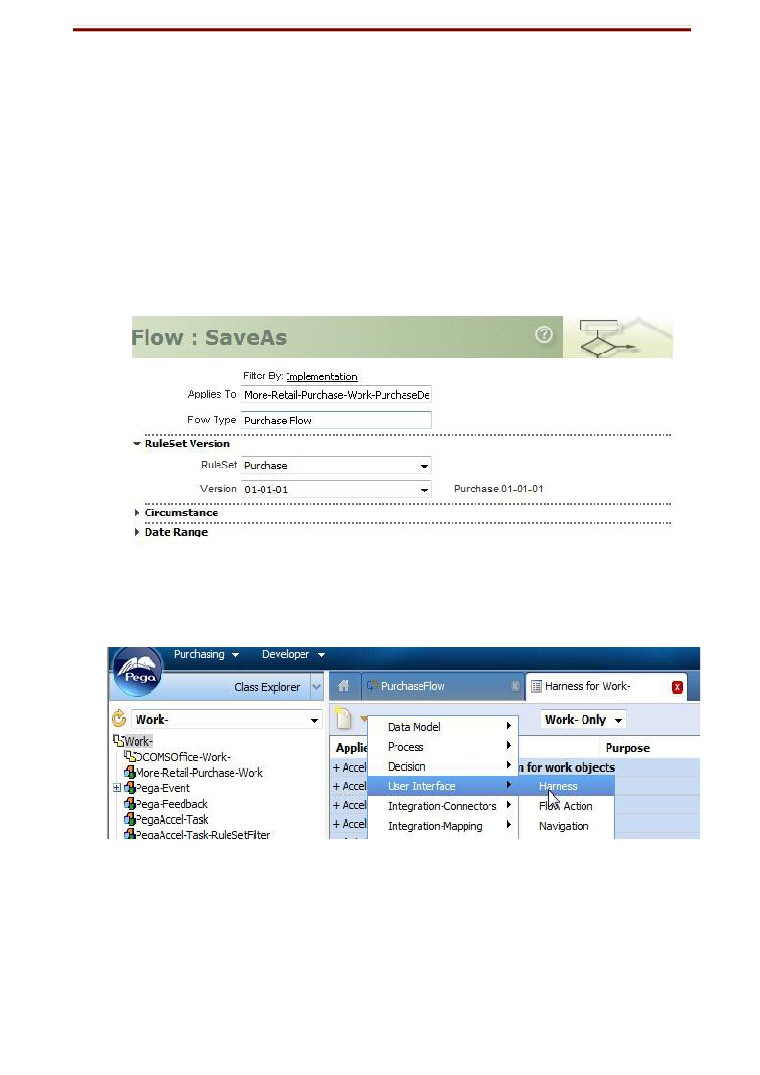
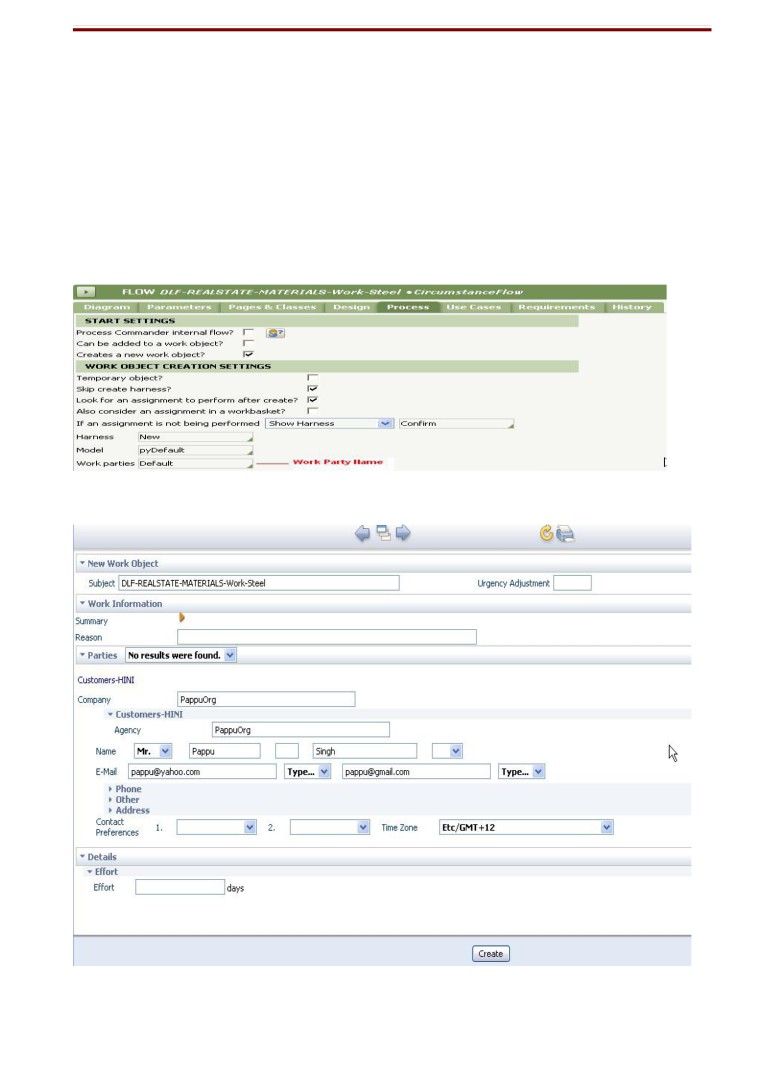
Creating Flow, Harness etc.
1) Flow
Select class explorer. From it select Work-. Click on Work-, then select Flow sample.
Click save as with Applies to as : <Class type>. And Flow Type: <name of flow>
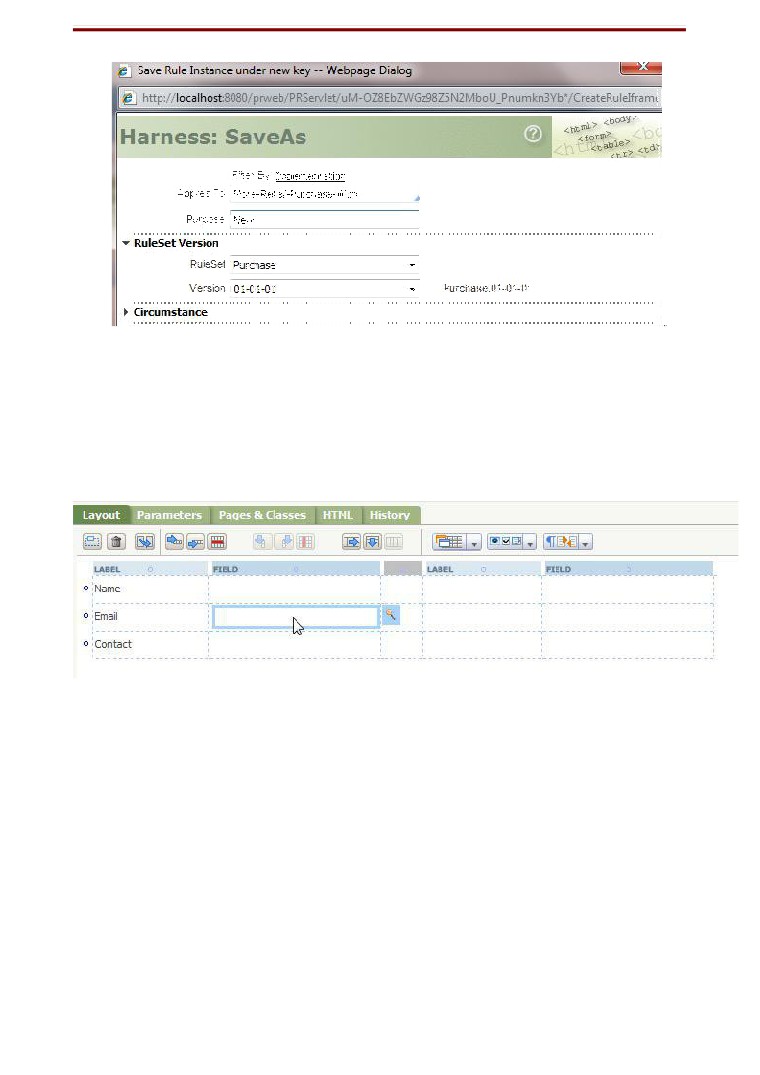
2) Harness
Select class explorer. From it select Work-. Click on Work-, and then select Harness. Click
New (in the grid)
Click as save as ->
Applies to -> <workpool>
10
3) Section
Two sections will be made.
5888
The common customer info. This will come under a section which will be
made under workpool.
Right-Click on work-pool -> new User Interface Section.
The fields from More- Should be dragged and dropped in the lebels.
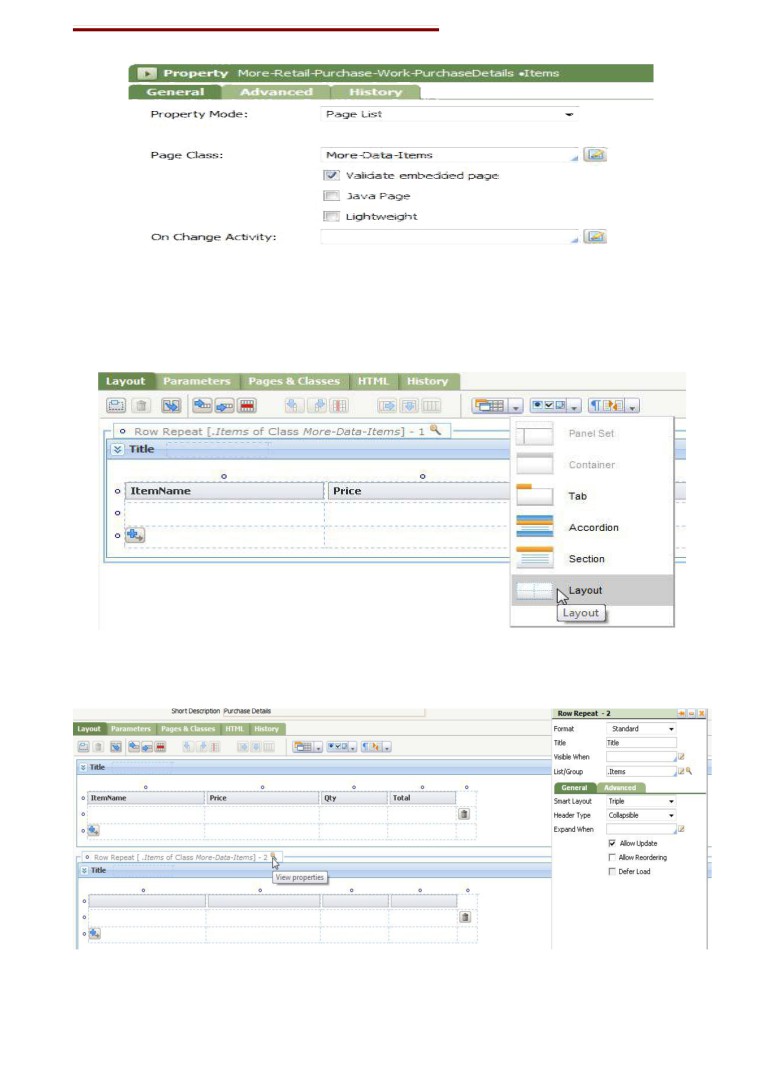
2) Now for repeating data. We need to create a pageList (Which holds the other property) in
Class type.
Right Click on work type -> new -> User interface ->
property. Give property name in the form.
Before saving.
Property mode Page list
Page class The name of class from where it will take the properties. Here we have More-Data-
Items
11
Now create a section to hold multiple data.
In the class type -> new user interface ->
Section. Click on Layout and drag it to the page.
Select repeating.
Add columns as required. Change the property of the grid.
Change:
12
Format - Standard
List/Group - It’ll be same as the PageList we created. i.e Items
Then as usual, drag and drop the properties in the columns.
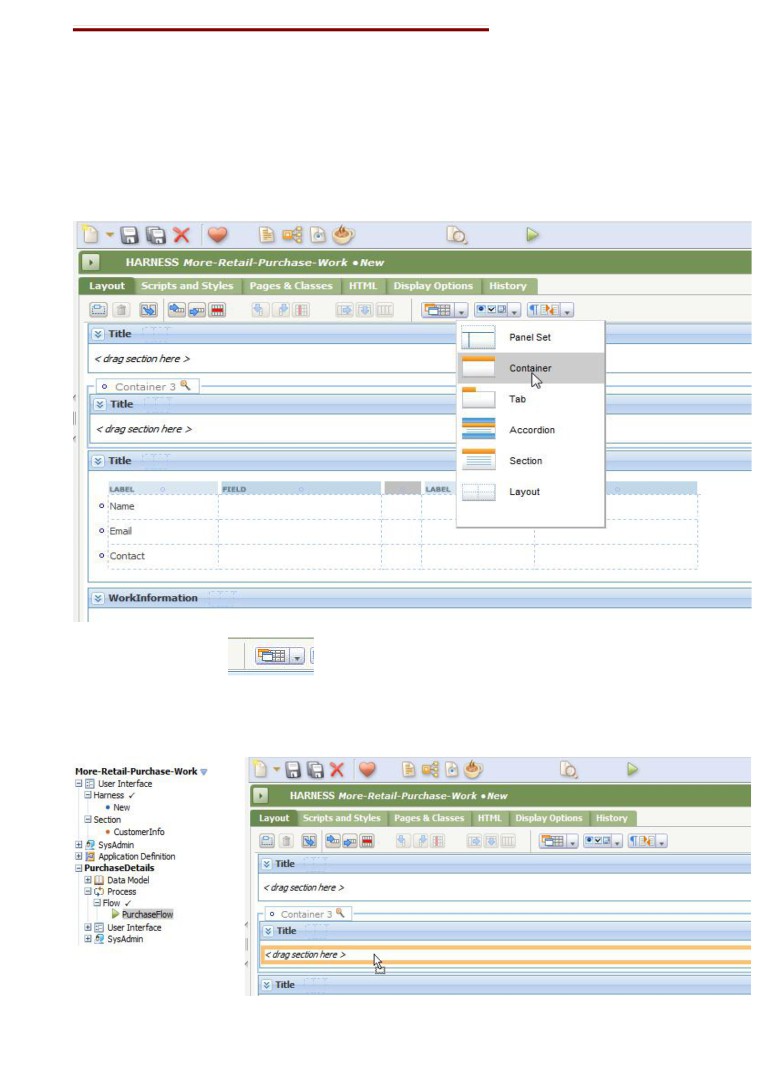
4) Adding Sections in Harness
Open the harness by clicking it.
Now click on the symbol
and select new container.
A new container will be selected inside harness.
Now drag and drop your section in the container.
13
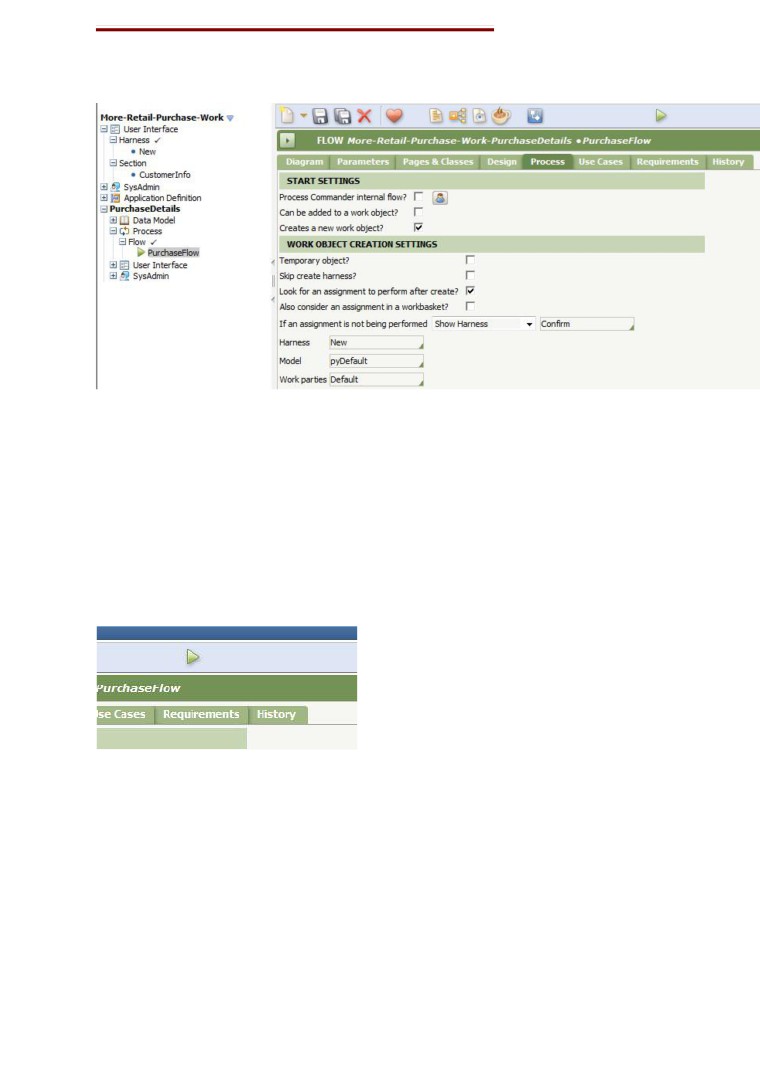
5) Adding Harness in Flow:
Click on the flow (here purchase Flow).
Click on process tab.
Under this change:
Create new work object:
tick it.
Harness :
New (The name of harness)
Now run from the above symbol.
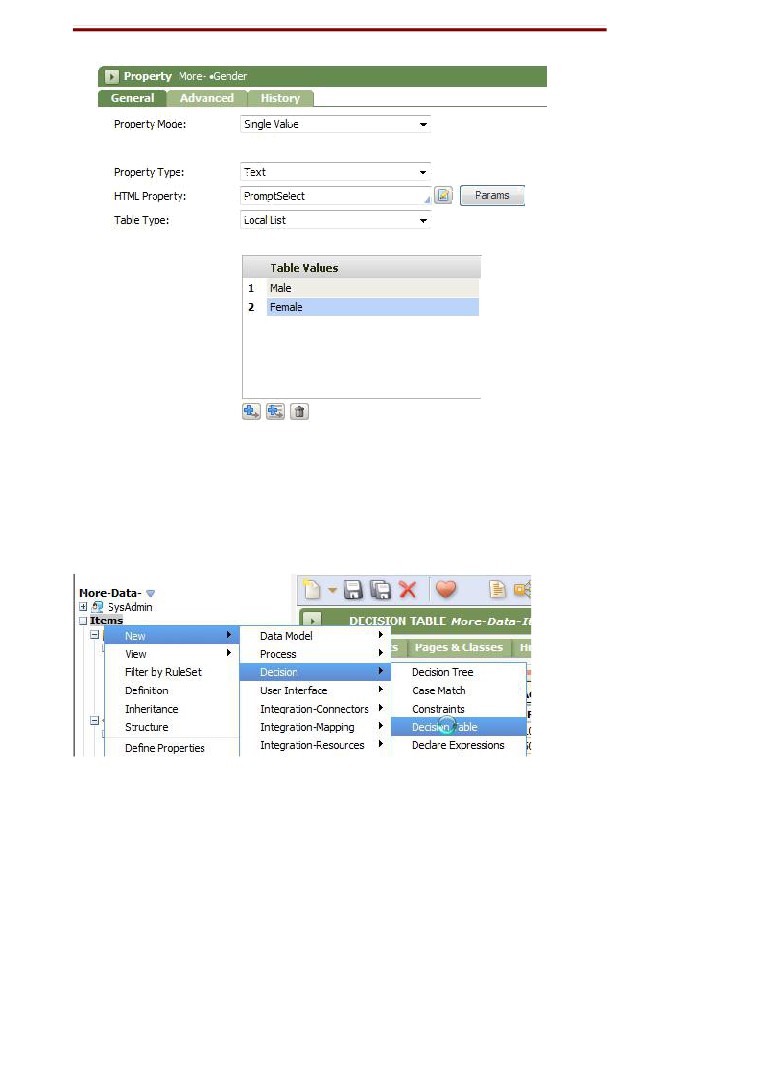
6) Creating drop down for set of values.
Select to create a new property. Under this modify the following.
HTML Property = PromptSelect
Table type = Local List
Put values inside the table type.
14
7) Creating decision table.
We create a decision table on ItemName present in pageList Items under More-
Data-. Right click on Items -> new -> Decision -> Decision table.
Then provide the details.
15
Click under Conditions and ->
7.1) Creating PromptList
16
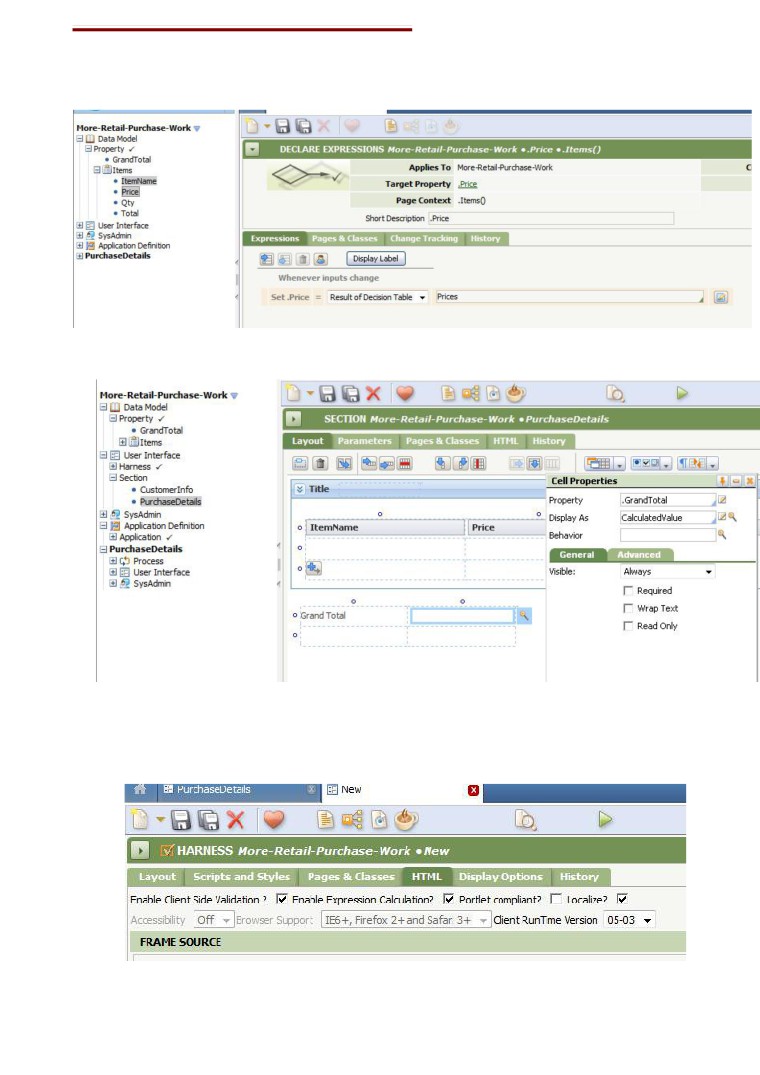
8) Creating expressions
9) Creating Calculated Value:
23
Steps to be followed for calculated value.
23 Harness: Tick Enable Expression Calculation
17
2) Create HTML Properties as Calculated value.
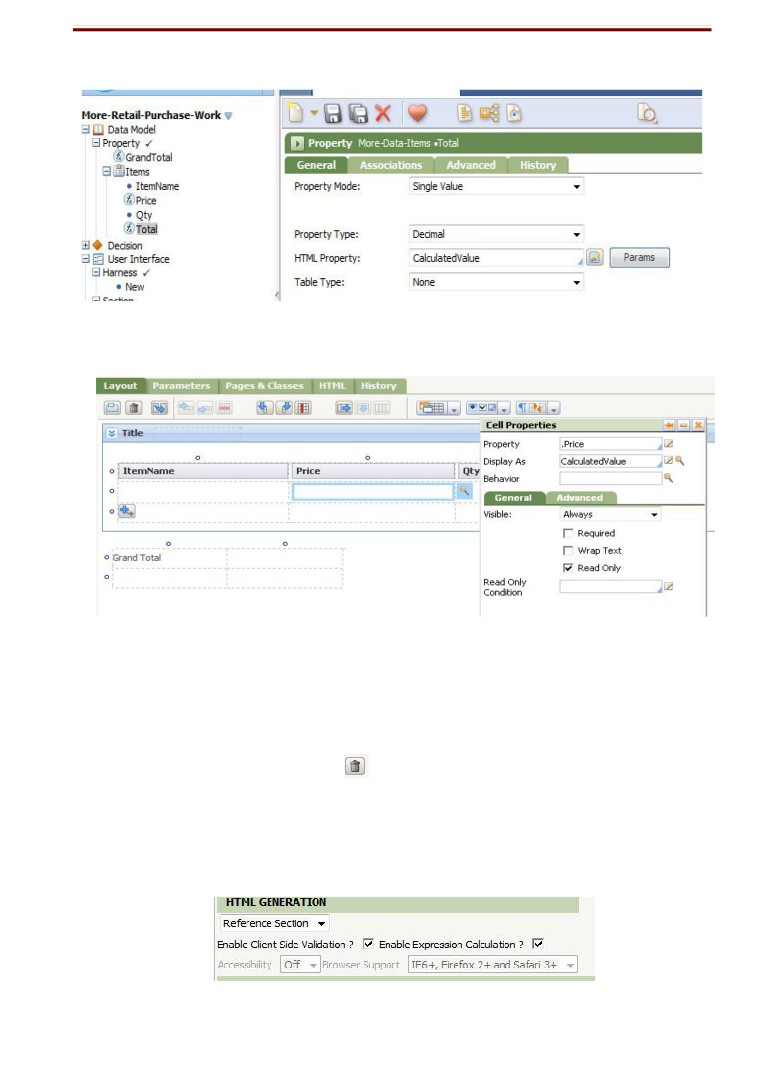
3) Section: in the properties of each of the calculated columns. Do -> Display as: Calculated Value.
Creating Flow Action, Flow, Sub-Flow, Decision Tree and Assignment
Properties
1) Creating Flow Action
Here there are 3 sections. CustomerInfo, PurchaseInfo and Confirmation. Confirmation is same as
PurchaseInfo but read only. We use button
to disable it from adding/deleting a new row
dynamically.
Hence for 3 sections, we create 3 flow actions.
5888
Create a new Flow action
-> CutomerInfo. Drag and drop the section
customerInfo there. Under HTML Tab, enable Expression calculation
18
2) Similarly create flow action for PurchaseInfo and Confirmation.
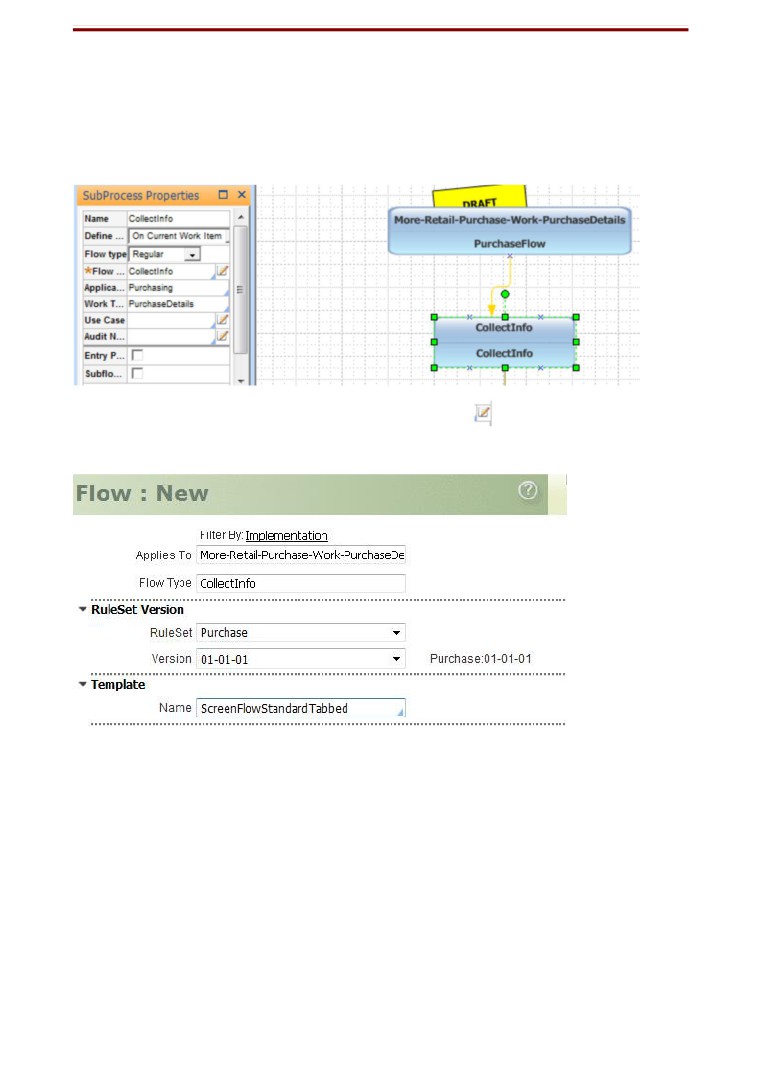
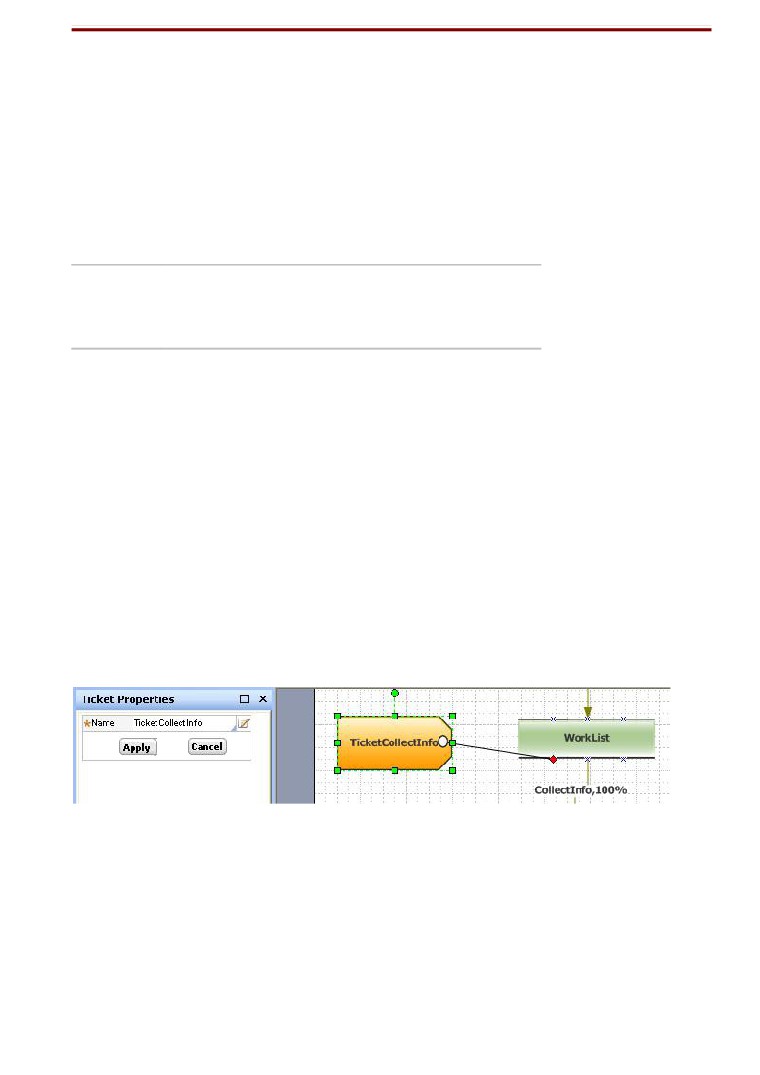
2) Creating Flow and Sub-Flow
For creating sub-flow, select “Flow” from the drag and drop in the main flow.
Select the diagram and in the properties box, give name and flow rule. (Flow rule will b the name of sub-flow)
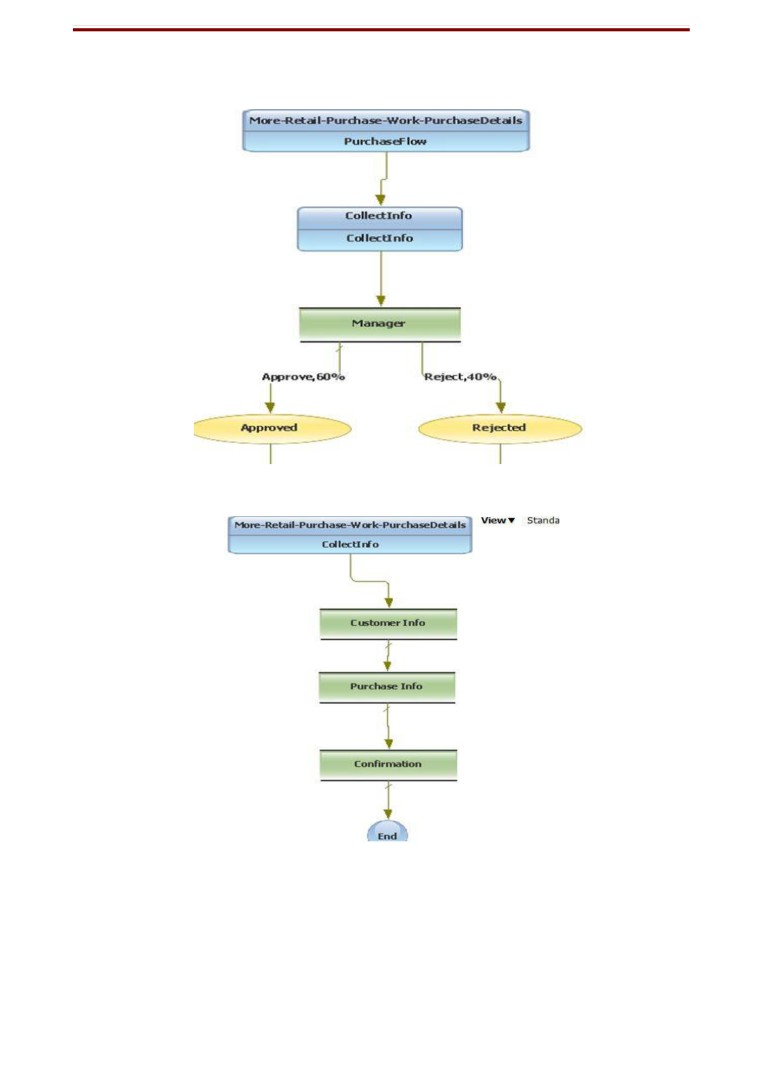
Note here Flow rule = CollectInfo. Now press the edit button next to it.
It will open the new sub-flow dialog. Provide the details in the dialog.
Note: Give Template Name as: ScreenFlowStandardTabbed.
Now edit the sub-flow
We have created the sub-flow as below.
19
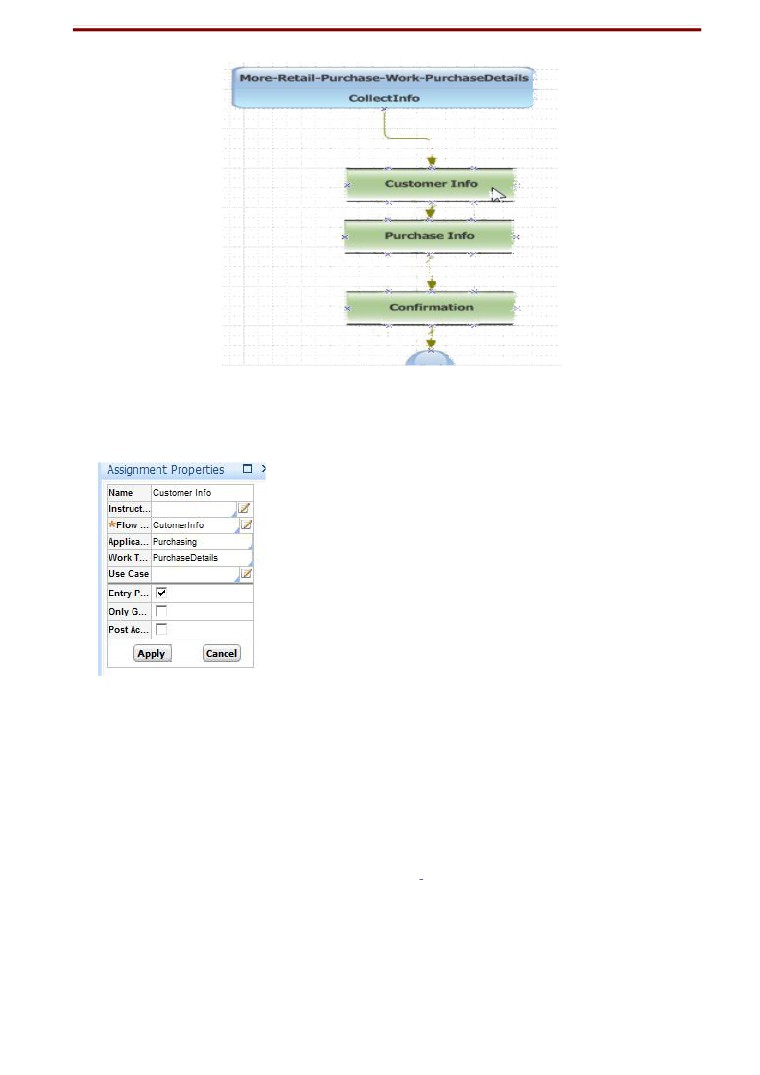
Select each of Assignment diagrams like Customer Info, Purchase Info and Confirmation and edit
the properties.
E.g - The Customer Info. See diagram in next page.
Give the name and Flow Name = Flow action created before.
Do similar to all cases.
Save it.
Now in the main flow the control will go to manager for approval.
We have created a rule here that,
if Grand Total >= 10000 then approval will go to manager else operator.
So we need to create a Decision tree for that.
20
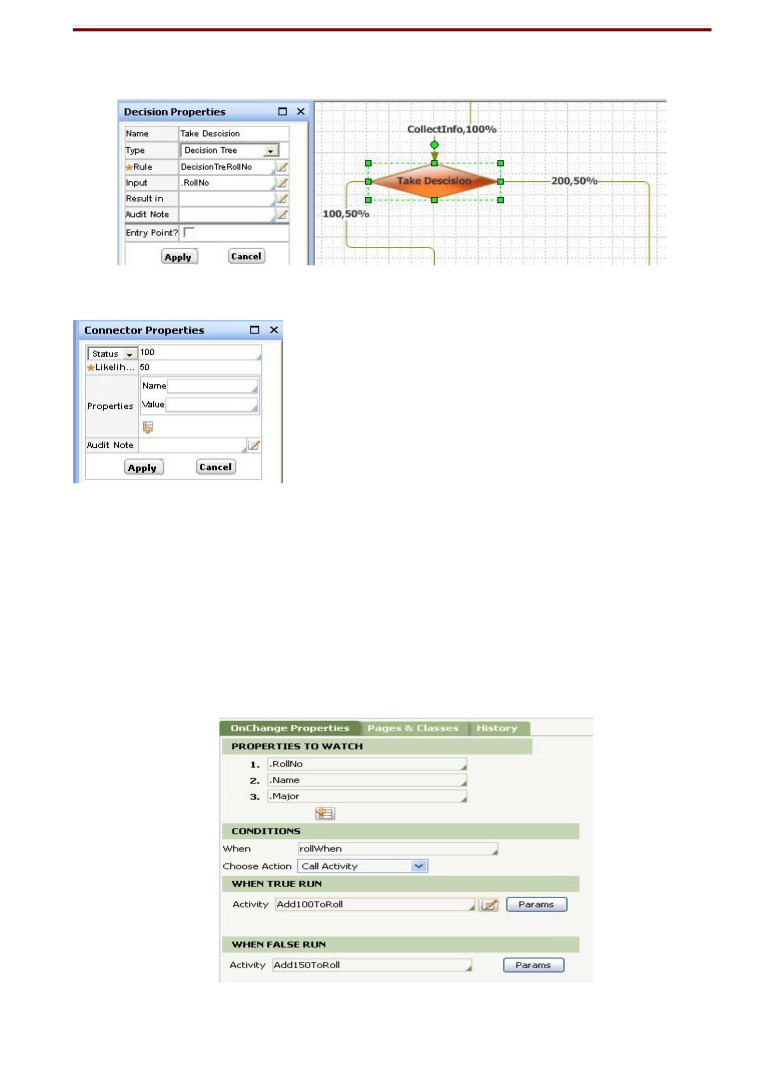
3) Creating Decision tree
Click on class group -> new decision -> decision tree.
Give the expression like below.
4) Creating Routing
Here we are introducing a routing assignment (named as Manager). The routing is based on
DecisionTree that we have created above. So select the routing assignment -> “Manager” and edit the
parameters as in screen-shot.
Router -> ToDecisionTree
Now click on the play symbol and edit other fields.
DecisionTree -> Name of Decision tree (Routing here)
INPUT -> It tells on which property Decision will be taken. Here it’s .GrandTotal
Service -> Blank
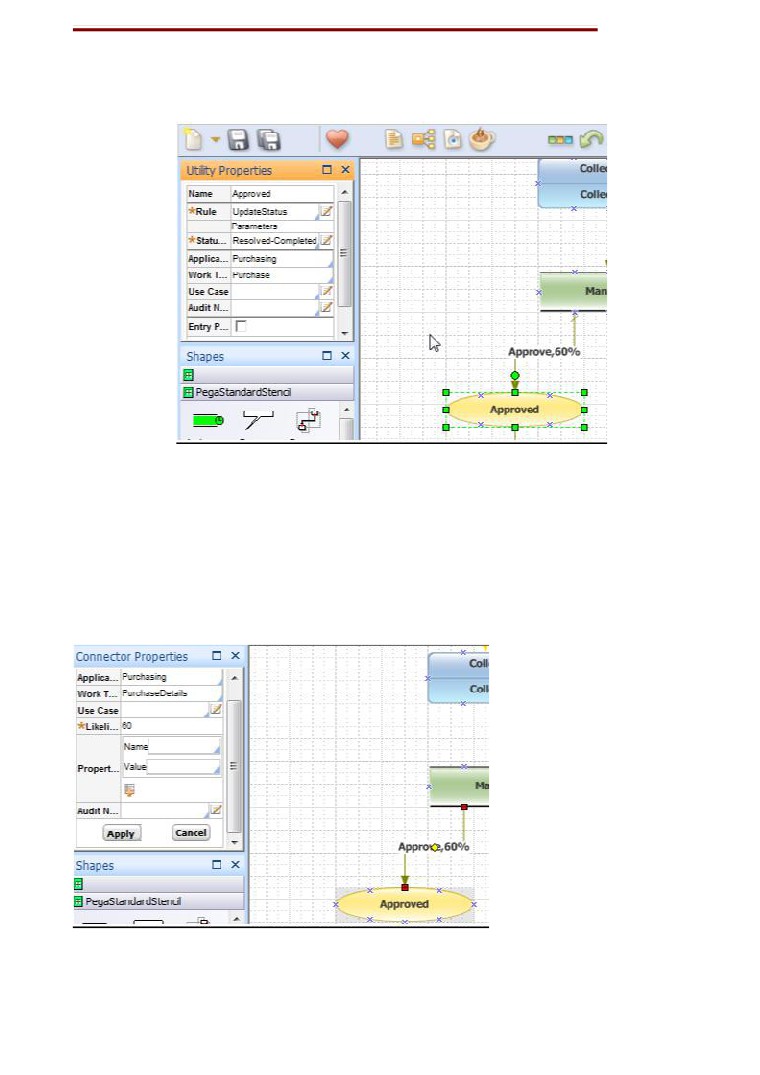
Now we provide two utility in the flow -> Approved and Rejected. Select each utility and edit
the properties.
Rule -> UpdatedStatus
Staus -> Resolved-Completed
21
Application -> Application name
Similarly for Rejected, do the same and in status give -> Resolved-Rejected
Now select the connector from manager assignment to utility and edit the properties.
Application name,
Flow -> Here out-of box flow will be given. Like Approve and reject
respectively. WorkType -> name of workType (Class type)
Likelihood -> anything between 0-100
Apply and save.
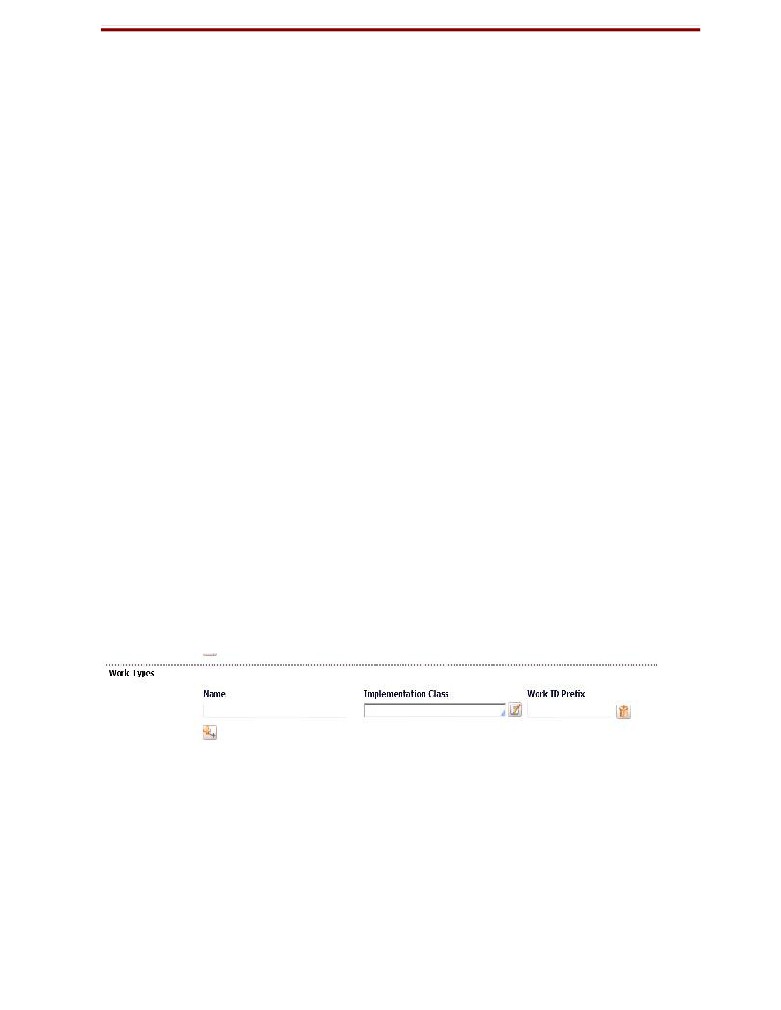
In the Application -> Details tab. Edit
Work Types .
22
Name as Purchase,
Implementation class as worktype
Work ID Prefix as “p-“
9.5) Creating User who can create work object
Create a new access group for user.
Role : PegaRULE:User1 and
Default portal : User.
Similarly create a operator ID for user.
23
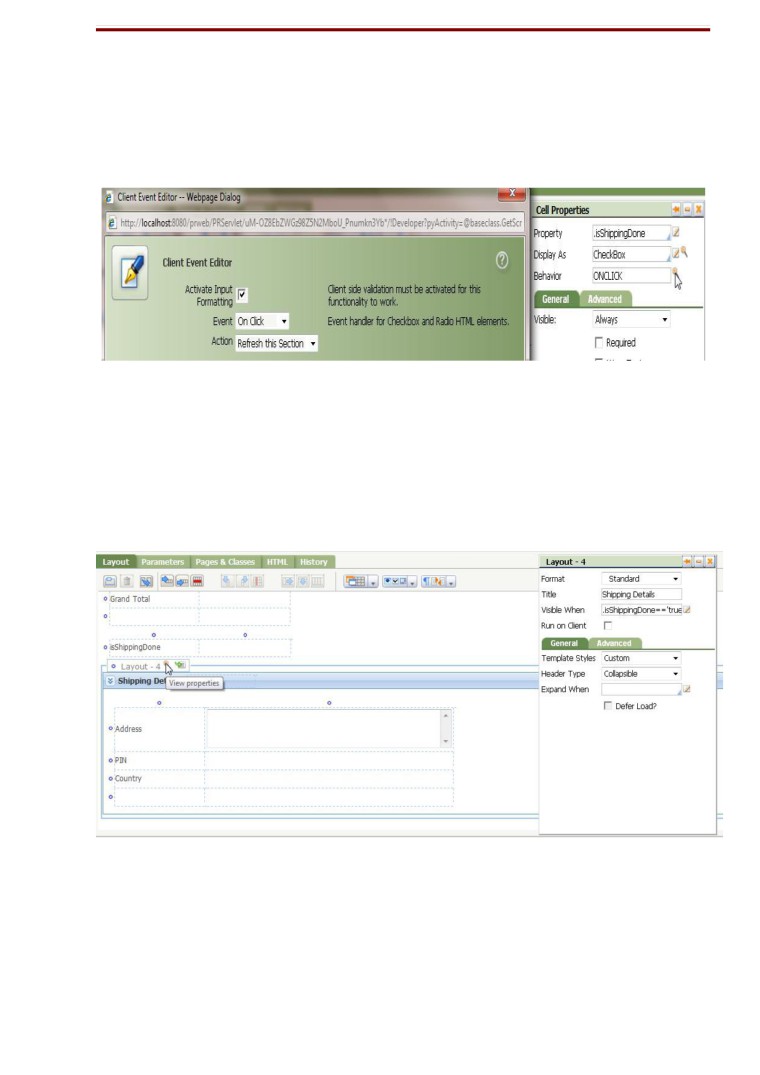
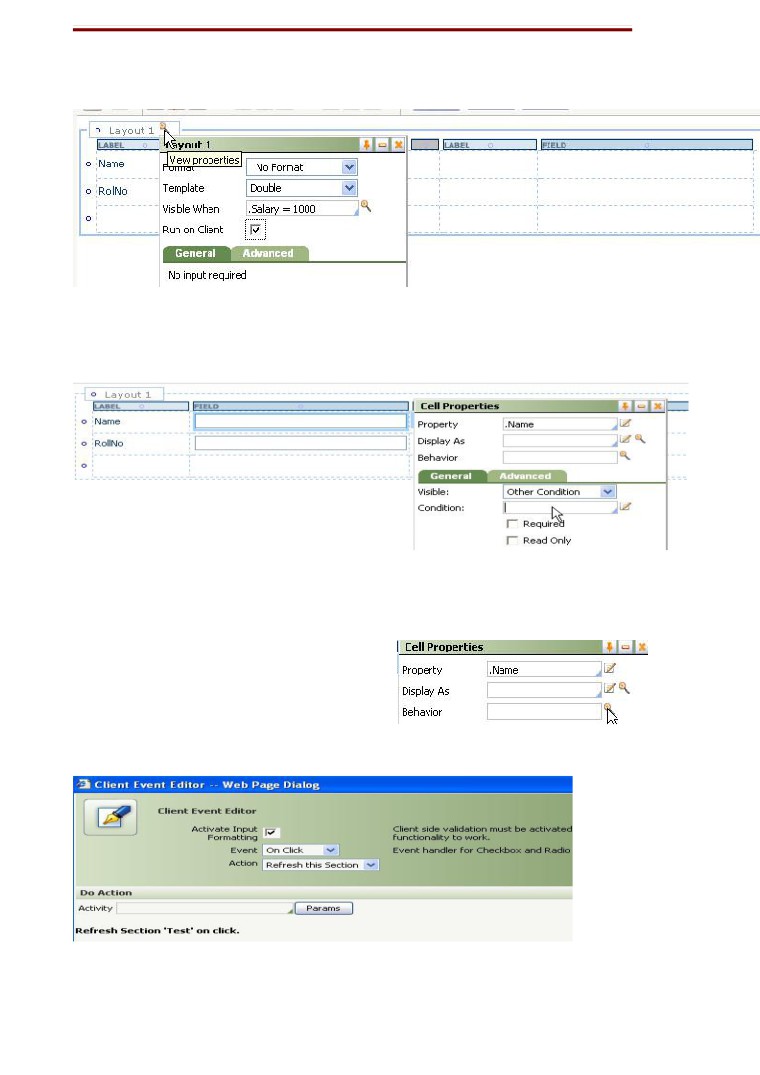
Creating ONCLICK event.
Here we have a check-box -> isShipping Details. If we click on check-box, a new section will
come to collect the address.
While in draft open the properties of check-box “isShippingDetails”. And edit
Display as -> CheckBox
Behaviour -> ONCLICK. Click its properties. A new window will open
23
Then edit.
Active Input -> check
Event -> On Click
Action -> Refresh this section.
The complete Shipping Details section appears on mouse click on is shipping details. Hence
select the whole section/container of Shipping Details .
Edit the properties as
Format = Standard.
Visible when -> .isShippingDone==’true’
24
5888
Main Flow
Sub -flow:
Overriding Default rule -> Approve
In the main flow, in the Approve, 60% connector, we have mentioned an Action flow =
Approve, which is out of box rule in Pega. So this rule provides a basic UI for approval by
manager. We can override it to add few information like
25
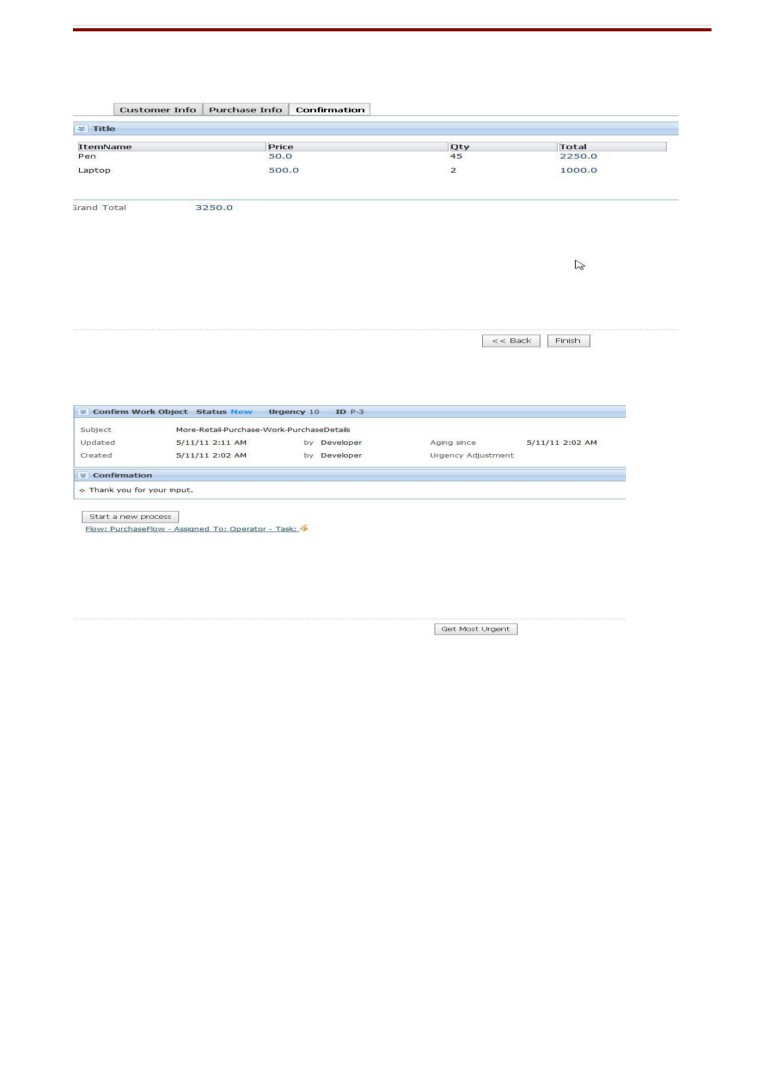
The list of things purchased (here we have a section called confirmation for that).
Hence Click on Work- and select flow action.
Select Approve rule and do a Save as. Give the details like Applies to -> Workpool/worktype name.
And save it. We can drag and drop the section -> confirmation under it.
So in manager portal, while approving the workobject, this additional info will be shown.
0
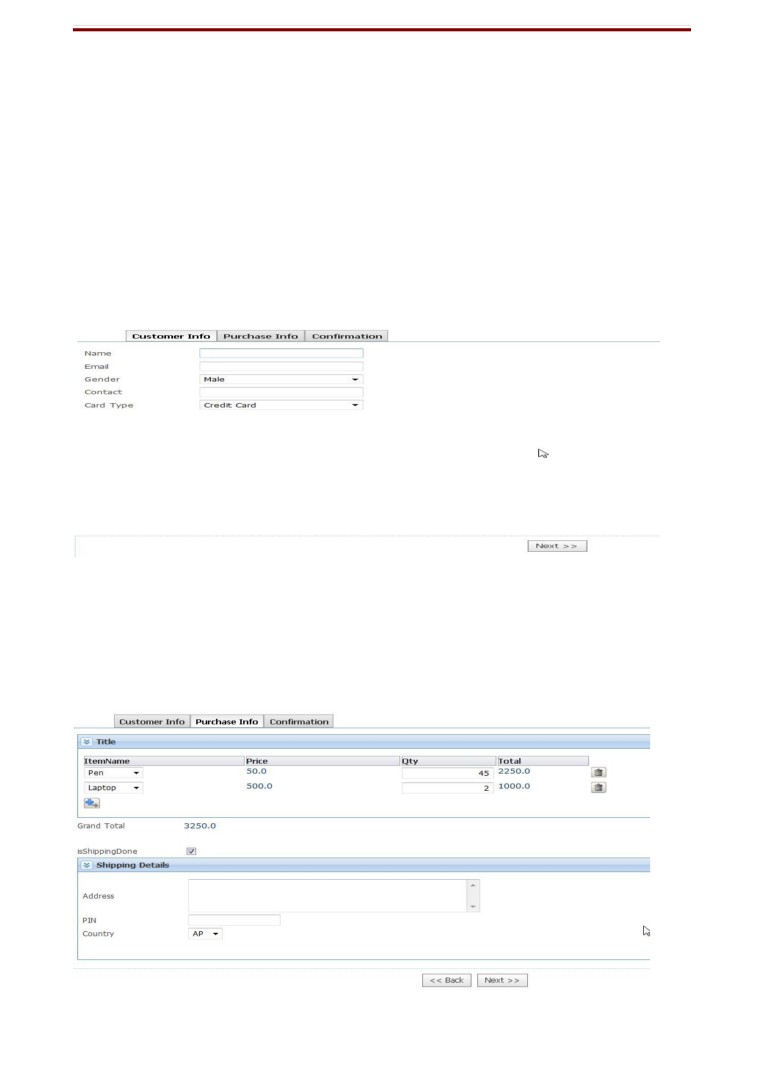
SCREEN-SHOT of Sample Application More.
Screen-1
Screen -2
26
Screen -3
Screen -4
WORK OBJECT:
A work object is the primary unit of work completion in an application, and the primary
collection of data that a flow operates on.
As an application is used, work objects are created, updated, and eventually closed
(resolved). Every work object has a unique ID (property pyID), an urgency value, and a status
(property pyStatusWork).
In some organizations, a work object is known by the older term work item.
RuleSet
RuleSet is the major sub-set of rules in PegaRules Database. It is the instance of Rule-RuleSet-Name. It
has a name and can have multiple versions associated with it. The purpose of RuleSet is mainly for.
0
Rule Resolution
1
Rules Versioning
2
Migration
3
Access Control
27
Operator Id:
It’s a combination of username/password, a access group associated with it and it’s a part of
an organization/div/unit. It mainly used for authentication purpose for a requestor. There is a role and
portal associated with the Operator ID trough the access group. Instance of Rule Data-Admin-
Operator-ID
Access Group:
Instance of Data-Admin-Operator-AccessGroup. This is mainly to control access. It makes a set of
RuleSet Versions available to requestors. The Operators in PRPC are associated with an access
group. It affects the accessibility of users in following way.
0
Contains the work pool.
1
Contains the Application, indirectly the RuleSets available to users.
2
Defines the role of the particular user
3
Defines the portal for the user
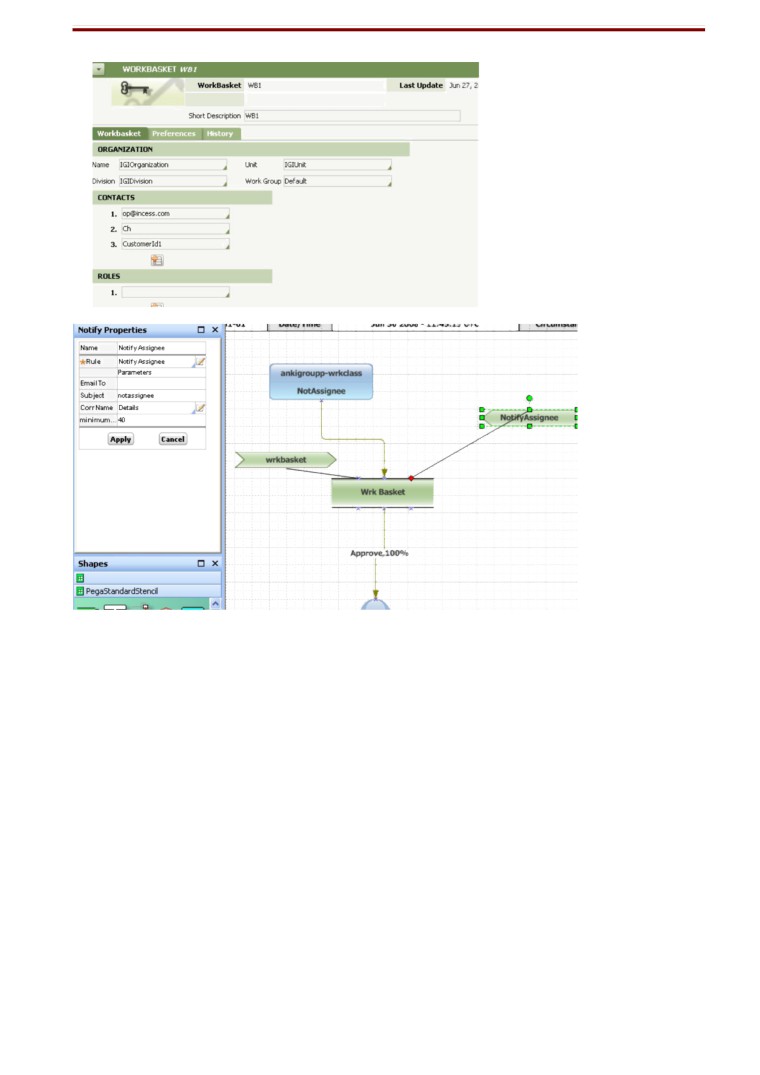
Work group
A work group defines a supervisor (manager), with set of workers and workbasket that report to him.
Class
A class is instance of Rule-Obj-Class. It defines capabilities such as other rules (UI Forms,
properties, decisions, declarations, flows etc).
Abstract Class
They end with a “-“. The don’t have any instances or are not stored in DB. They cannot create a W.O.
The out of box rules present in Work- won’t be available to them.
They don’t belong to workpool. Hence cannot run the flow.
Internal Classes
The concrete classes whose instances are stored in PegaRules Data base are Internal classes.
External classes
The concrete classes whose instances are stored in External Databases are external classes.
Basic Activities in Flow (OutOfBox and Interactive)
1) Assignments Activities
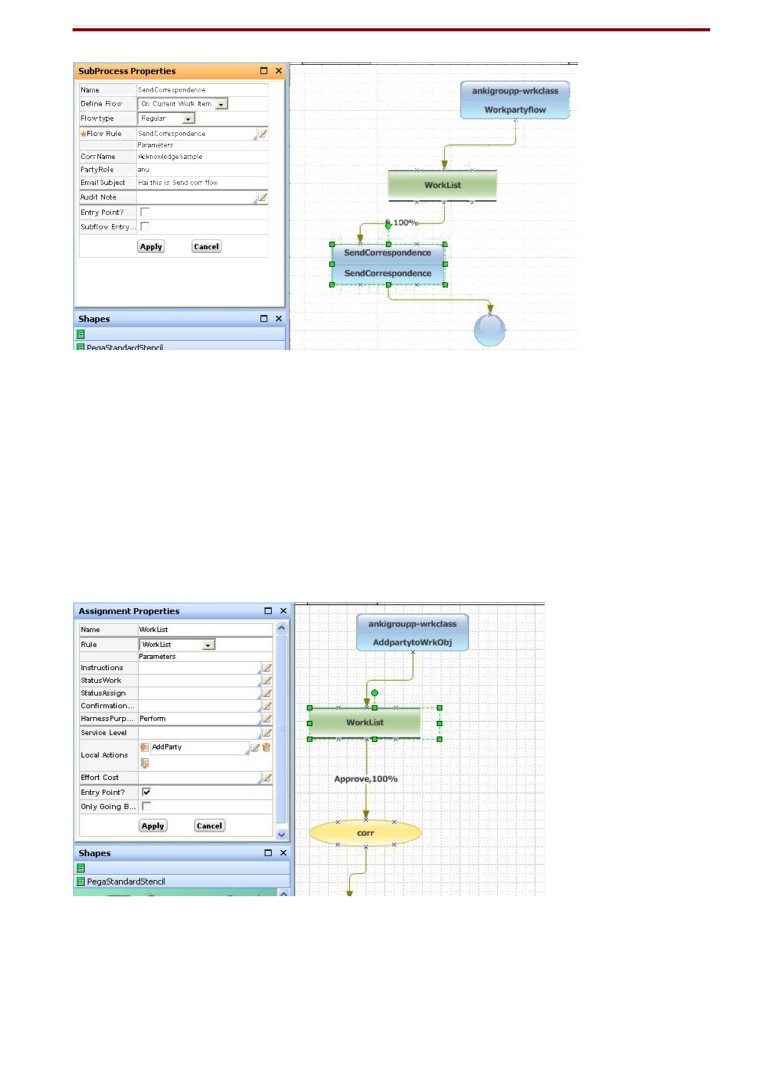
0 Work-.WorkList — Causes the assignment to be placed on the worklist of the current operator
(or of another operator identified by a Router shape). Creates an instance of the Assign-
Worklist class.
28
0 Work-.WorkBasket — Causes the assignment to be placed in a workbasket, determined by an
associated Router shape. Creates an instance of the Assign-Workbasket class.
e-mail to a party identified in the work object who is not an interactive Process Commander
user. Creates an instance of the Assign-External class.
2 Work-.Agent — Sends the assignment to a background process rather than to a person (rarely
used, similar to WorkBasket ).
2) Router Activities
0
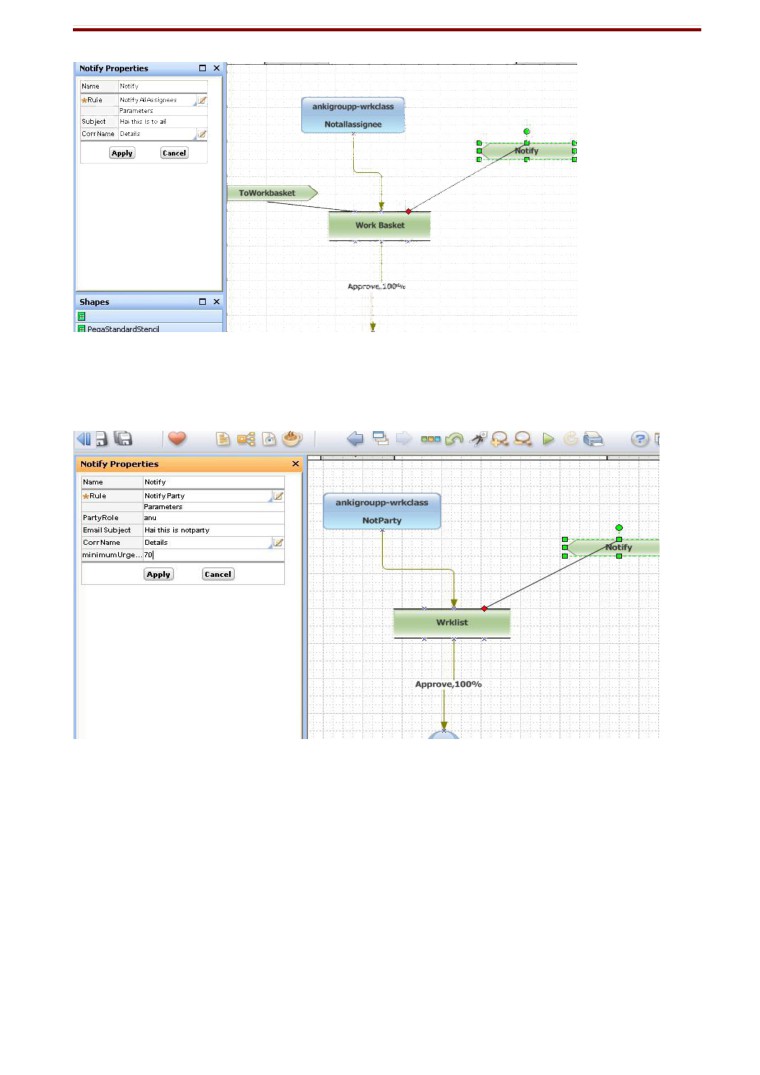
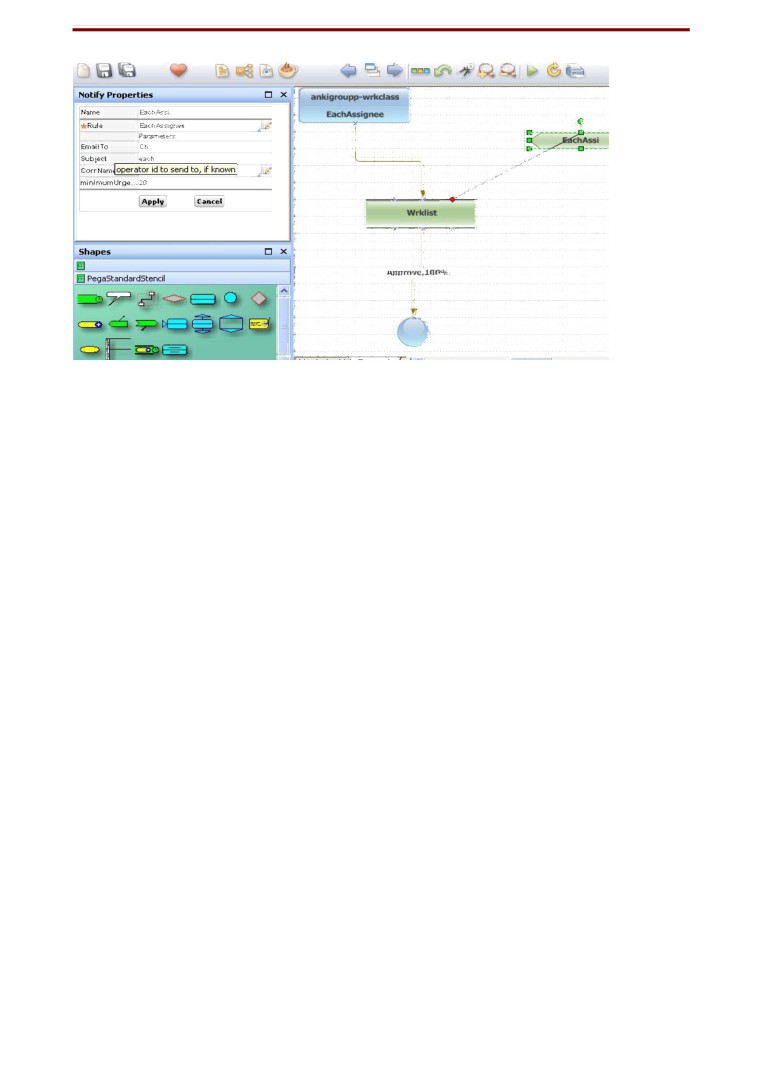
NOTIFY Activities
1
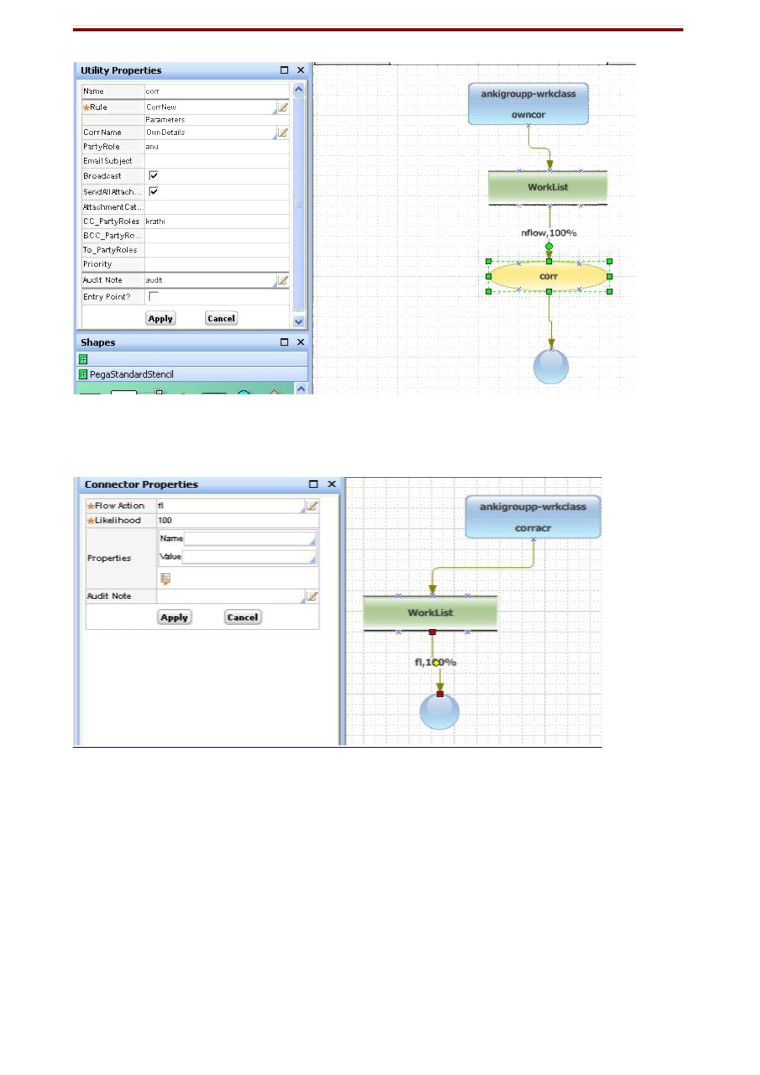
Utility Activity
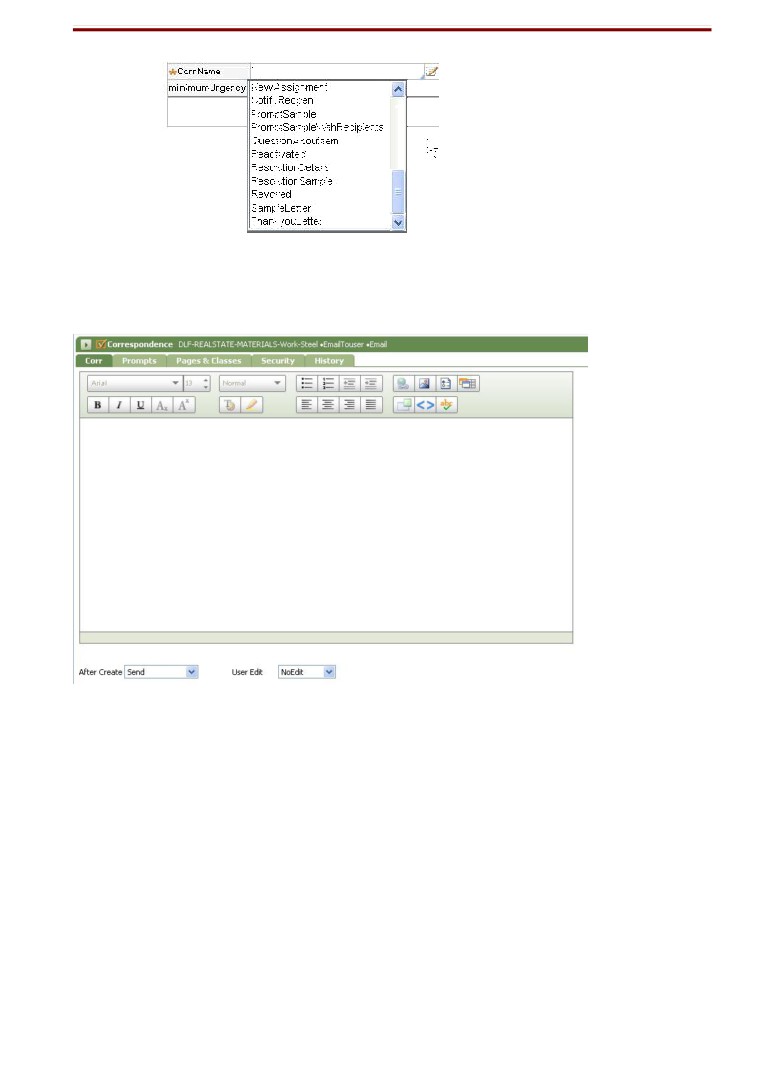
CorrNew or CorrCreate
UpdateStatus (It’ll ask the parameter Status Work).
ConvertAttachmentToPDF.
5) Connector Flow Action
cancelAssignment
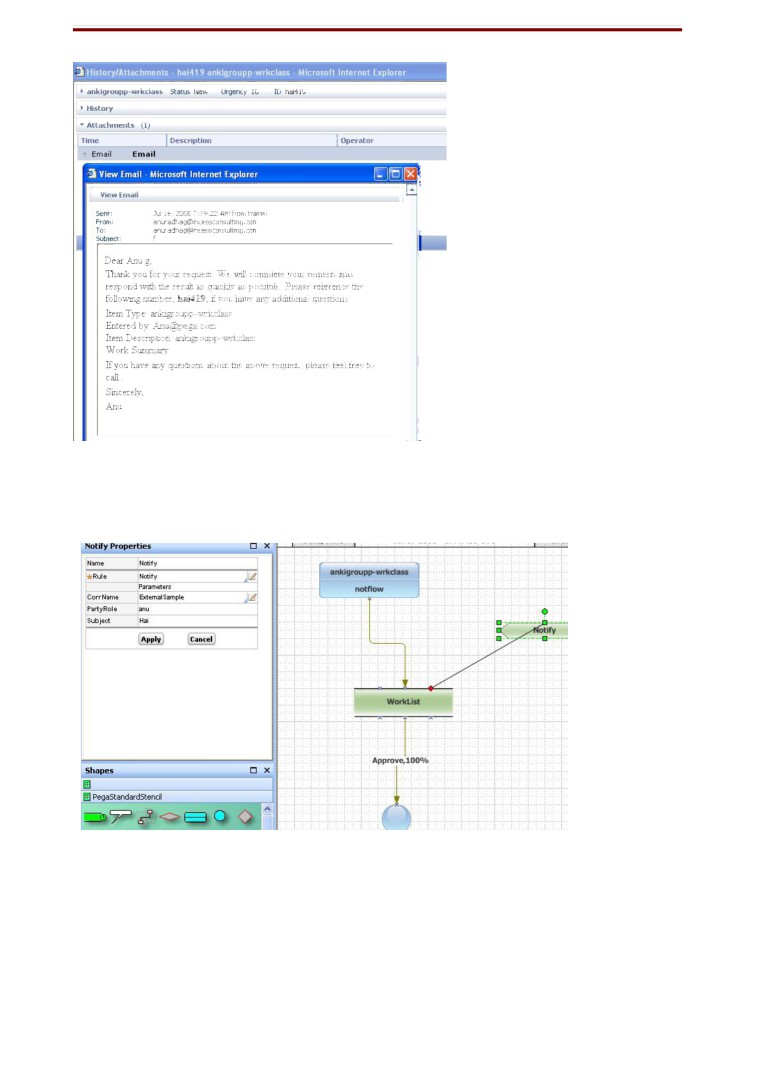
Notify
sendCorrespondence
resolve
reject
ConvertAttachmentToPDF.
29
6) Local Flow Action
addAttachment
addFlow
addCovered
addToCover
addParty
AttachAfile/URL/Note
7) SLA Standard Escalation Activity
AdvanceFlow
Default
NotifyAssignee
NotifyManager
TransferToManager
NotifyAndTransferToManager
TransferToWorkBasket
ScreenFlow have standard Harnessess like Work-.PerformScreenFlow, Work-
.TabbedScreenFlow etc.
23 Operator’s Work Settings Tab.
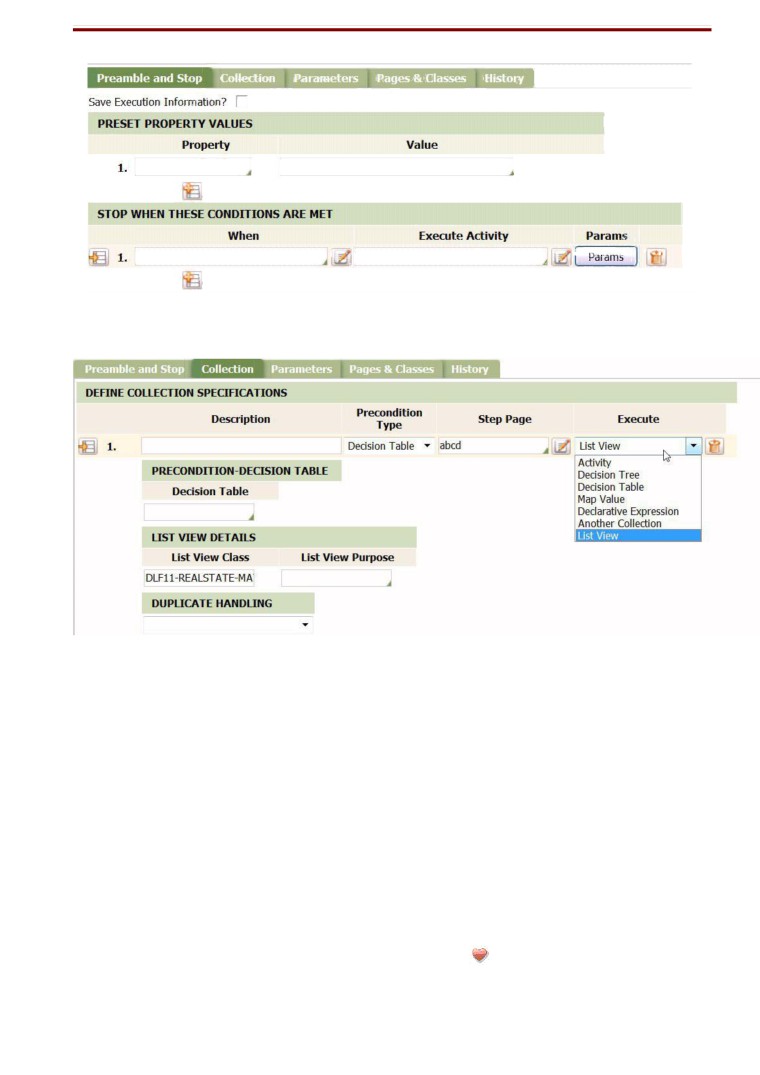
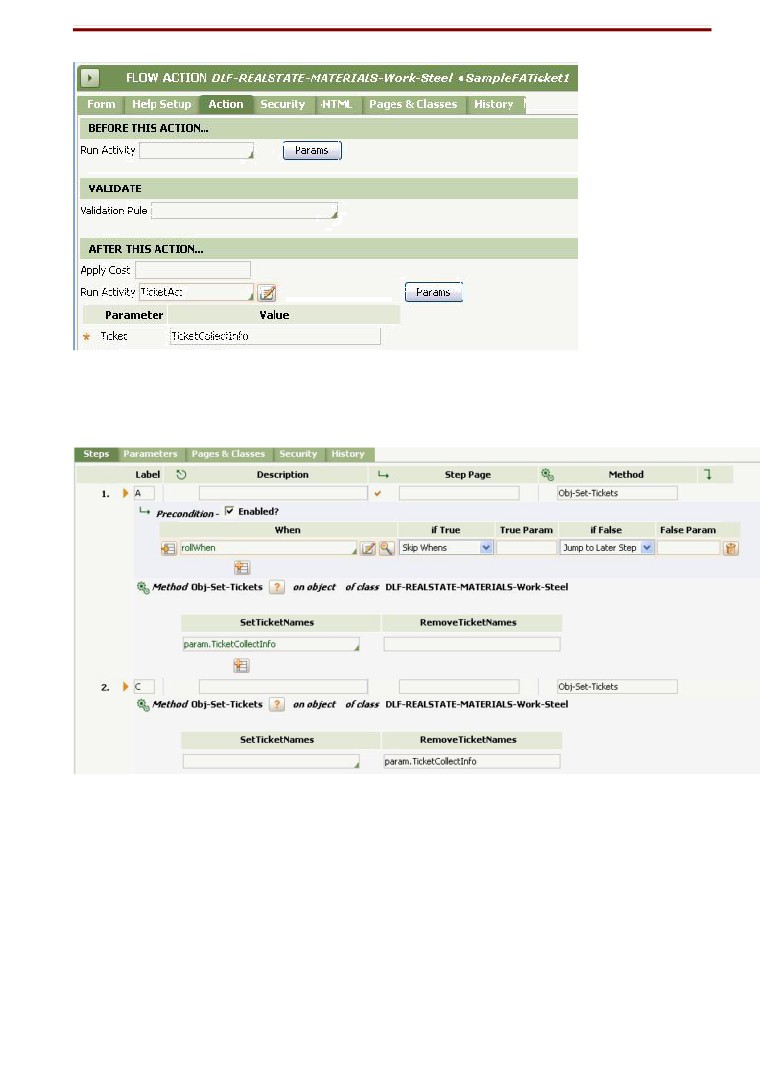
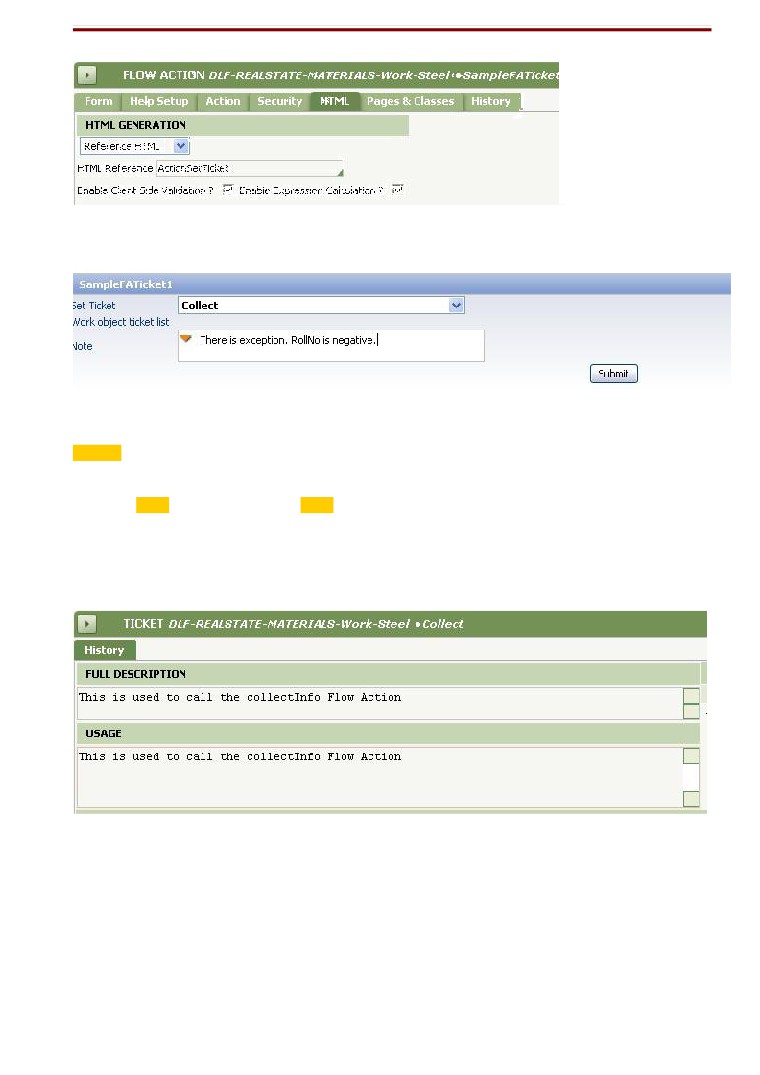
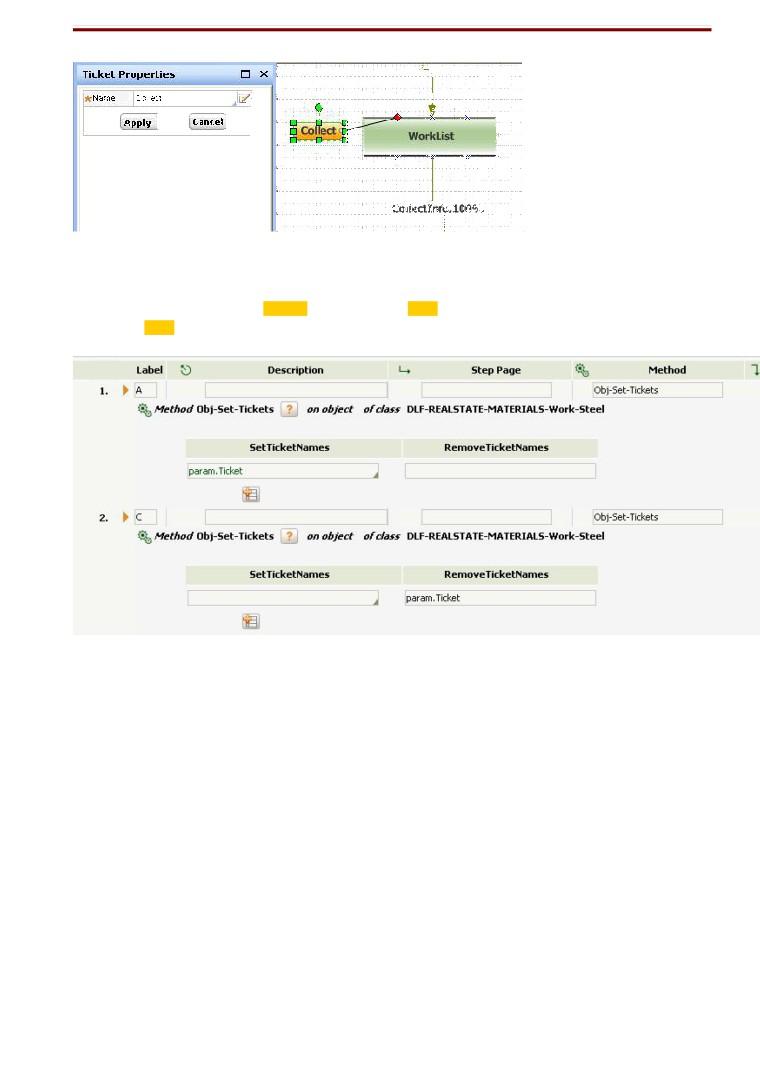
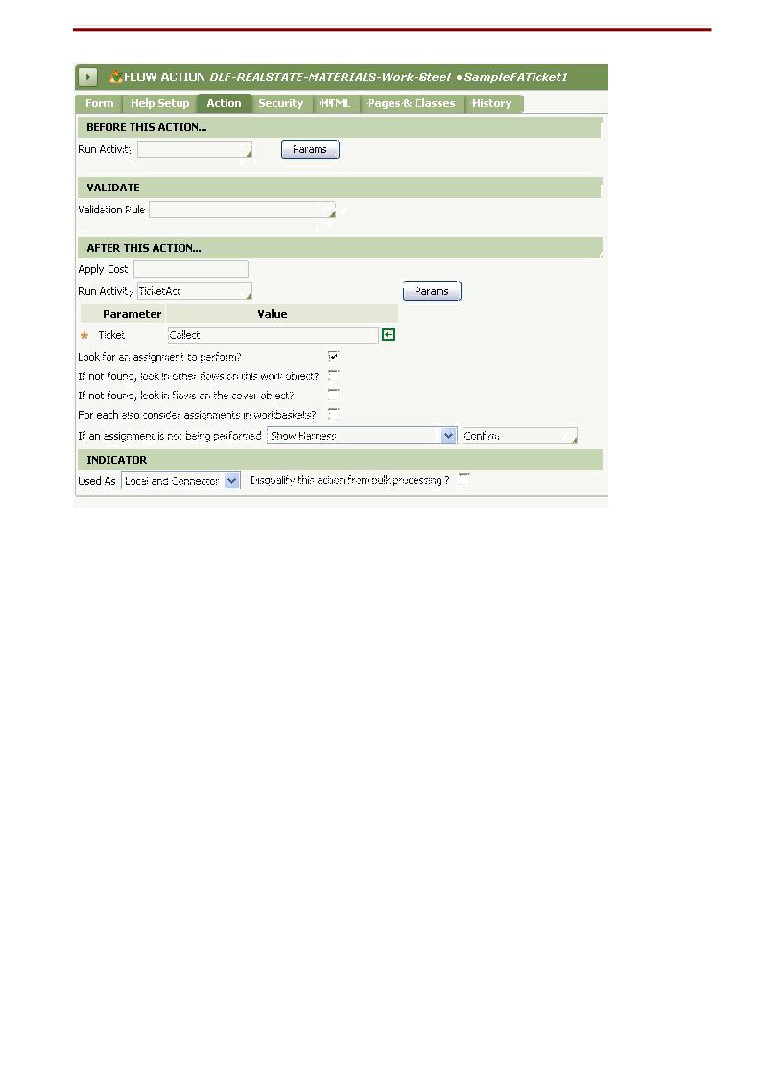
Collections
Create a collection rule to identify other rules in your application that can execute in sequence, under
a set of conditions evaluated for each rule in the sequence. You can include both procedural rules
and Declare Expression rules in the sequence. By referencing a list view rule, you can retrieve at
runtime a dynamic list of qualifying rules to be executed. Typically, all rules in the collection update a
common page.
Where referenced
Collection rules are referenced by the Collect instruction in an activity. In addition, one collection rule
can reference another collection rule.
30
Collection Tab
PreCondition Type: Decision Tree/Table, Map, When, None.
This Collection rule is called in Activity method: Collect <Collection name>
Rule Delegation
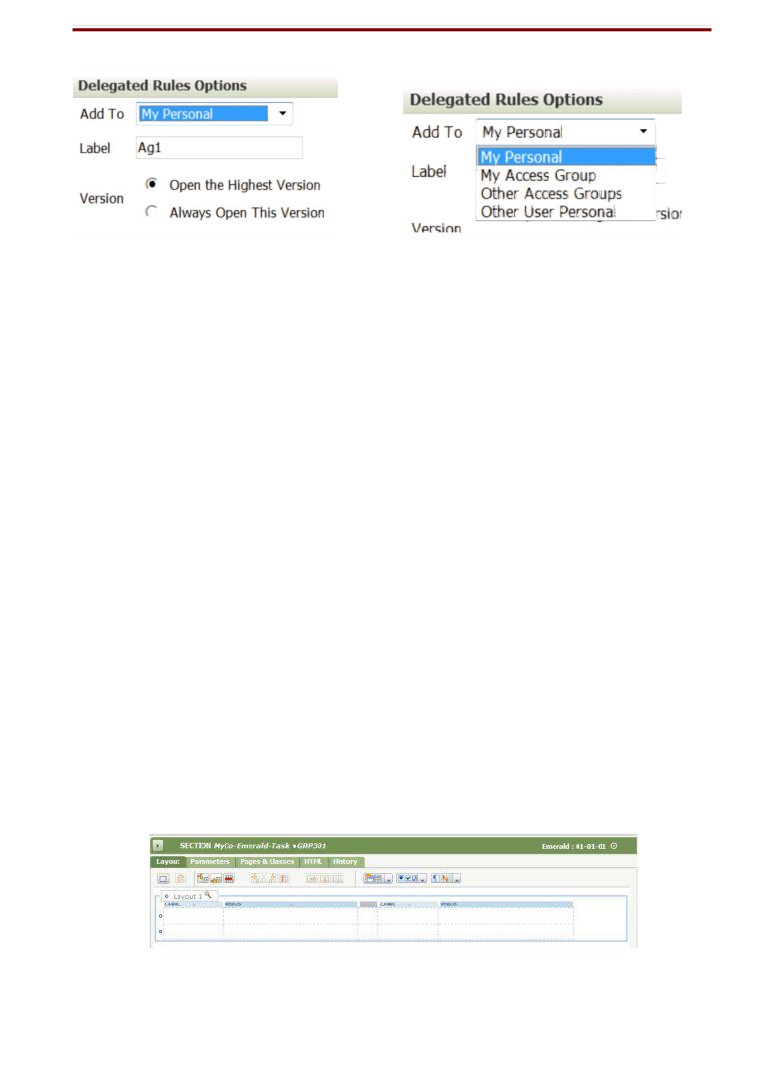
A delegated rule is one that appears for a specific group of users so that they may manage
these rules outside the development environment. Delegated rules appear on the My Rules gadget for
a single user or for all the users who are associated with a specific access group.
We normally delegate the few rules to Business Managers, so that they can modify the rules as
changing business needs, without going to developer portal. We normally put those rule for delegation
which change frequently, have less impact on business etc.
Delegating a rule
To mark a rule as delegated, click the Favorites toolbar button (
) and complete the Delegated
Rules dialog box.
31
Opening a delegated rule:
To open a rule delegated to you:
5888
From the WorkManager portal, open the Dashboard workspace, locate the My
Business Rules area, and click the link that labels the delegated rule.
5889
From the Developer portal, select View > My Rules > label.
5889
What design considerations should be done while using Commit method in an activity.
Ans -
We should use the Commit method judiciously. Flow processing performs commits automatically
when the flow ends and when an assignment is created or completed. To avoid interference
with this approach, do not use Commit in the flow-related activities in your application.
When you include the Commit method in an activity, design the processing so that the Commit
method occurs only after errors are intercepted, checked, and corrected. If a Commit method
fails, it is unlikely that processing can continue in any reasonable way, so it is important to
include a transition in the Commit step that checks the status.
Even when processing can continue after Commit failure, design your activity (after debugging and
fixing the cause of the failure) to collect any required user input that corrects the problems, and
re-perform any Obj-Save methods that preceded the Commit call.
Smart Layout
Introduced in V5.5, a Smart Layout is a grid (corresponding to an HTML <TABLE> element) of
paired cells on a harness, section, or flow action form that has columns of uniform width, uniform
styles, and uniform characteristics. Each pair of cells holds one label and one property value or other
form control.
32
Using Smart Layouts rather than "freeform" table layouts produces attractive work object forms with
less developer effort. Smart Layouts are recommended for new applications. .
A primary benefit of Smart Layouts it to force vertical alignment even when layouts are nested. When
a section using Smart Layouts is nested within another section, all labels and fields are given
consistent widths. Process Commander adjusts padding and cell widths to seek attractive spacing and
presentation.
Select Template with row and column count, from layout. Don’t select free form.
Basic UI
Flow Actions
A flow action is a choice available to users as an interim or final disposition of an assignment they
process. Each flow action is defined by an instance of the Rule-Obj-FlowAction rule type.
Flow actions are of two types:
Connector flow actions appear as lines on Visio presentation in the Diagram tab of a flow rule. A
line exits from an assignment shape and ends at the next task in the flow. At runtime, users
choose a connector flow action, complete the assignment, and advances the work object
along the connector to the next task.
A local flow action, when selected at runtime, causes the assignment to remain open and on the
current user's worklist. Local flow actions are recorded in the Assignment Properties panel
and are not visible on the Visio flow diagram. At runtime, users can select local flow actions to
update assignment or work object properties, change the assignee, and so on but do not
complete the assignment.
We can provide our own local flow action, but there are few pre-defined flow actions.
AddFlow, AttachAFile, AttachANote, AttachAScreenShot, AttachAURL etc.
In the Action tab of a Flow Action, we provide INDICATOR : Used as -> Local Flow Action,
Connector Flow Action, Local and Connector.
While running the flow, both Local and Connector flow actions are visible under “Take
Action” panel.
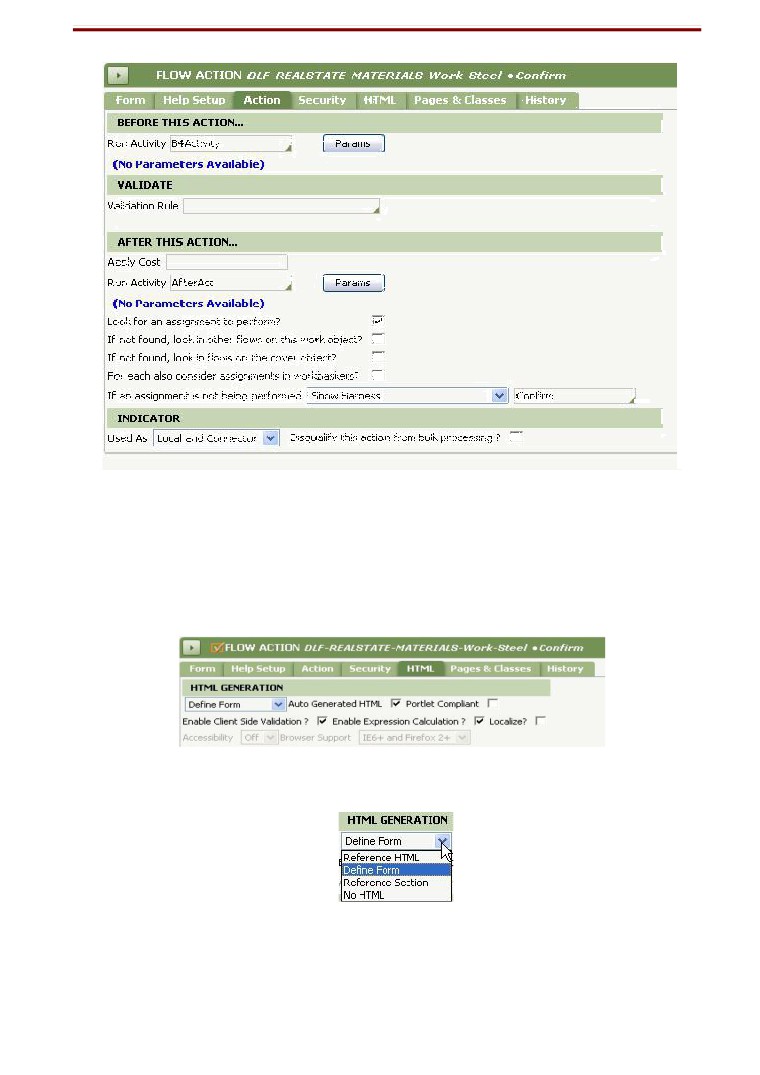
Action Tab in Flow Action
The Action tab under Flow Action contains few important things like.
33
1.) Run an Activity before this Flow Action is called.
2.) Run an Activity after this Flow Action is called.
3.) Validate rule.
4.) INDICATOR that this is : Local Flow Action/Connector Flow Action/Both Local and Connector.
HTML Tab
HTML GENERATION :->
It can refer a HTML Fragment (Rule-Obj-HTML), a section or can define its own form.
34
Enable Client Side Validation. -> Select to cause your application to immediately validate the format of
user input to dates, integers, and other fields within the browser window when focus leaves the form
field, before a user submits the form. For example, you can't enter a letter into a numeric field. You can't
enter 02/31/2007 into a date field. Error notification occurs immediately when you tab out of the input
field or change focus to another field.
Enable Expression Calcualtion. -> Causes to evaluate the expressions by forward chaining.
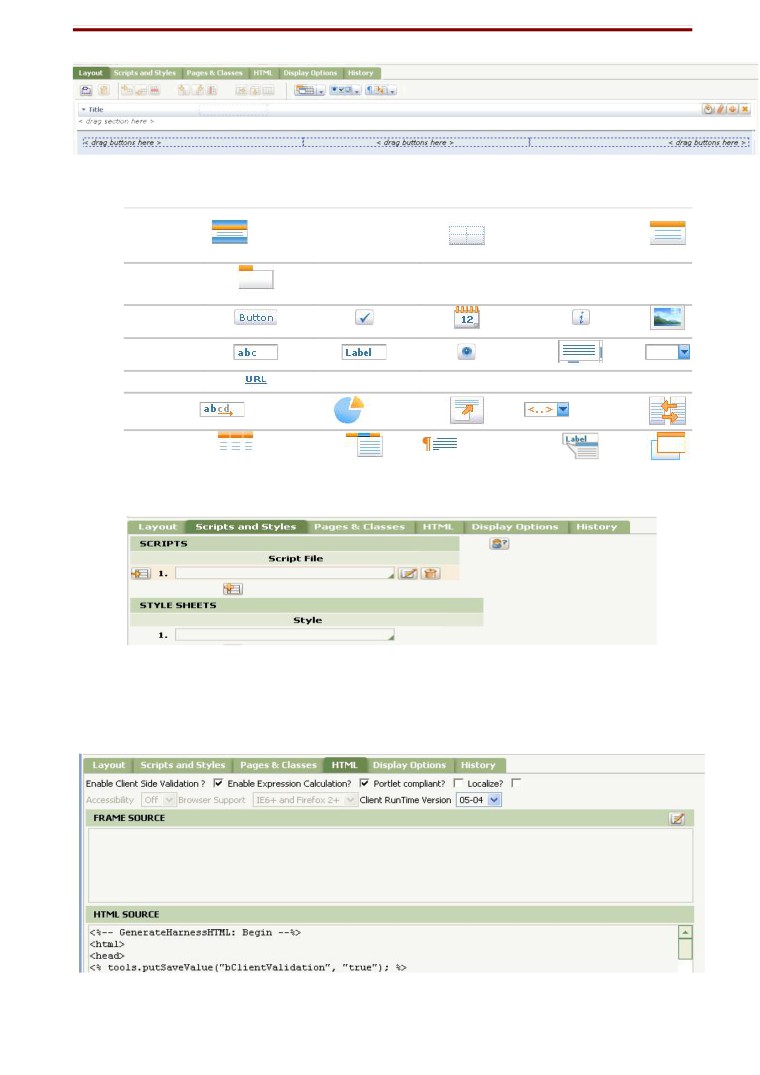
SECTIONS
A section rule defines the appearance and contents of one horizontal portion of a form.
A section is a portion or area of a standard work object form that is incorporated on a harness
form. Sections may contain other sections, informally called subsections.
The appearance, behavior, and contents of a section are defined by a section rule (Rule-HTML-
Section rule type). Section rules are referenced in:
Harness rules
Other section rules
Flow action rules
Paragraph rules with SmartInfo pop-ups
Process Commander contains dozens of standard harness and section rules. You can copy and
tailor these standard forms to meet your application needs.
Controls
Layout
Accordian
Repeat
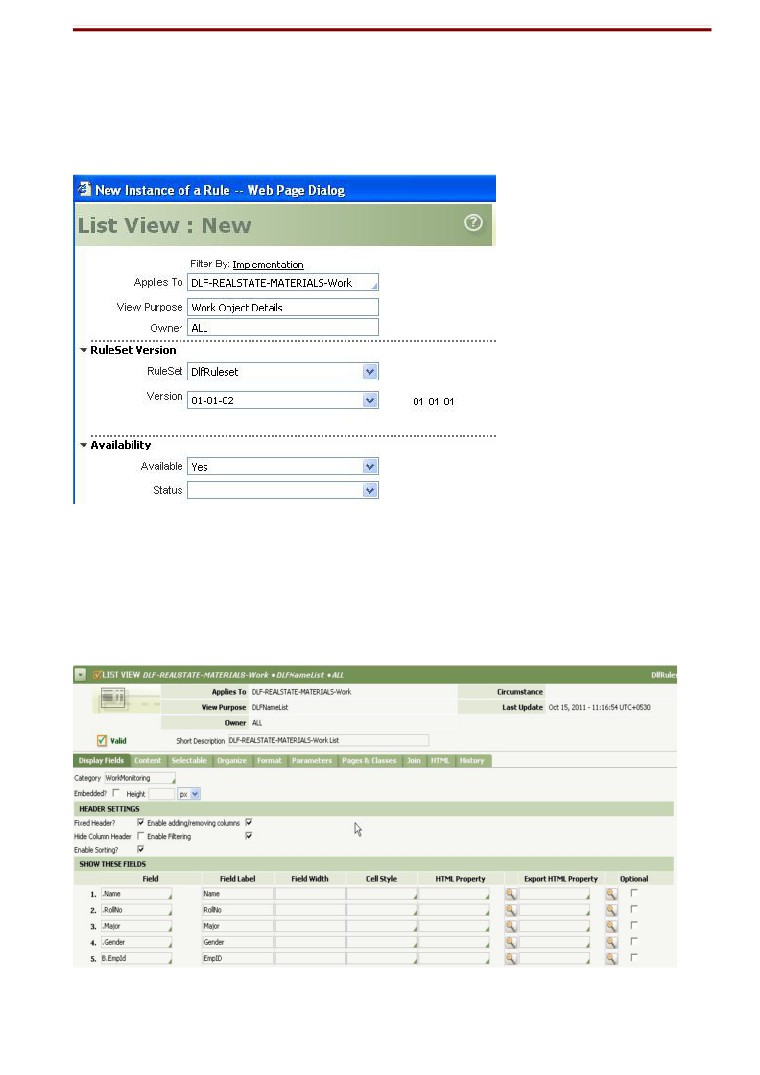
SECTIONS.
Basic
Advanced
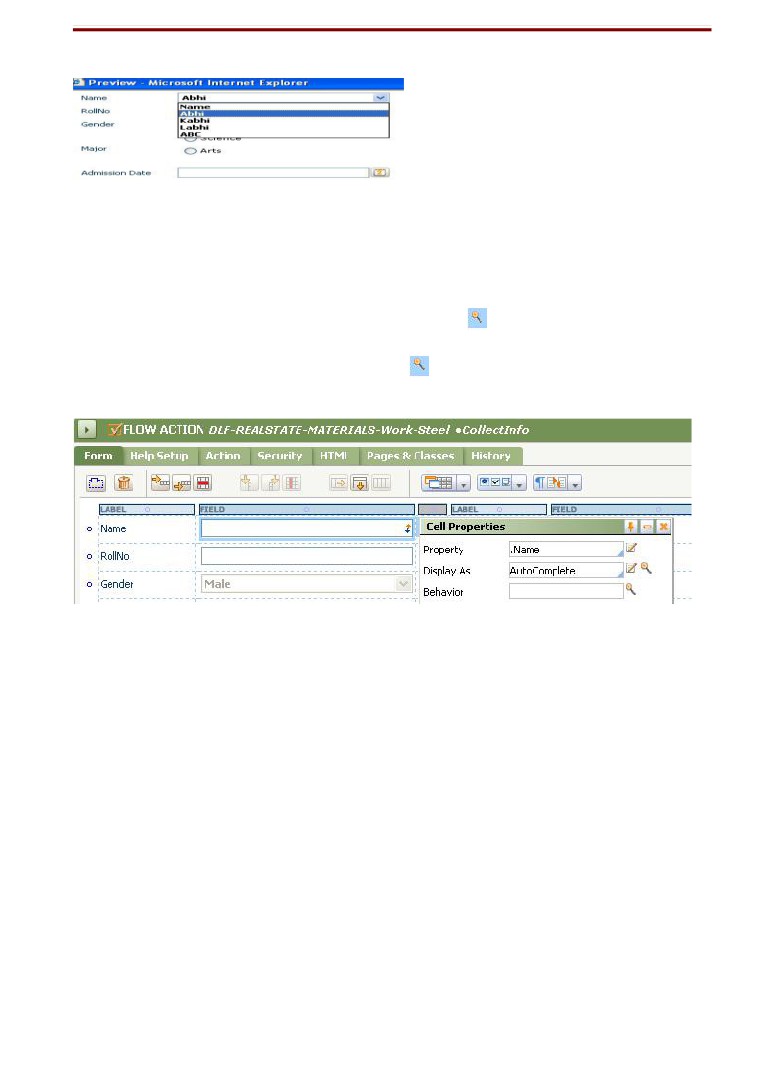
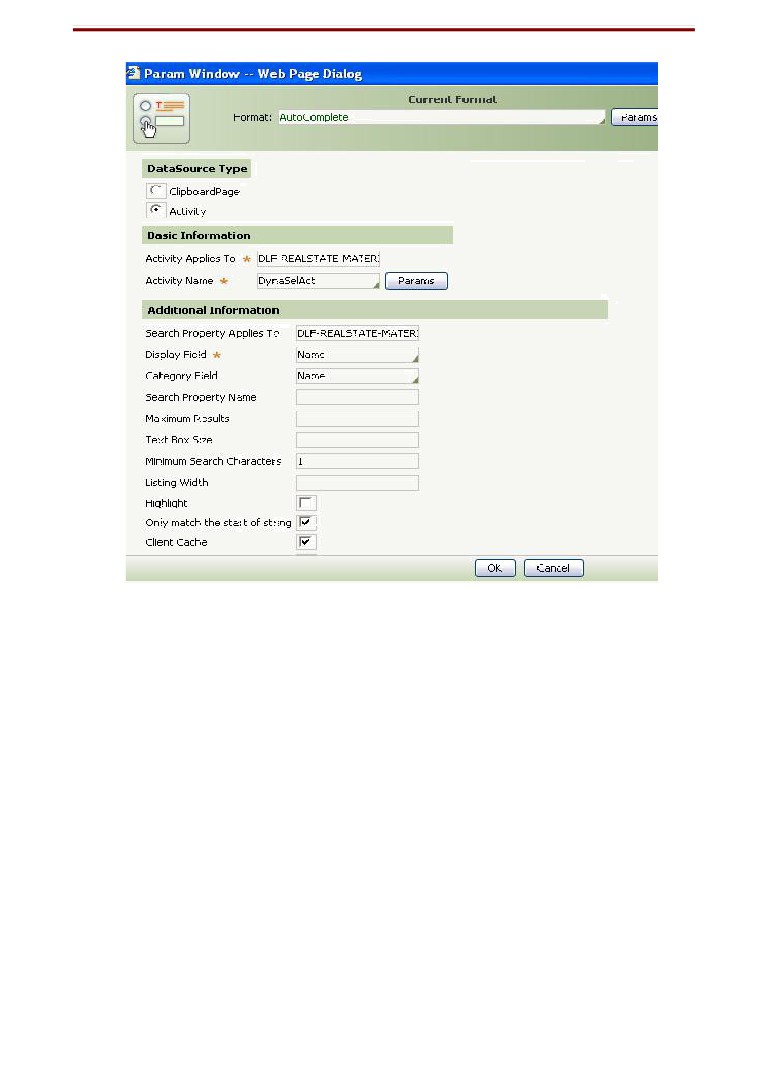
Dynamic Selct
AutoComplete
Charts
Paragraph
List View
HTML Tab.
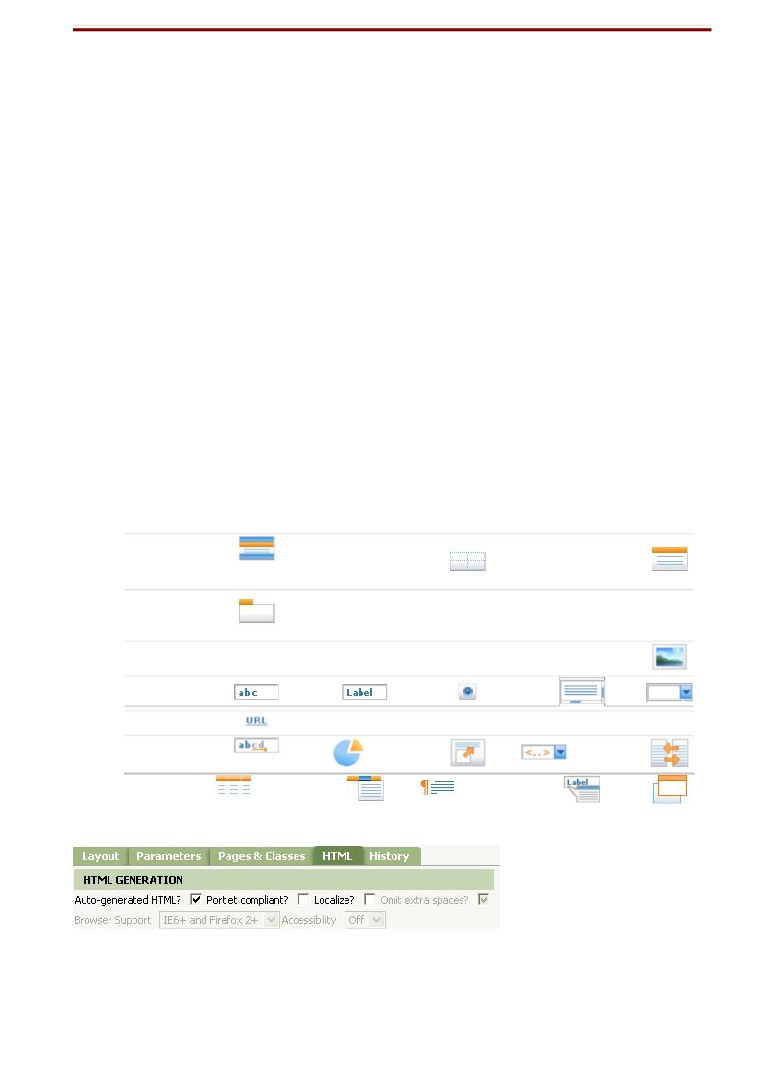
Auto Generate HTML Only. We uncheck this box and can provide our own HTML/JSP in the
below space.
35
HARNESS
A harness rule — an instance of the Rule-HTML-Harness rule type — defines a runtime form.
Use harness rules to define the appearance and processing of work object forms used in your
application to create work objects and process assignments.
Like section rules, HTML rules, property rules, and others, harness rules define the structure,
appearance, and behavior of the forms used in applications to create and update work objects and
assignments.
Process Commander includes more than a dozen standard harness forms for entering,
reviewing, updating, and processing work objects and assignments. Your application can override the
standard rules to extend and tailor them to specific needs.
Each harness rule defines the appearance and behavior of a form. Harness rules produce three types
of forms:
Work object forms — For reviewing, entering, and updating work objects in a Process Commander
application
Composite portals — User portals that support application users with Firefox browsers as well as
Rule forms — Forms that appear in the Developer portal that developers and administrators use to
review, enter, or update rules or selected data objects. (This capability is reserved.)
There are various types of Harnesses. New, Perform, Confirm, Review.
When we start a flow, the new Harness is created. In the Process Tab of the flow, we can check:
Create New Work Object - then only the process button appears on the screen.
Skip creates new Harness - This will skip the new harness screen while we run the flow.
61456
Perform Harness: This harness will appear when any flow action is called within an
assignment. Any flow action will have the GUI, is painted on Perform Harness.
61457
Review Harness: Display the W.O in display only mode, with no fields changeable. To
review the assignments and w.o without any update.
61458
Confirm Harness: Accepts a text note confirming the user’s response. This harness is
called
at the end when the processing of the Work Object is finished. Presents a read-only
confirmation display of the work object, acknowledging user completion of an assignment.
Contains the Get Most Urgent button.
This button is by default linked to the standard activity Work-.GetNextWork. Your
application can override that activity.
Reopen:
Allows a user to reopen a resolved work object.
PrintReview:
Supports printing of all the fields.
36
Controls.
Layout
Accordian
SECTIONS.
Basic
Advanced
AutoComplete
Dynamic Selct
Charts
Paragraph
List View
Scripts and Styles Tab.
Script File: It accepts a Javascript/VBscript file name.
Style Sheets: The CSS Style sheets.
HTML Tabs
37
Making Section Visible/Invisible.
Click on the magnifier of the Section. Make it Visible When (can refer a when condition).
Making Property Visible/Invisible.
Provide the Visibility condition as above.
Note: The Section and Property will be visibility/Invisibility will be triggered by some event.
E.g:- Click on Behavior Magnifier.
So OnClick of this HTML Property, The Section will refresh.
You can even call an Activity.
38
Containers:
A container is a structural element of a work object form, defined through a harness rule. Not
every work object forms include a container. The container may correspond to a visually distinct
rectangle on the form, marked by a colorful border.
We can drag a section here. Only Harness rules contain Containers.
Panel Sets
A panel set is a configuration of sections in a harness rule that support a composite portal. On the
Layout tab of the Harness rule form, use the Panel set control (
) to select among the available
panel sets.
Each panel set has one or more panels, each identified by position as Top, Left, Right, Bottom,
or Center.
This panel set is only available in Harness and we can put sections in it.
0
Accordions and Tab are present in Harness and Sections only.
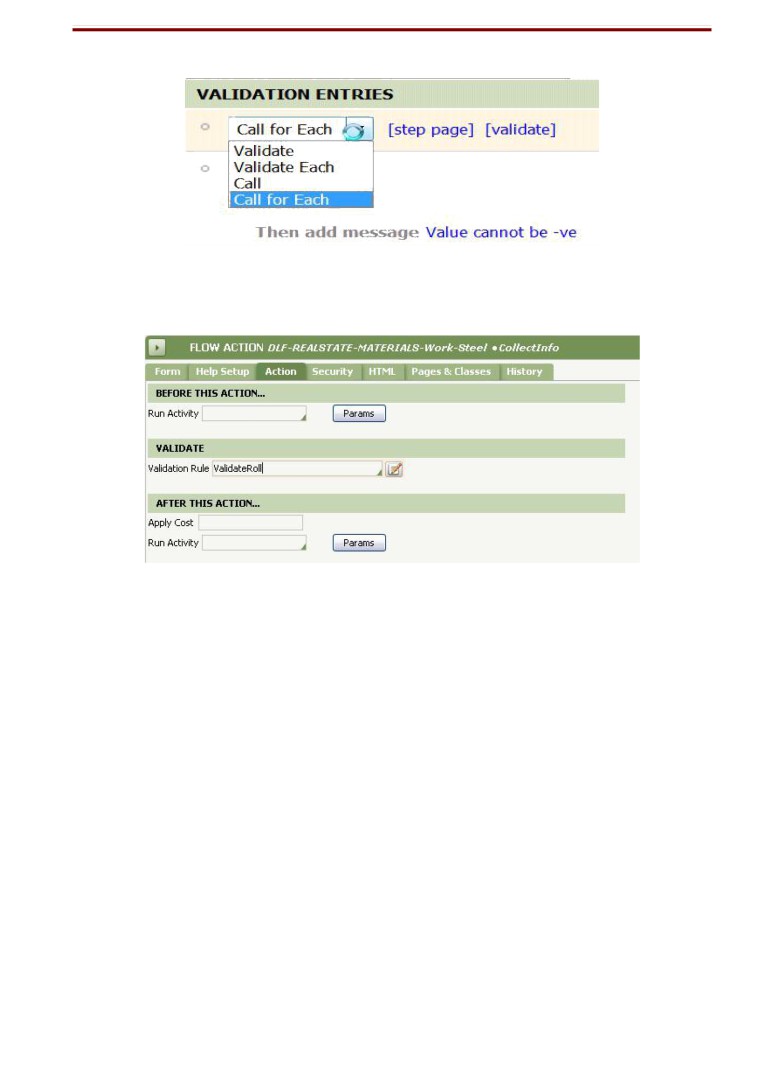
Validation in Pega.
1) Using Validate Rules (Rule-Obj-Validate)
Create a validate rule. Go under process Validate.
39
Validate Each -> Give Aggregated property name.
Call and Call for Each -> Give a clip-board page.
This validate rule can be used under Flow Action -> Action tab.
This rule is used in Flow Action for validating the properties and parameters. It’s also used under
Activity under methods
Obj-Validate. Obj-Validate validates only selected properties on the page, but Page-Validate validate
all the properties in a page.
There is another method called Property-Validate, it validates the selected properties, using the edit
validate rule (mentioned in the property it-self) (custom java).
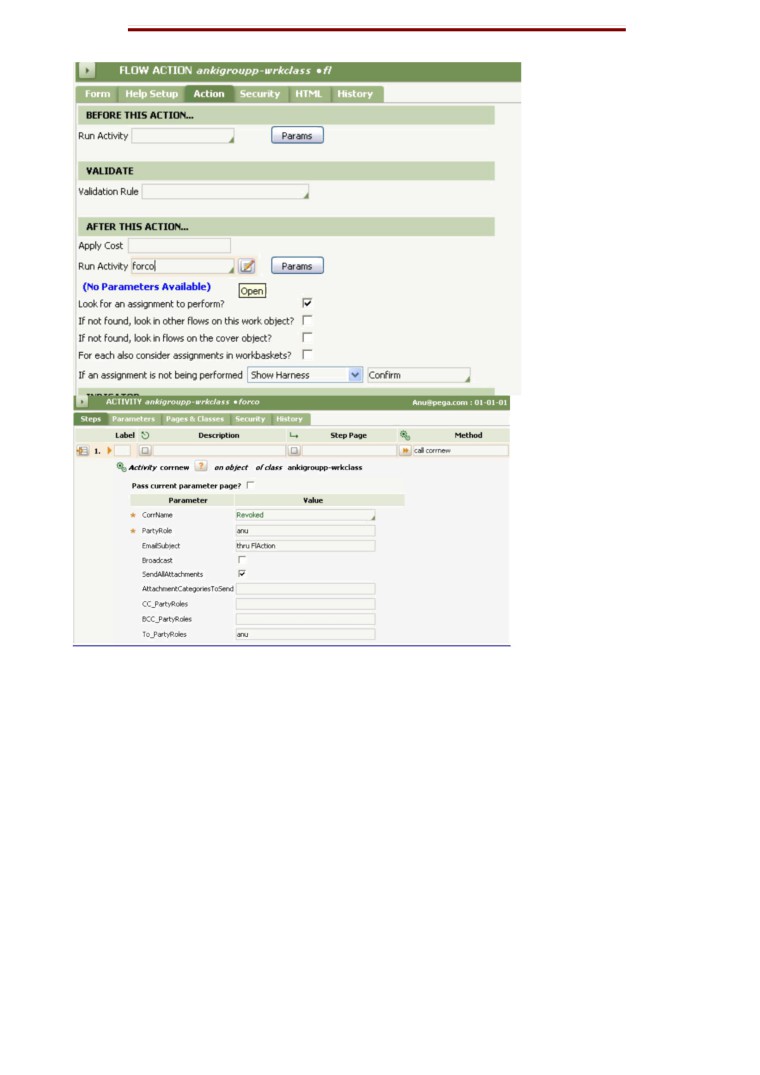
Note: Flow Action, Action tab has 4 major things.
0 Run Activity before Action
1 Run Activity after Action
2 Validation Rule
3 Indicator (for local flow action/connector flow action).
40
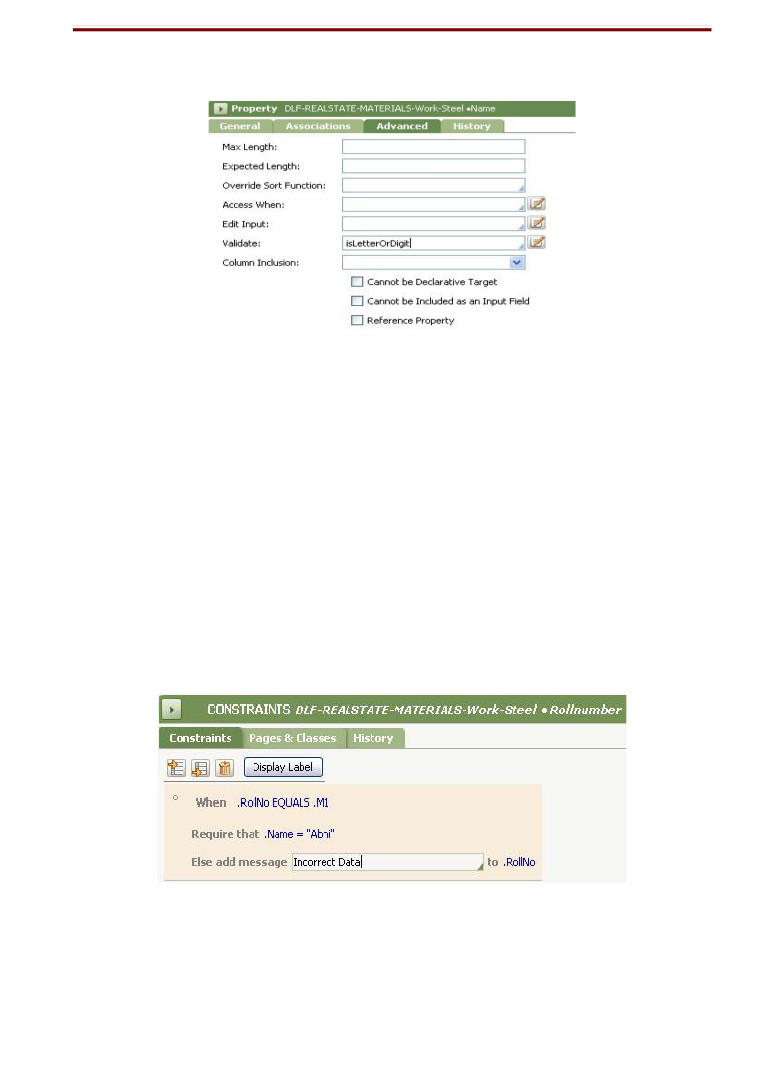
2) Using Rule-Edit-Validate
Difference between Validate rule and Rule-Edit-Validate
1.) Rule-Edit-Validate: It requires Custom Java code to validate the property. But Validate rule
doesn’t require java code, but we give expressions to validate the property.
2.) Rule-Edit-Validate: It is implemented on property as a whole (In advanced tab of the property
form). It is fired automatically whenever the property is referred. But Validate rule is
implemented at screen level (at Flow-action action tab) or called by Activity (Obj-Validate and
Page-Validate methods).
Using Constraints. (Rule-Declare-Constraint)
This normally generates a client-side validation code. And it is used to put
validation/restriction on the property in relation to other properties (expression) .It also fires
automatically, as it is under declaration rules.
See the Declaration section for more info.
41
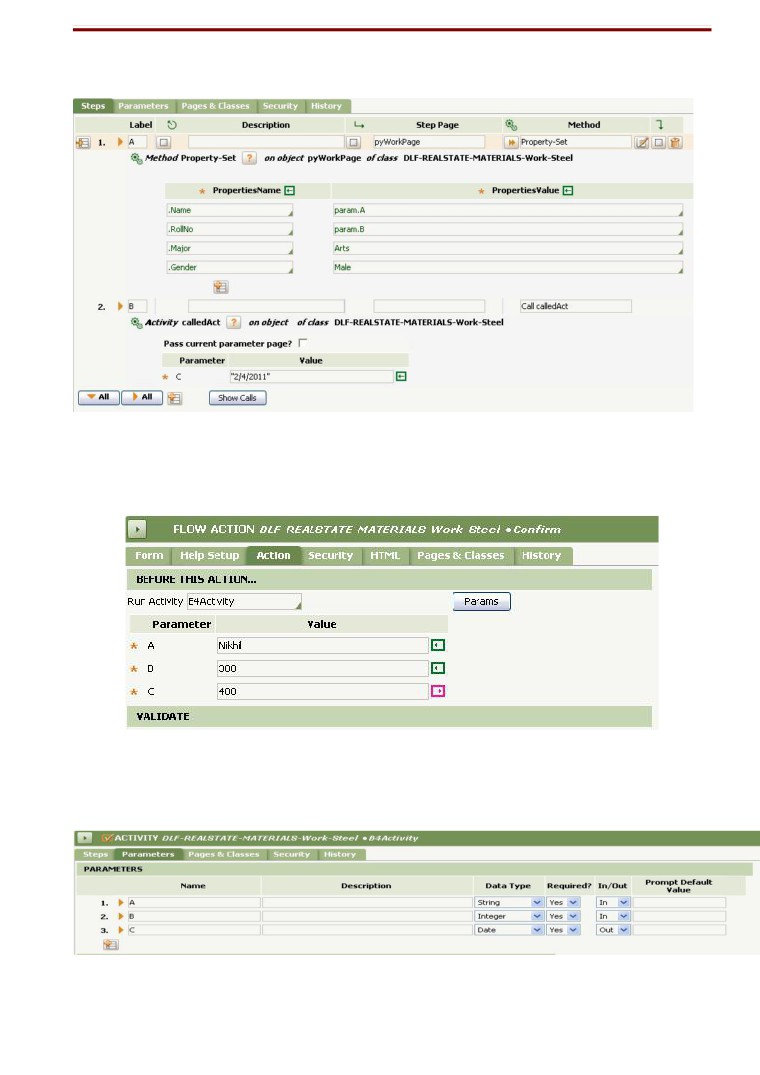
Activities Basics: (We have a separate activities section)
Here we have written an activity with 2 steps. In first step, it sets the property values. The
values for Name and RollNo is being supplied as parameter (from where this activity is called, like
from a Flow Action).
In Step-2, we have called another activity and supplied a parameter to it. (this will be output parameter
in calling activity.) The value of output parameter is supplied from the calling activity.
The parameters tab of calling activity:
42
Types of Activities:
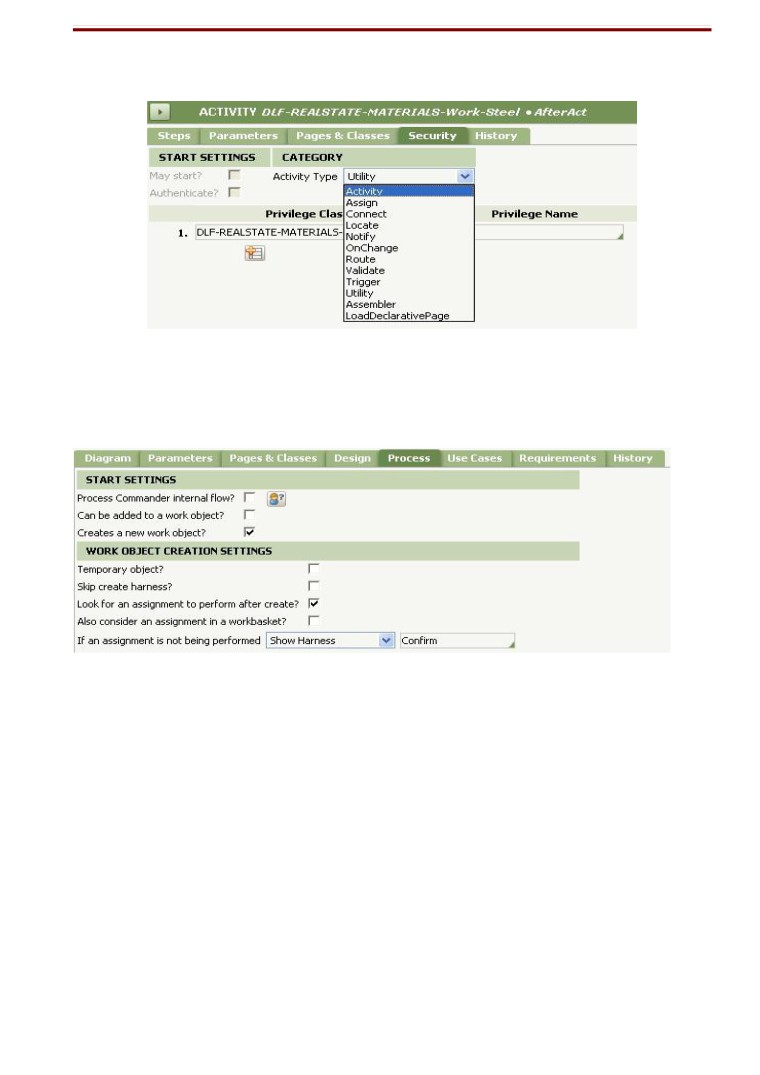
While calling an activity from Utility shape, change the Activity type under security tab as Utility.
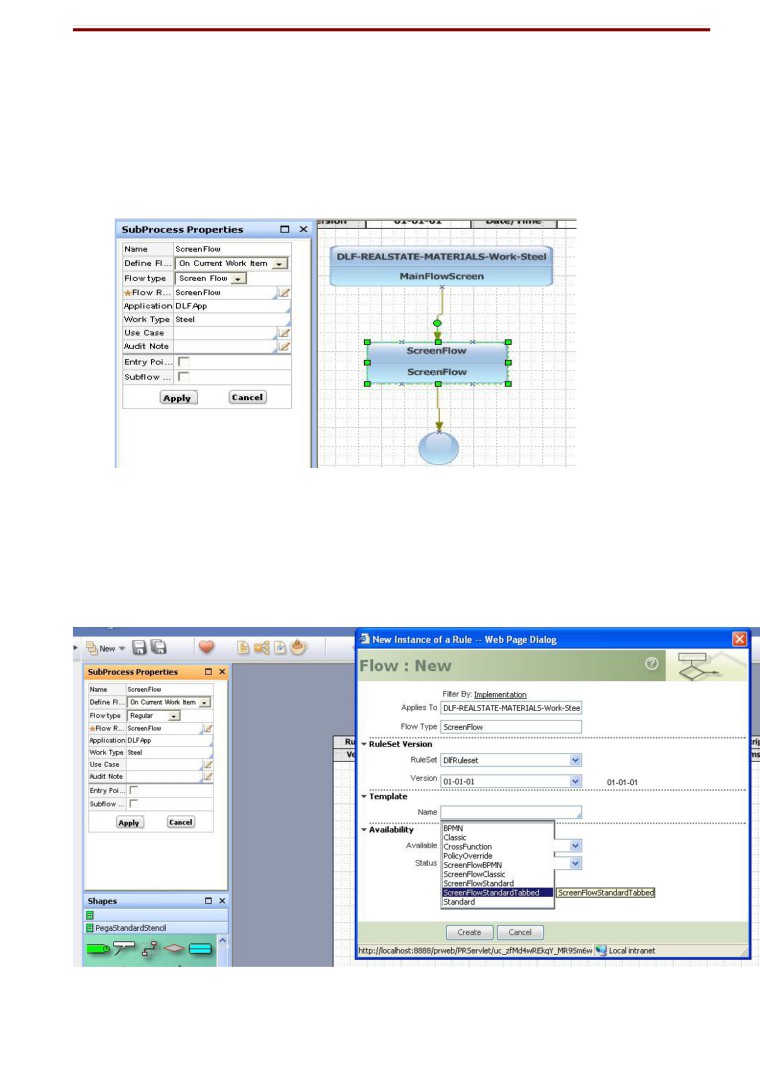
Creation of Flow
While creating a Flow we have to edit a check-box in its process tab.
Flow:
A flow is a fundamental representation of a business process in PRPC. It’s an instance of Rule-
Obj-Flow rule type, which defines the sequence of processing that your application applies to work
objects. They are represented through Visio diagrams.
Types of Flow
There are basically 4 types of flow.
1.) Starter Flow: A flow that creates a new work object is called a starter flow.
2.) Straight-Through Flow: A flow rule that contains no assignments, and so can execute from
3.) Sub Flow: A flow that is called by another flow is known as a subflow; the calling flow is called
parent flow. Processing of a subflow is synchronous, meaning that the calling flow execution
43
pauses for the duration of the subflow. When the subflow execution reaches a Flow End
shape, the calling flow can continue.
A Sub flow can create a work object.
4.) Screen Flow: This flow cannot create a work object. This is special kind of sub flow where we
give the flow action inside the assignment itself, not in the connectors. While creating this
Screen Flow, we have to do few modifications.
In the sub-flow properties panel
Flow Type: Screen Flow.
And while creating the Screen Flow,
Template: Screen Flow Standard Tabbed, Screen Flow Standard Classic etc.
44
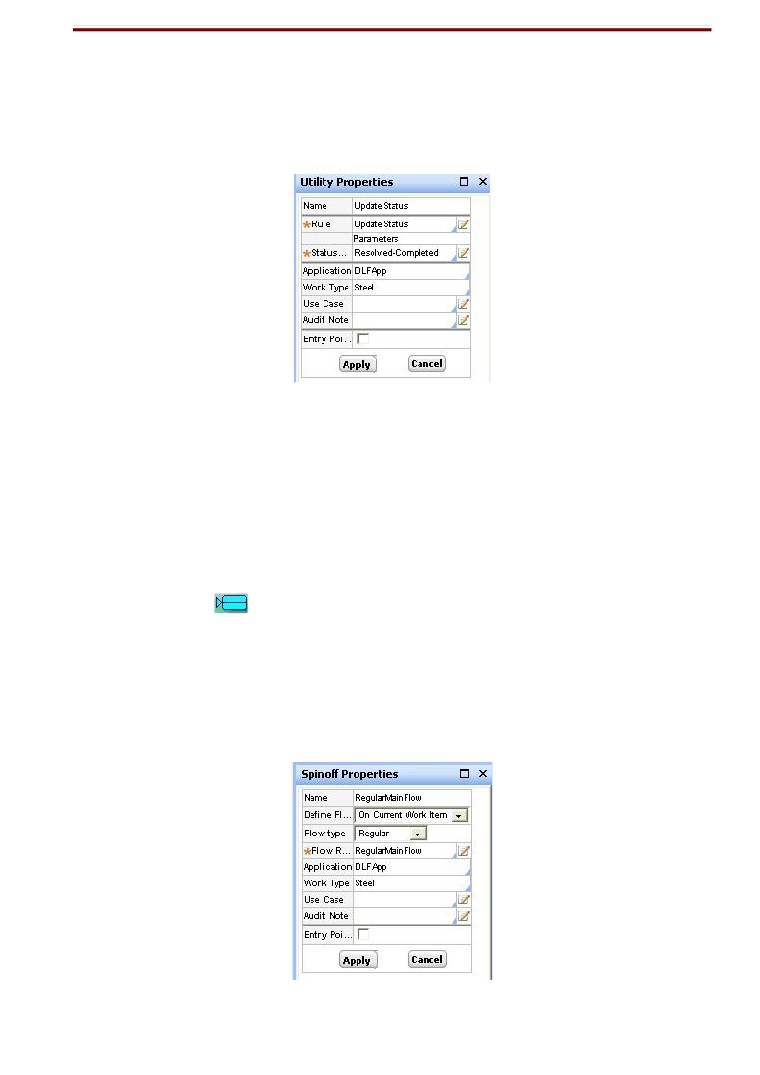
UTILITIES:
These are used to call an activity from a flow (Activity type = utility).
Here we are calling a pre-defined activity to update the status of work object.
There are pre-defined Activities which we can reference in this utility like: UpdateStatus of work object.
Also we can provide our own Activity under Rule: The Activity must be of type Utility.
Assignments
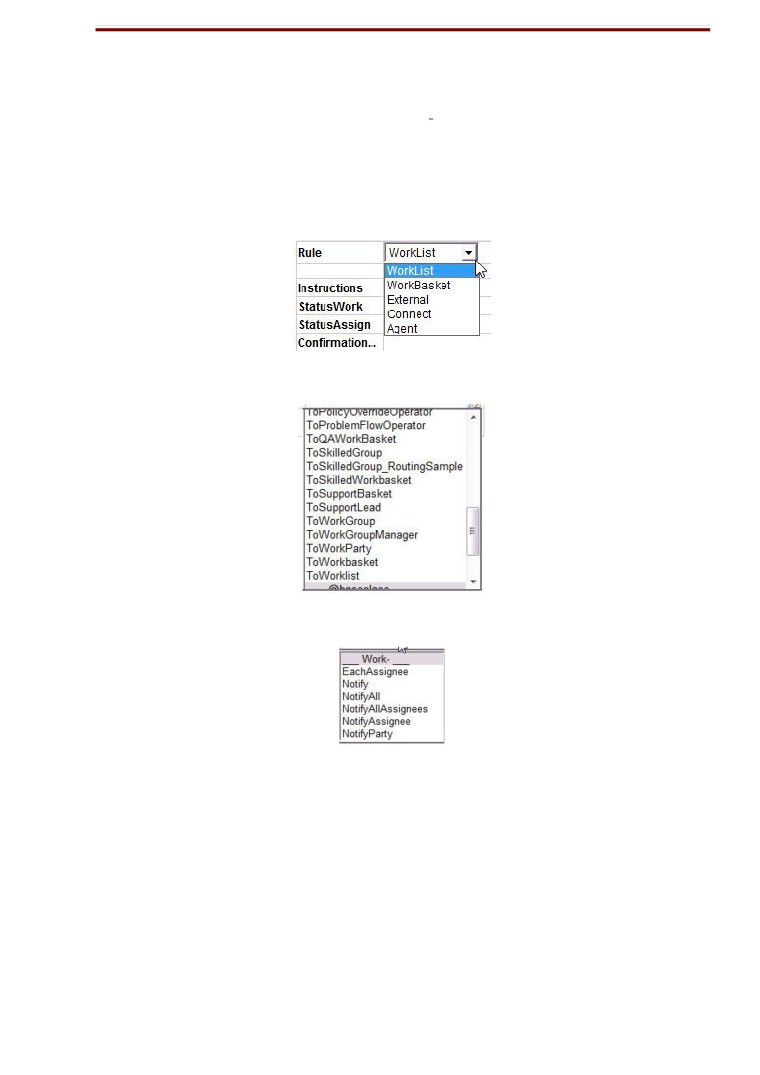
Important Properties of assignments are:
Rule (Worklist, Workbasket), Instruction, Work Status, Status Assigned, Confirmation Note,
Notify, Route, SLA, Local Action. Etc.
Spin-Off:
A Spin-off task
causes the second flow (sub flow) to start. The main flow and the second
flow executes asynchronously. The user can choose, which flow (Main Flow or Sub-flow) to run first.
While we reach the Spin-off shape, we can choose: View ->My Recent Work -> The recent
work to see the process list.
Now we can choose from the process list, which flow to run first. In it’s properties panel,
we provide the Rule: Flow name.
45
The Process List for main flow and sub flow to choose between
Note: Except Screen-Flow, other flows can create a new work object. Hence we can say that in spin-off,
the sub-flow can create flow to work on same work object (screen-flow) or can create a new work object (a
sub-flow or other main flow).
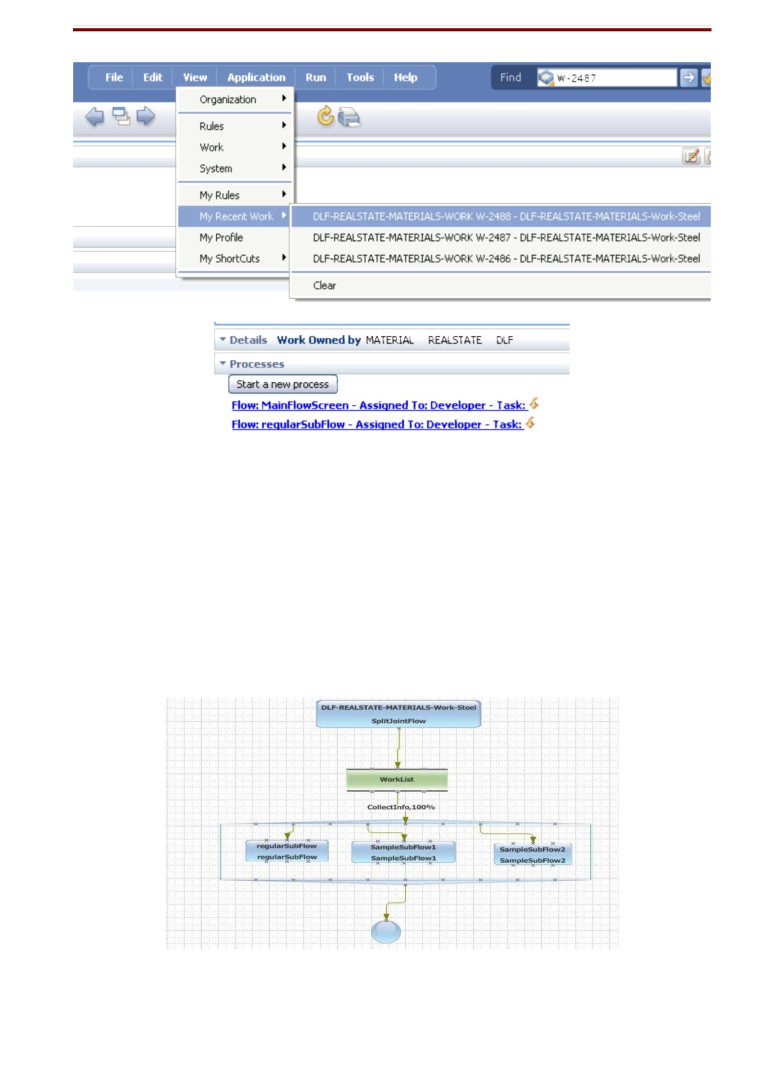
Split-Joint:
Use the Split-Join shape to require that multiple subflows of your flow be completed before the current
flow continues execution. This allows subflows to execute asynchronously, in parallel. Put multiple
sub-flows inside it. While we run the flow, we can use view-> My Recent Work to see the Process list
containing all the sub-flows. The parent flow will run at last.
There is option here that, to run parent flow when all sub-flows are completed or any one sub-flow is
completed.
46
We describe the Split-ForEach after the PageList Concept.
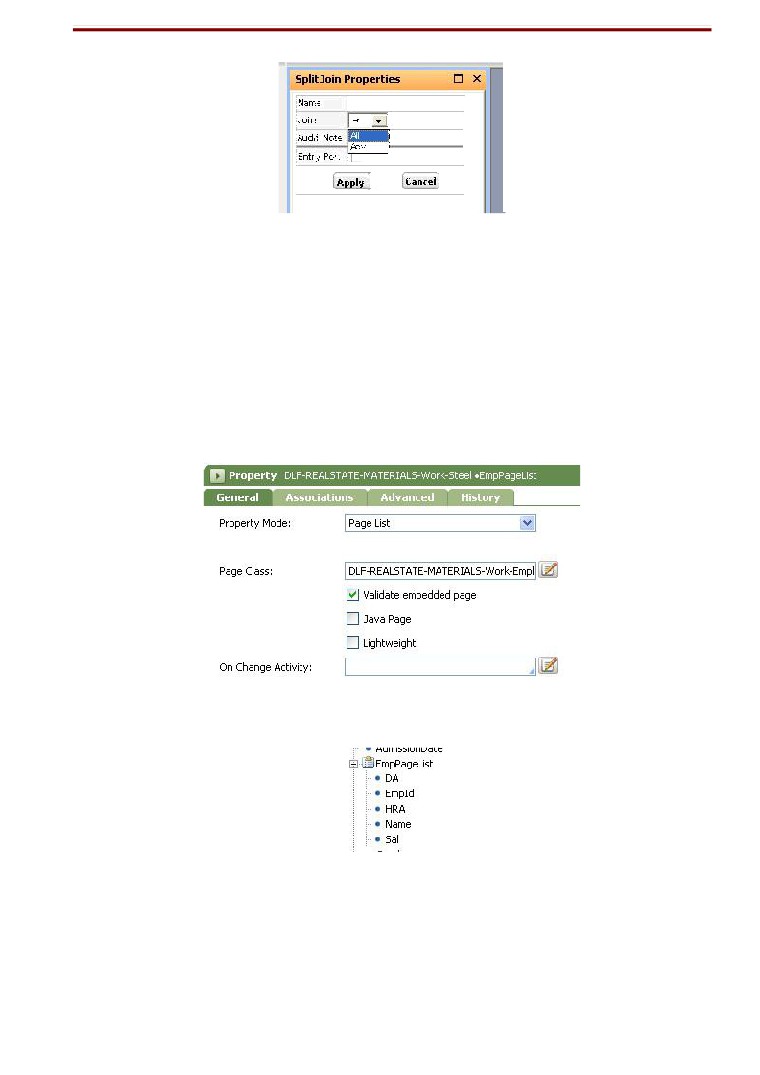
PageList:
For creating pageList, we have to first create a Data- derived class to contain the properties that we
want to include in pageList.
e.g : Class DLF-RealState-Structure derived from Data- class. Create properties in it like:
EmpId, EmpName, Salary.
Now in the Work type, create a property of type pageList. In the form, it’ll ask for the Class name
containing the properties. Provide the data class name.
The pageList property will appear like below.
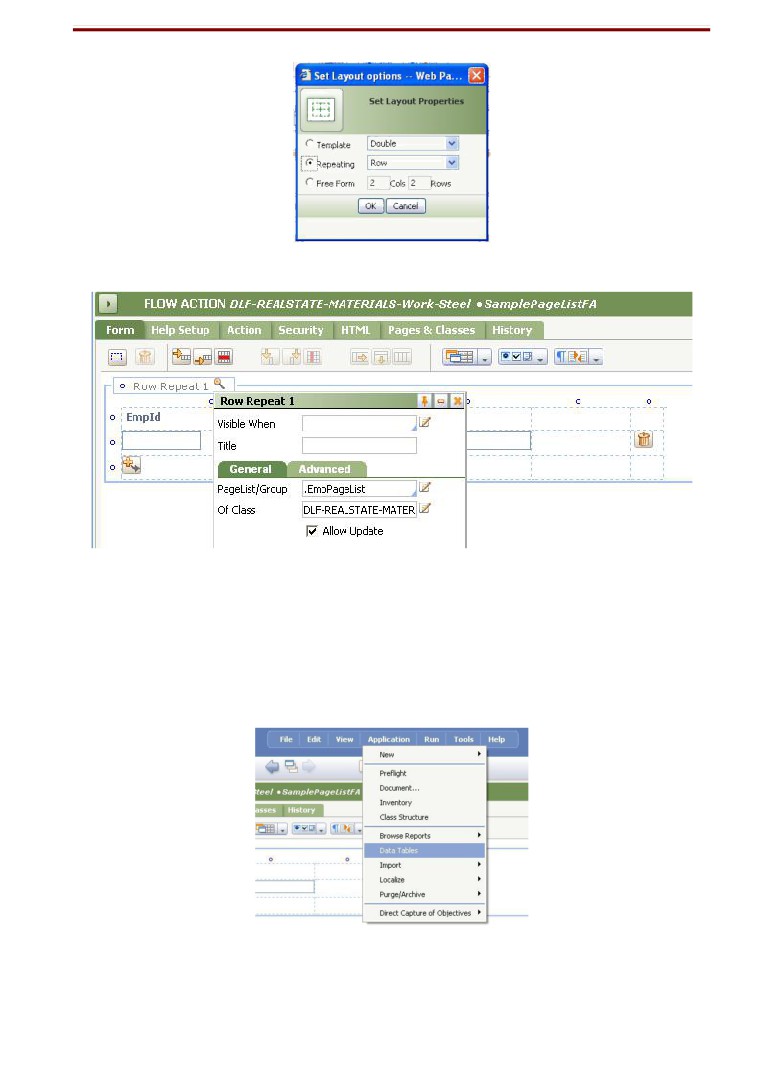
Now we create a Flow Action for PageList. We’ll create a repeating layout in the Flow Action/Section.
47
Now click on the magnifier button on the layout, and edit the general tab.
Give the PageList/Group as the pageList property we created. Now the Class will be the
containing class of the properties in the Page List.Now drag and drop each element under each of the
2nd column of the layout. This will create a aggregate layout flow action/section.
Creating Data Tables.
Go to Application -> Data Table.
Click On “Add” new data table.
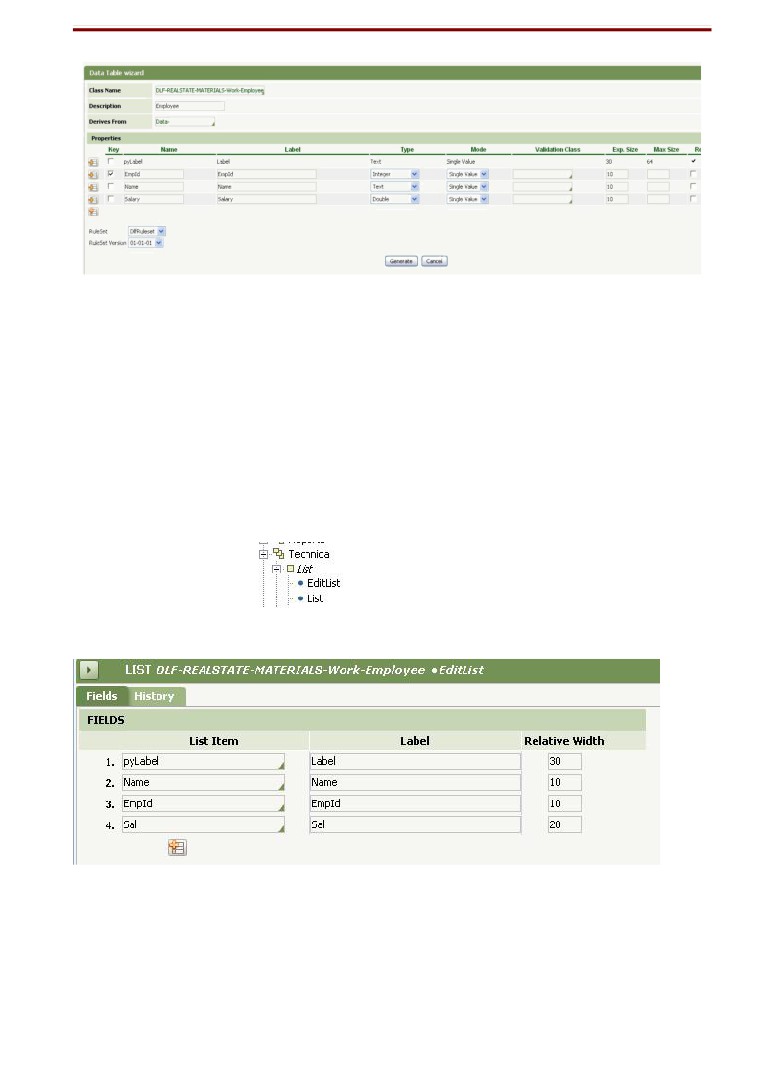
48
Give
Class name: The Data- derived class which will contain these properties.
Description: Description of data.
Create properties it’ll contain, with one column as primary
key. Now generate.
It’ll create a Database class containing these properties.
By default, instances of classes created through this facility are stored in the PegaRULES database
table named pr_other and are limited to 1,000 rows.
Editing Data Tables
If we create a data table using the above methods, it’ll also create few things under
technical category like.
in the Data- derived class.
Click on EditList and modify the things.
Save the modifications. Now can check the Data tables, the modification will reflect there.
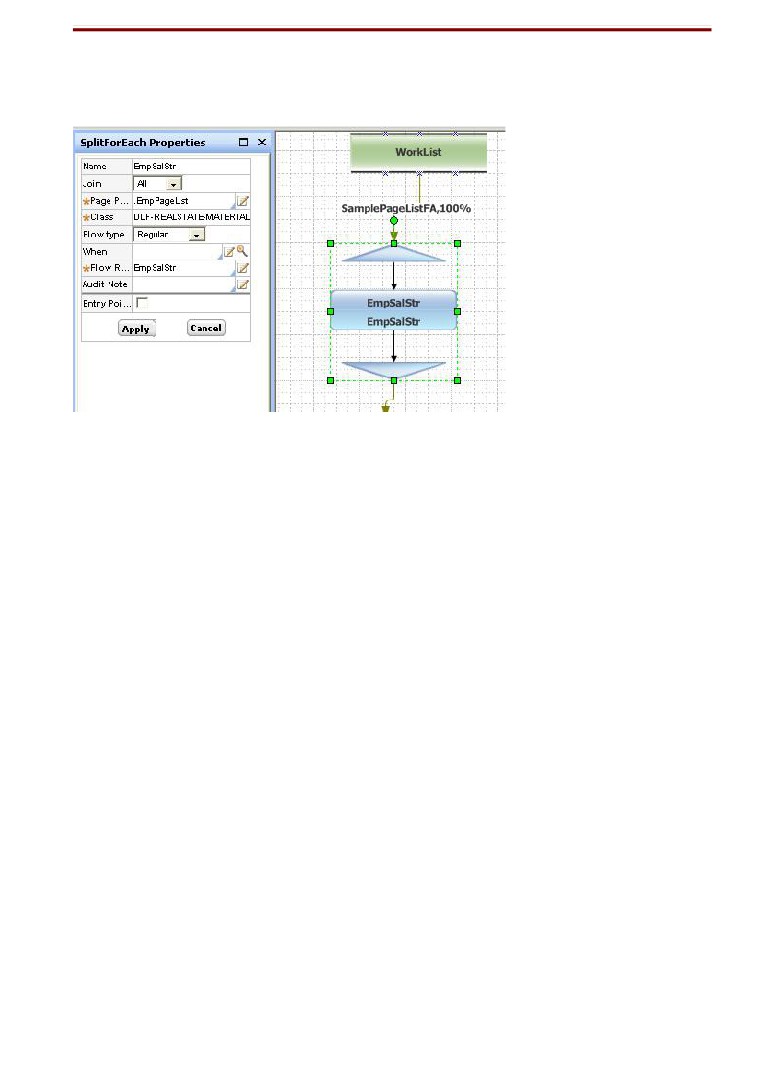
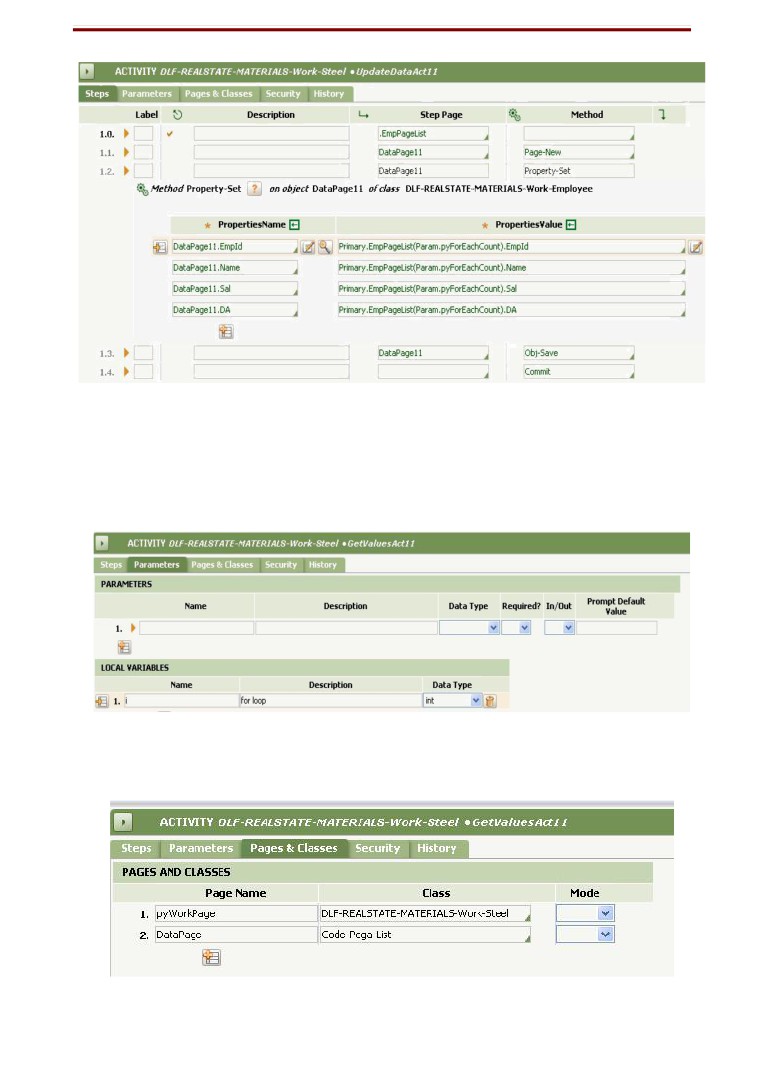
Split-For Each
It is used to process an aggregated property (PageList/PageGroup) and executes a sub-flow for each
page.
49
E.g.: if a PageList contains 4 individual pages (4 rows in repeating layout), then for each node (page)
the sub-flow will run.
Note, here we provide values.
Page Property as : the PageList that we want to process.
Class: Containing the Properties of the PageList.
Flow Rule: The sub flow name.
Note: The Sub flow mentioned here must be under the Data- derived class because it’ll process the
properties of Data- Class. Also the flow actions mentioned inside this sub-flow must be defined under the
Data- derived class.
When we’ll run the flow, process list will appear equal to the no. of pages in the PageList.
We can choose any of the process list to run the sub-flow.
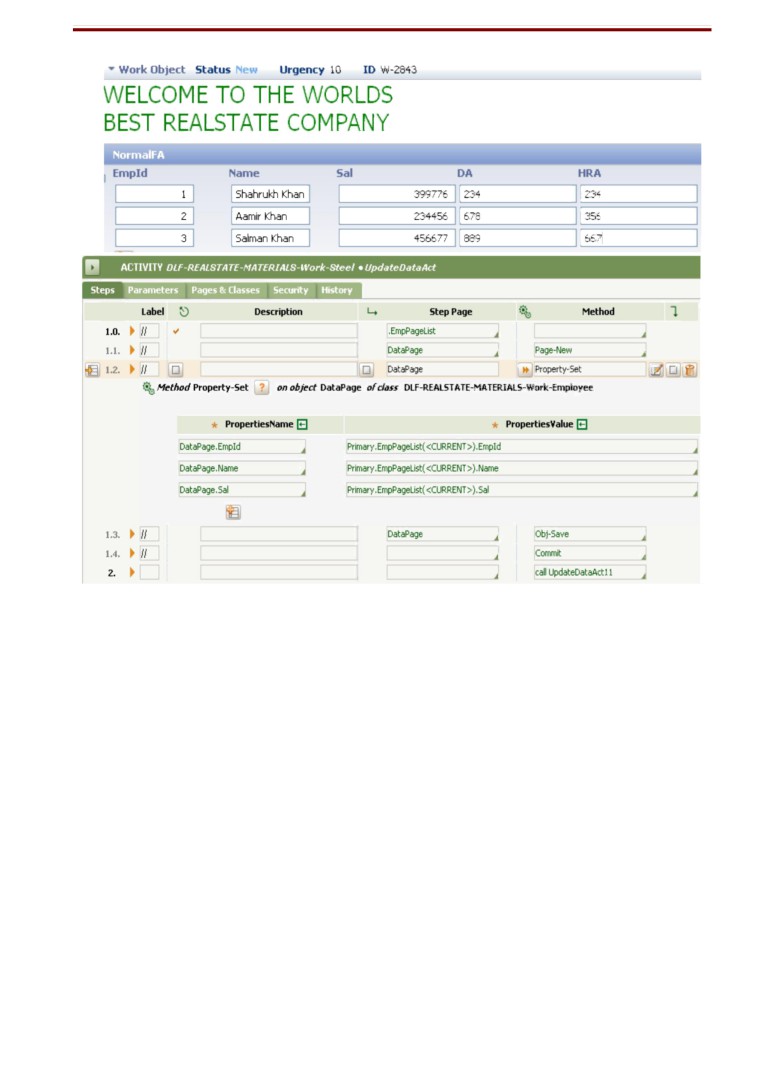
Normally we can think this thing in this way. We have an employee list, with EmpNo, Name and
Salary. We want to Calculate DA and HRA for each employee, the calculation goes inside the sub-
flow.
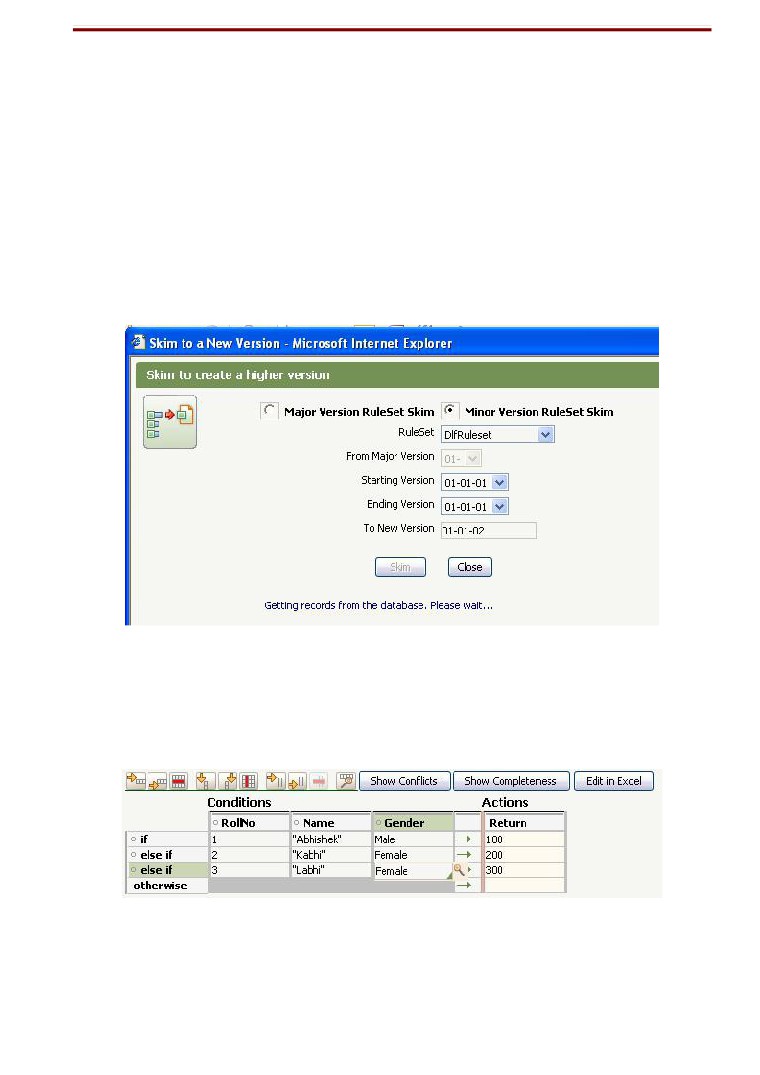
SKIMMING:
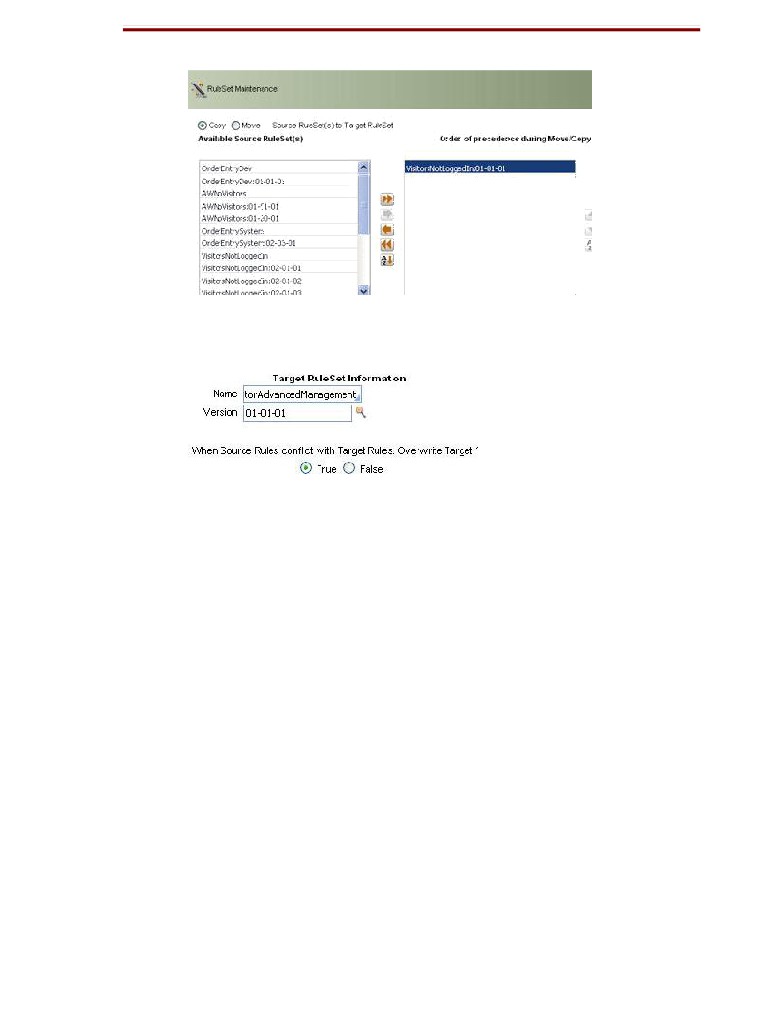
The Skim facility causes a resetting of the RuleSet version values in the highest version of existing
rules. For each rule instance in a specified RuleSet or version, the system identifies the highest
numbered version and creates a still higher copy.
0
For a major skim, the system adds one to the major part of the version, and sets the minor
and patch values both to "01."
1
For a minor skim, the system preserves the major version, and sets the minor and patch
version values to the version you specify.
Starting a Skim operation
From the Developer portal, select Tools > Rule Management >Skim a RuleSet to begin the
skim operation.
50
Results:
Skimming simplifies the topmost rule versions in a RuleSet after multiple iterative development cycles.
For example, if the highest version was previously 02-21-06:
0
After a major skim, the skimmed version number is 03-01-01.
1
After a minor skim, the skimmed version number is 02-22-01.
Rules in lower versions such as 02-21-05, 02-18-53, or 01-88-15 of the same rule are not copied by
the skim operation.
The skim automatically creates the new RuleSet version instance corresponding to the major,
minor or patch version above the current version. It then copies rules from the current version
(selecting only those in the highest-numbered version) into the new major or minor version. Rules with
available of Blocked in the source RuleSet versions are not copied.
Decision Tables:
Sample Decision Table. Below is the Results Tab. We can provide allowed results for return.
Preset properties and Options.
Note that, I haven’t found any option for calling other decision rules under it. Wait Now I found out.
51
We can call other Decision table using call.
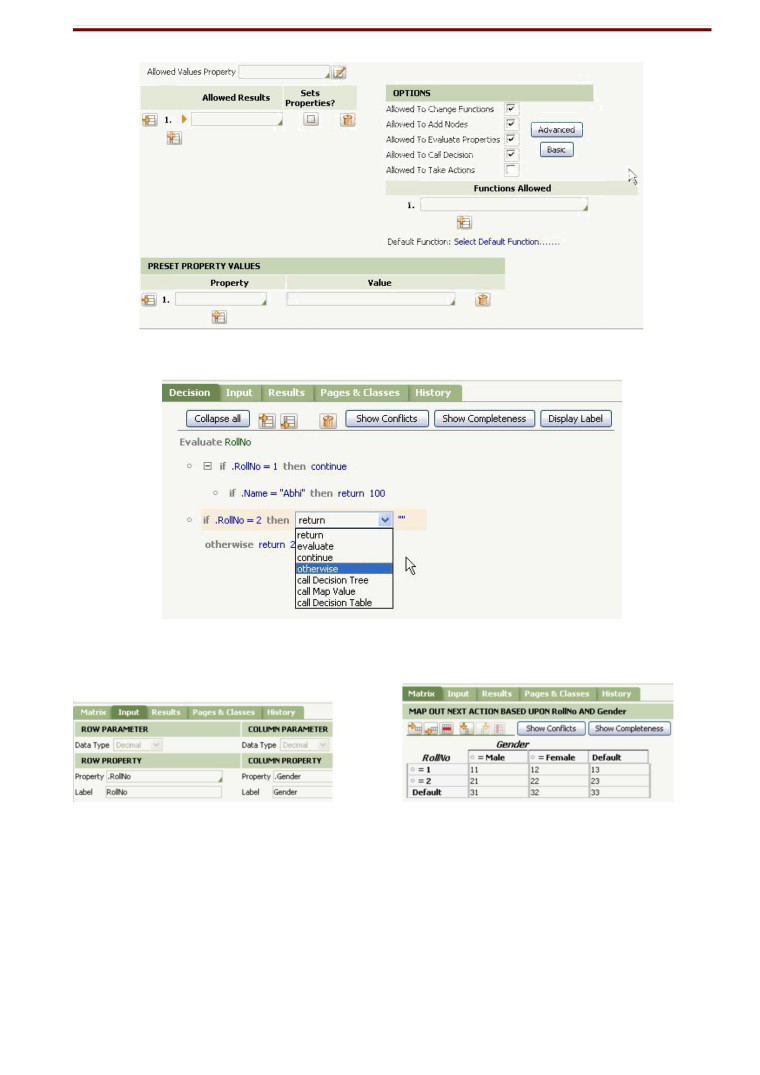
Decision Trees:
We may provide the input values (property to evaluate) at input tab.
This is the Results Tab.
52
This is the Decision Tab.
Map
We need to provide the Input values for Row and Columns, Then can provide a matrix structure
between 2 values.
53
Decision Tree/Table/Map in Flow
Connector Properties
Status compares the return values of Decision rules used above.
DECLARATIONS
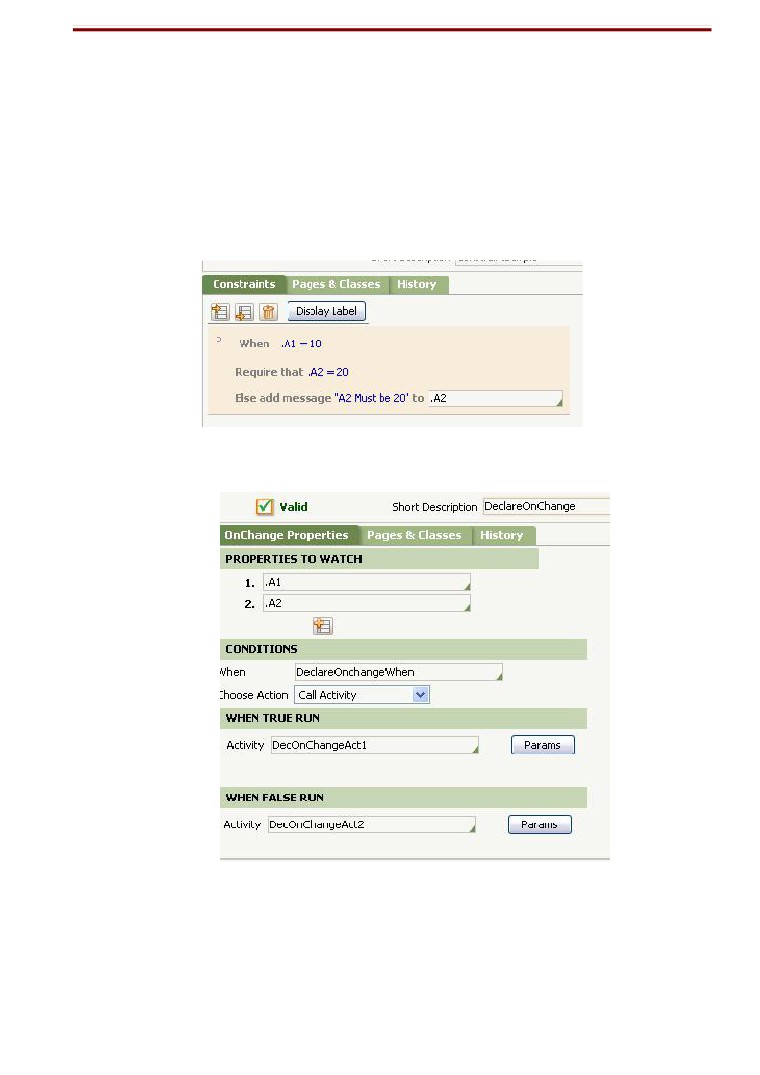
1) DeclareOnChange
A Declare OnChange rule automatically executes an activity, or suspends the current work object,
when the value of a specified property changes.
There can be more than one property that we can include in Declare OnChange rule to watch. If
any of them changes, we can fire 2 activities. One when a “When” condition returns true, and another
when it returns false.
Note: The called activity must be of Activity Type = Onchange (in security tab)
See next page for Fig.
54
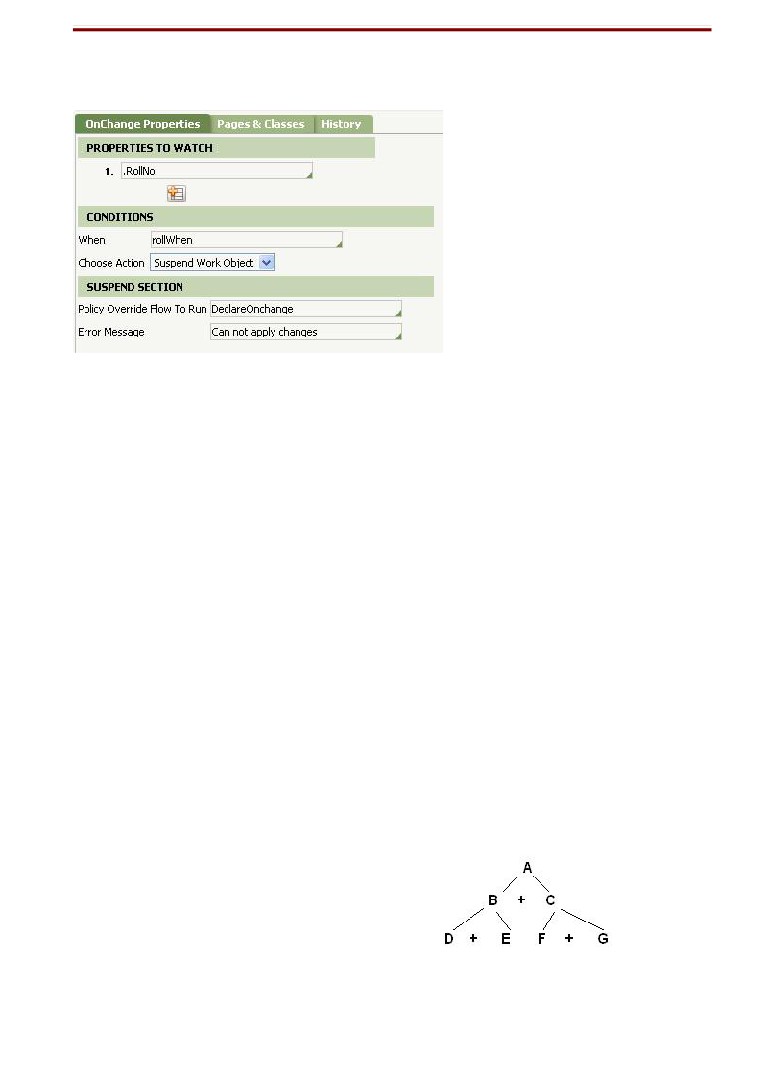
Declare OnChange can also be used to validate properties. We can suspend work object, if the value
of the property is modified meeting some criteria.
Note: Choose Action is Suspend Work Object (Not call activity as before)
Policy Override Flow to Run, we can include any other flow to continue running if the Roll No
changes and when condition is met.
Here we can see, we have given the same flow name at “Policy Override Flow To Run” so that work
object stalls and asks the user to change the property value.
Declarations (Rule-Declare-)
Declarative rules offer the ability to perform processing whenever the value of a specified property
changes, or on other conditions. We can say that Declarative rules simplifies the applications and
reduces the no of activities we create.
They are fired automatically whenever the value of any property changes and on other
criteria. Declarative rules follow forward chaining as well as backward chaining.
Forward Chaining: It is the process by which, the target property changes/adjusts its value depending
upon change in the source properties. E.g: A = B + C. If values of either B or C changes, The value of A is
automatically adjusted.
Backward Chaining: Unlike forward chaining, whenever the target property is used or referred, its value is
calculated at that point by seeking the values of its source properties in the dependency network.
E.g: A = B + C. B can be = D + E and Similarly C = F + G.
Note: Only Declare expressions use backward chaining. Rest all Declaratives use Forward chaining only.
So the dependency network is built in this way.
55
They are of 6 types.
0
Declare Expression
1
Constraints
2
Declare OnChange
3
Declare Trigger: Declare Trigger rules perform an activity any time data of a specific type is
changed in the application. For example, a declare trigger could be defined to flag a customer's
account for review any time their address changed.
4
Declared Index: Indexing can improve performance and facilitate reporting. Create a Declare
Index rule to define criteria under which Process Commander automatically maintains index
instances for faster access. An index can improve search and reporting access for properties that
cannot be exposed as database columns because they are embedded within an aggregate
property.
5
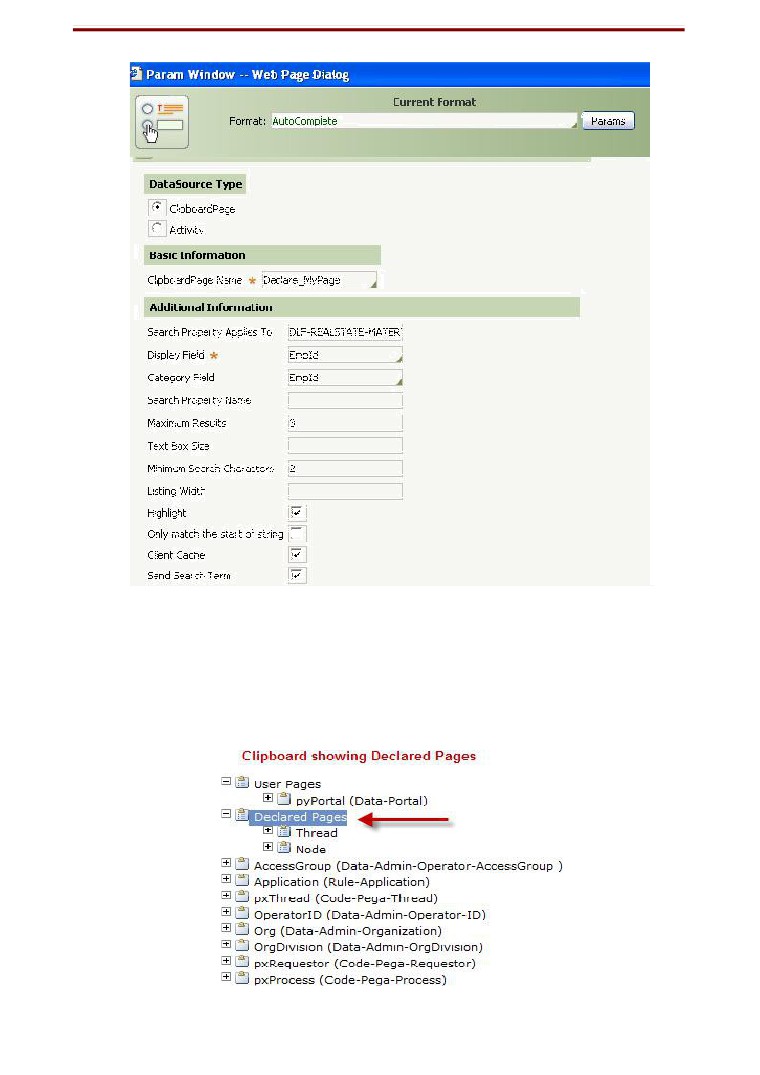
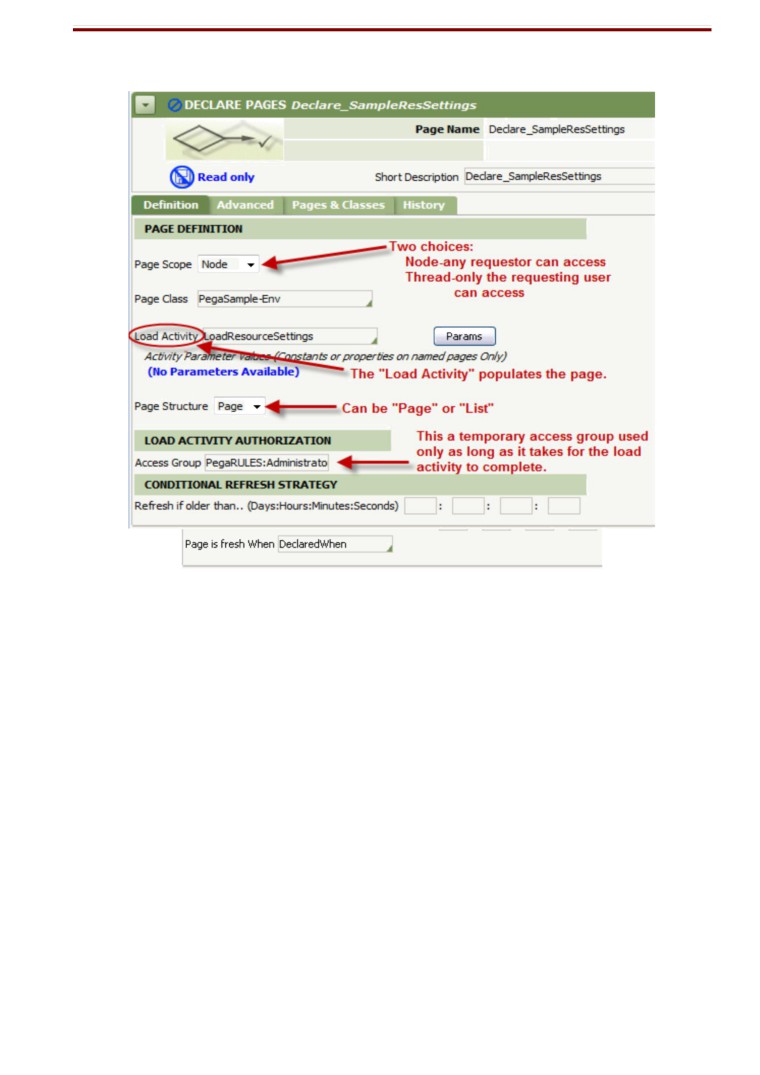
Declared Pages: A declarative page is a clipboard page created by execution of a declare pages
rule (Rule-Declare-Pages rule type).The name of a declarative page starts with the prefix Declare_.
Such pages are created and updated only through operation of activities identified in a Declare
Pages rule. The contents of these pages are visible but read-only to requestors.
1
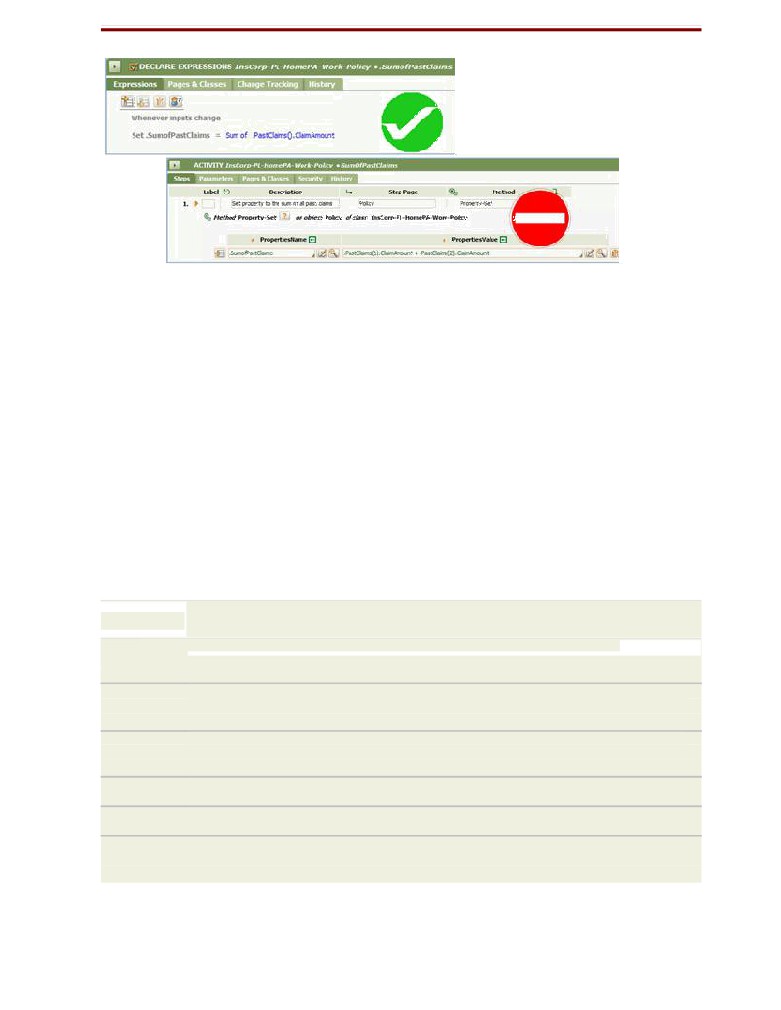
Declarative Expressions:
Declare expressions establish functional relationships between properties, and compute the result any
time one of the Inputs is changed. Declare expressions ensure that any time an input is changed by
any source, the result is always
Up-to-date.
Ways to create:
New -> Declaratives -> Declare Expressions
We can provide Page Context, if we want to calculate values from a pageList/pageGroup.
56
The Change Tracking Tab. 1st option is
Forward changing. Rest 4 options are Backward changing.
In the UI Part
57
We can change the behavior of properties A1 and A2 as Event = On Change, Action = Refresh This
Section.
Note: We can call An activity also when the input changes.
0
Declarative Constraints:
0
Constraints rules provide data validation for properties after they are already inside your
application. Any time the specified property changes, the constraints rule checks to confirm
that the value still falls within the expected range.
1
Normally Constraints are used to define validation on one property based on criteria on another
property. Eg: If a = 10 and b = 20 then c must be 30.
3) Declare On Change:
Declare OnChange rules run an activity any time that the value of a specified property changes.
Note: The activity referred must be of type OnChange in security tab.
We can also Choose Action = Suspend Work Object and can assign to start a new flow.
58
So, when condition is true, it Suspends Work Object and Calls another Flow : “Screen Flow”.
0
Declarative Pages: Given in diff section.
1
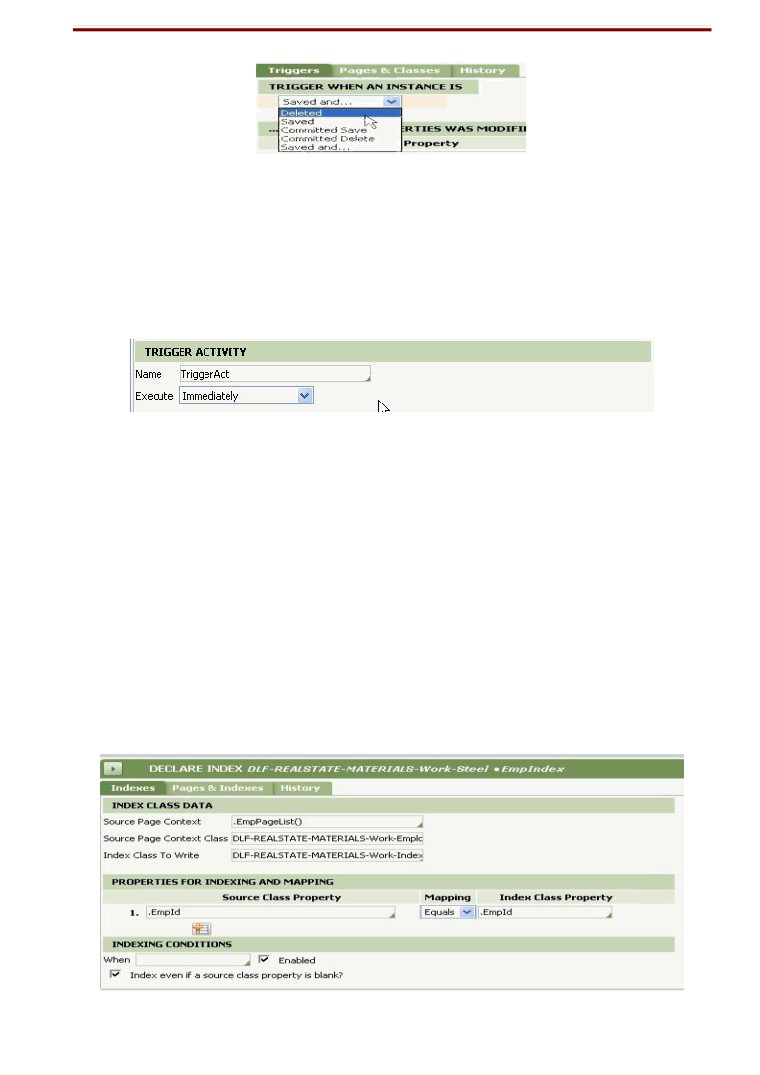
Declarative Trigger:
Create Declare Trigger rules to cause an activity to run when instances of a specific class are
created, updated, or deleted in the database. This implements a form of forward chaining.
For each Declare Trigger rule, Process Commander monitors database operations for objects of the
Applies To class (and concrete classes derived from that class). During database commit processing,
forward chaining processing may trigger — start execution of — the activity identified in this rule.
Trigger when an instance is
59
If we choose Save and ….. Then we have to provide some properties that will be watched.
...ONE OF THESE PROPERTIES WAS MODIFIED
Provide the property name that will be watched, so that trigger will fire the activity (of type trigger).
Copy Value To (optional): Provide another property name that will hold the original value of the property
modified.
When: Provide a when condition that will be evaluated. If true then only Activity will be fired.
Trigger Activity: Name of the trigger activity that will be fired. This Activity should be of type trigger.
6) Declarative Index:
Indexing can improve performance and facilitate reporting. Create a Declare Index rule to
define criteria under which Process Commander automatically maintains index instances for faster
access. An index can improve search and reporting access for properties that cannot be exposed
as database columns because they are embedded within an aggregate property.
Index instances are sometimes called alternate keys or secondary keys. The system saves indexes as
instances of concrete classes derived from the Index- base class.
By default, Process Commander stores properties that are embedded in a Page, Page List, or
Page Group property in a BLOB column in the database. In order to make these properties available
for reports, and to optimize them for processing in other operations, the Property Optimization tool
"exposes" the values of an embedded property by creating a concrete Index- class, properties for the
new class, and a Declare Index rule that allow Process Commander faster access to the property
values.
60
Source Page Context: Name of the PageList.
Source Page Context Class: The class name which holds the actual properties (Not which holds the
PageList Property)
Index Class to Write: A concrete class derived from Index- Class, It will also contain the same
properties as above class.
PROPERTIES FOR INDEXING AND MAPPING
Map the properties from Page Context Class to index Class.
ACTIVITIES
Activities automate processing. Activity rules contain a sequence of structured steps. Each step calls a
method rule or contains a control instruction such as Call or Branch.
0
contain a sequence of procedural, atomic steps that are by default executed top down
1
reference a specific instruction (known as a method) in each step
2
can perform calculations
3
can retrieve, update and save data
4
can call other activities
5
can contain loops or iterations
Note: We cannot create our own methods and we have to use the given set of methods only.
0
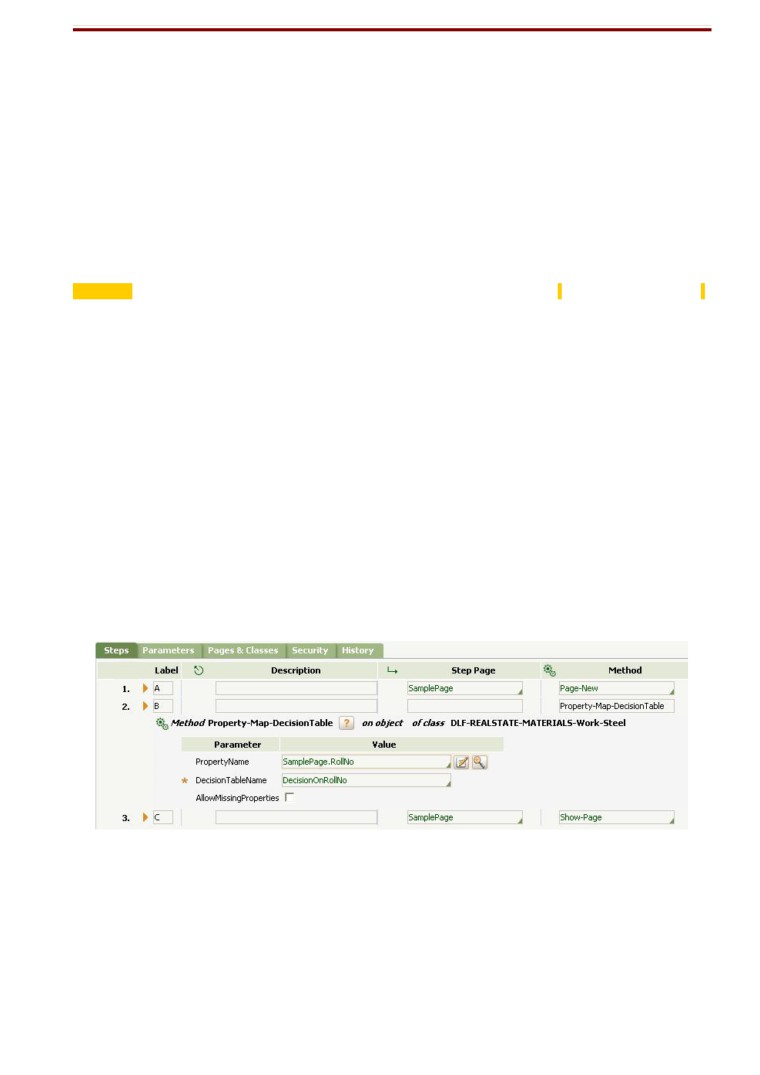
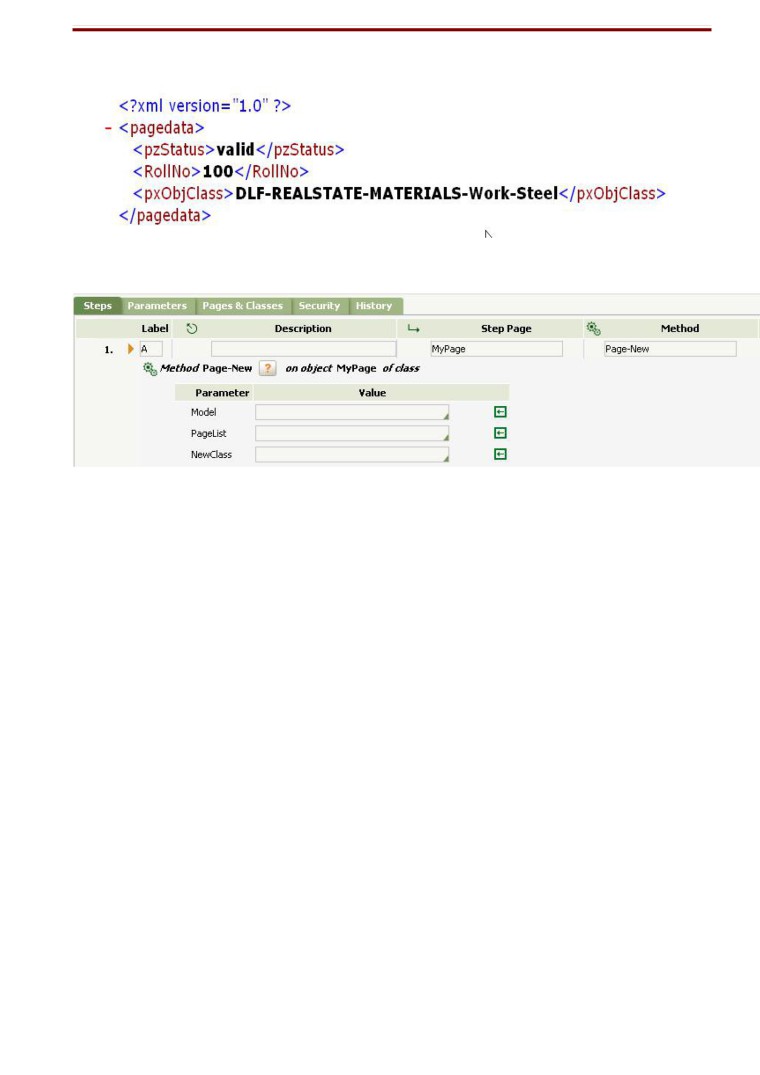
Page-New and Show-Page: Creates a new page in Clipboard and Show-Page shows the page in
XML Format. Show-page is normally used during debugging, because it blocks the flow. We should
remove the Created page by using Page-Remove method if it’s not used further. This keeps the
performance good.
In Pages & Classes:
give page name: SamplePage
page class : The class name where the properties mentioned are defined.
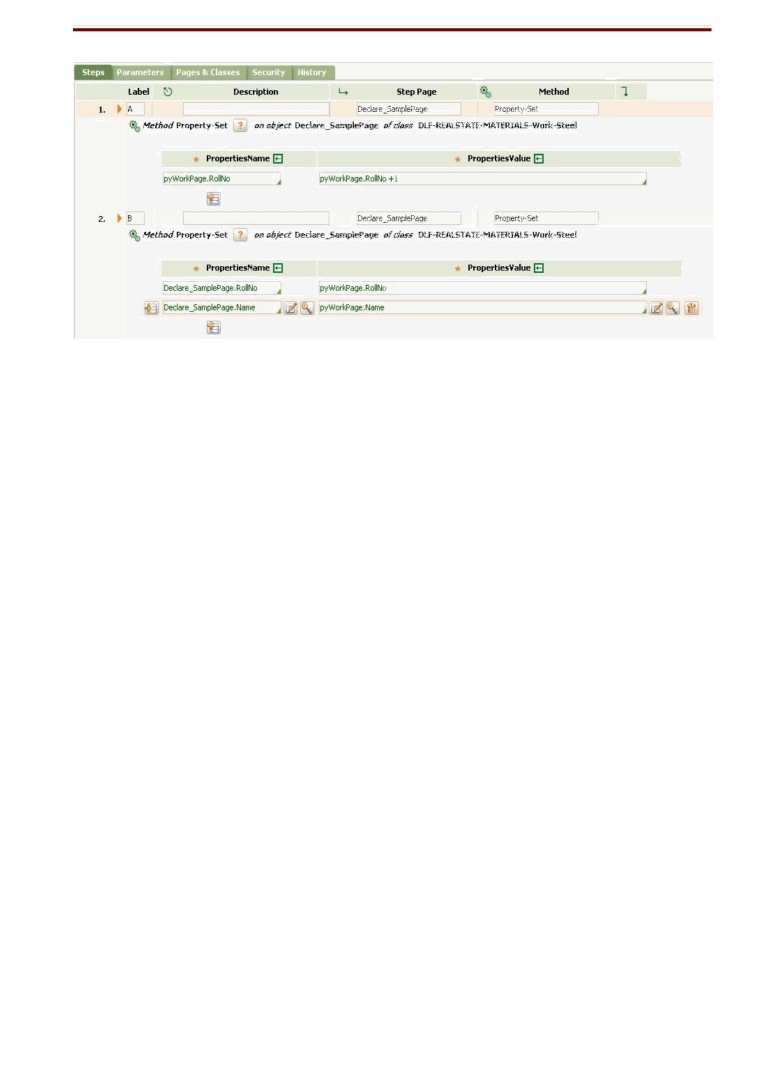
Here, we have created a new page called SamplePage and called a decision table, which returns a
value.
We capture the returned value in SamplePage.RollNo. Show -page displays the output as below.
61
OutPut:
Note: If we have used a model for a class, then if we declare a page and class in pages and classes
tab, then the model will also b called when the page is created.
Model: Represents the model of the class for which we create the page. It’ll initialize all the properties of
the class in the page.
PageList: To save the name of the new page as the final element in a list, identify a Value List property
(not a PageList property). Use the notation pagename.propertyname. The system appends the name of the
new page as the value of the last element of the Value List property.
NewClass: Optional. Identify a class — in most cases concrete class — for the new page. Enter the
keyword $NONE to create a classless page. If left blank, the system creates the new page using the class
of the page specified in the Step Page column of the activity step being executed. (It retrieves the class of
this page from the array entered in the Pages & Classes tab of the Activity form.) If the Step Page field is
also blank, the system creates the new page of the class that is the first key part of the current activity.
0
Page-Clear-Message: Clears all the messages in the page. Normally validation/error messages.
1
Page-Unlock:
Use this method to unlock a page in the unusual situation that the page was locked during the
Obj-Open operation but the ReleaseOnCommit parameter was not selected.
Typically, when the Obj-Open method opens and locks an object from the database, the
ReleaseOnCommit parameter is selected. When a later Commit method executes, the system
automatically releases the lock.
62
However, when the ReleaseOnCommit parameter is not selected, the Commit operation has no effect
on the lock, which remains in force. This capability facilitates multiple Commit operations on one page
without the need to re-acquire the lock.
You can also use this method to release a lock that is no longer needed, regardless of the
ReleaseOnCommit parameter value.
4) Page-Validate
Use the Page-Validate method to force validation (or revalidation) of the value of all properties
on the step page. The system adds a message to each clipboard property that fails validation against
the restrictions in its property rule.
If the page has hundreds or thousands of properties, this method can be expensive in terms of
system resources. The properties on the page already set (through the Property-Set method or similar
methods) may already be validated. This method validates them again, and also validates any
property values not changed since the page was opened.
Unless the content of the page was altered by Java code or by unorthodox means, the Page-
Validate method is not necessary.
0
It actually refers the Rule-Edit-Validate and Rule-Declare-Constraints to validate the properties
on the Page.
Use the Obj-Validate method, not the Page-Validate method, to validate specific properties identified
in a Rule-Obj-Validate rule.
-A Page-Clear-Messages method applied later to the page removes the messages set by this method.
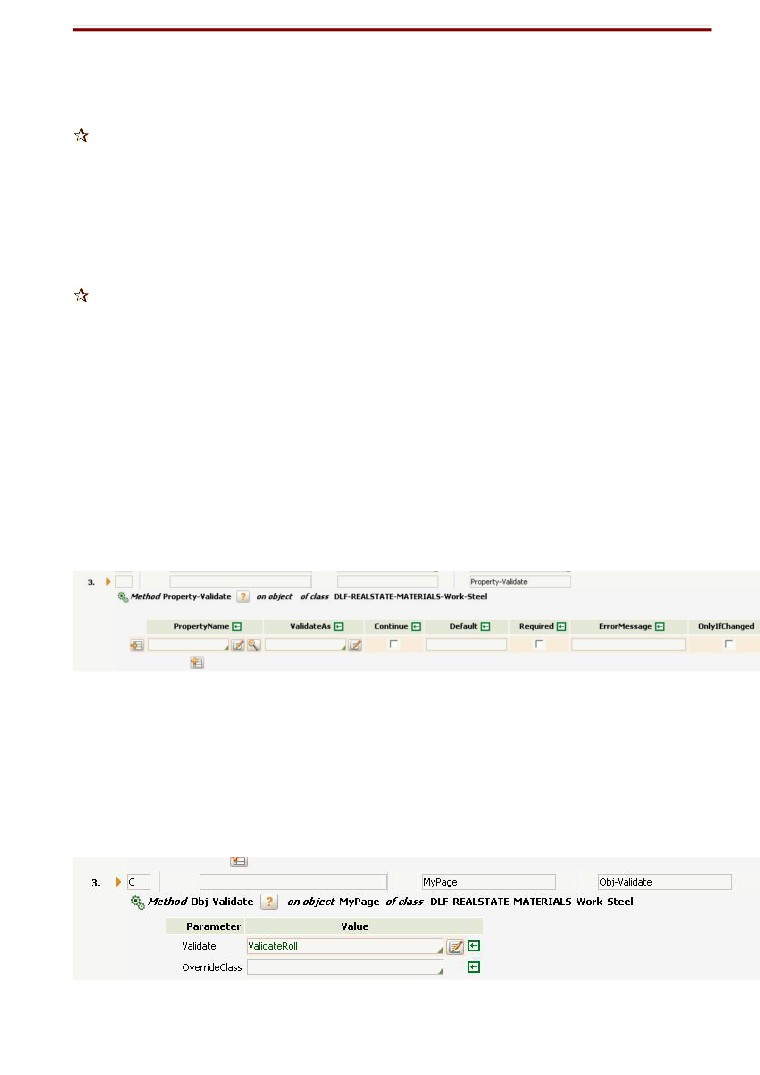
4.3) Property-Validate
Uses Rule-Edit-Validate. Continue -> Continue if error found else stop. Default -> Set a value if null.
Required -> Value is required else set an error message “value not present”.
4.5) Obj-Validate:
Use this method to apply a validate rule (Rule-Obj-Validate rule type) for the object identified
on the primary page or step page.
This is different from Page-Validate in one case. It only validates the selected property not all
the property. But Page-Validate validate all the properties.
63
Validate: The Rule-Obj-Validate rule
OverrideClass: The class name from which the search for the above rule will start.
5) Property-Set-HTML
Use this method to save the contents of an HTML stream as the value of a Single Value property. The property value
can then be mapped as output for transmission to an external system.
Parameter Description
PropertyName Enter a Single Value target property reference. Identify the property that to receive its value from stream processing.
Typically, choose a property that has a Text type.
HTMLStream
Enter the Stream Name key part of an HTML rule (Rule-Obj-HTML rule type) to be processed to produce the value of the
property.
6) Show-HTML
Use the Show-HTML method to cause the activity to process an HTML rule and send the resulting
HTML to a user for display by Internet Explorer. Known as stream processing. this may involve the
interpretation of JSP tags (or the older directives), which can access the clipboard to obtain property
values, or can insert other HTML rules, and so on.
Parameter Description
HTMLStream
Identify the Stream Name key part of an HTML rule (Rule-Obj-HTML rule type) to be processed. The system uses the
class of the step page as the Applies To key part of the HTML rule.
7) Show-Stream
Use the Show-Stream method to apply stream processing to an HTML rule, correspondence rule, or XML Stream rule,
and send the results to a browser-based requestor session.
Parameter Description
StreamClass
Optional. Identify the class of a rule type derived from the Rule-Stream class. such as:
Rule-Obj-Corr
Rule-Obj-HTML
Rule-Obj-XML
If blank, the default value is Rule-Obj-HTML.
Do not use this method with list view or summary view rules.
StreamName
Enter the second key part of the rule to be processed. To locate the rule using rule resolution, the system uses the class
of the of the step page as the Applies To class of the rule.
StreamType
Optional. If you selected Rule-Obj-Corr or Rule-Obj-XML as the StreamClass value, enter here the third key part of the
rule (the Correspondence Type or XML Type).
8) History Add
We can append the history details of a work object.
Database related methods
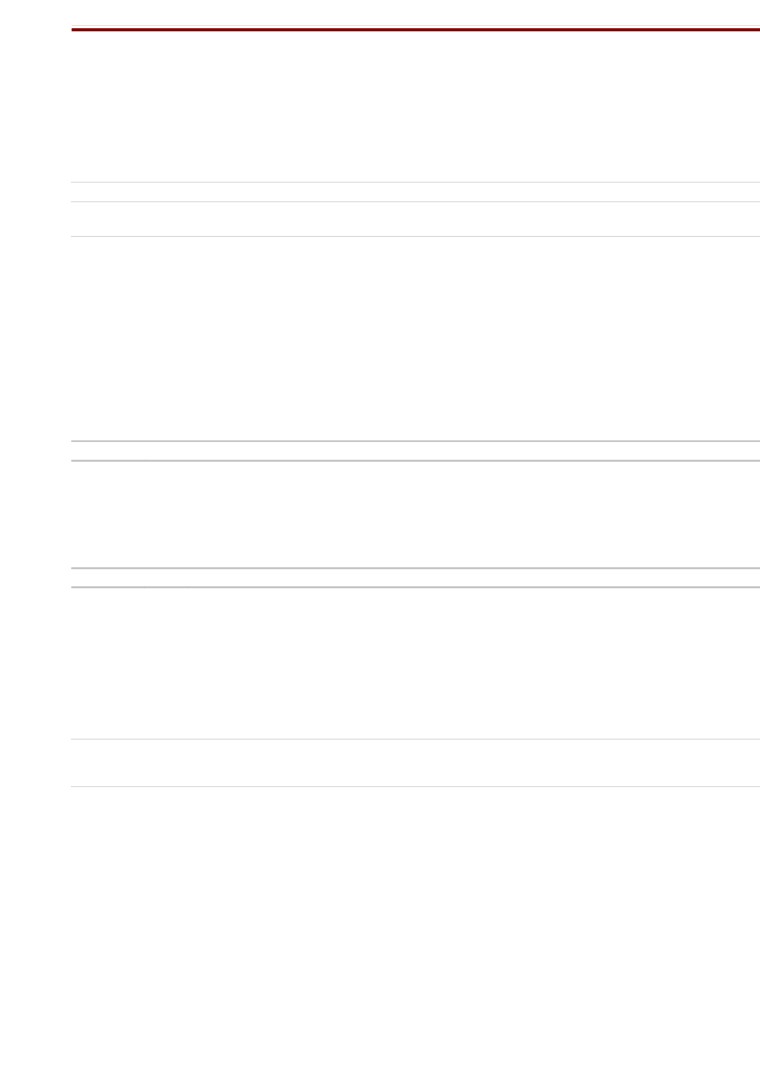
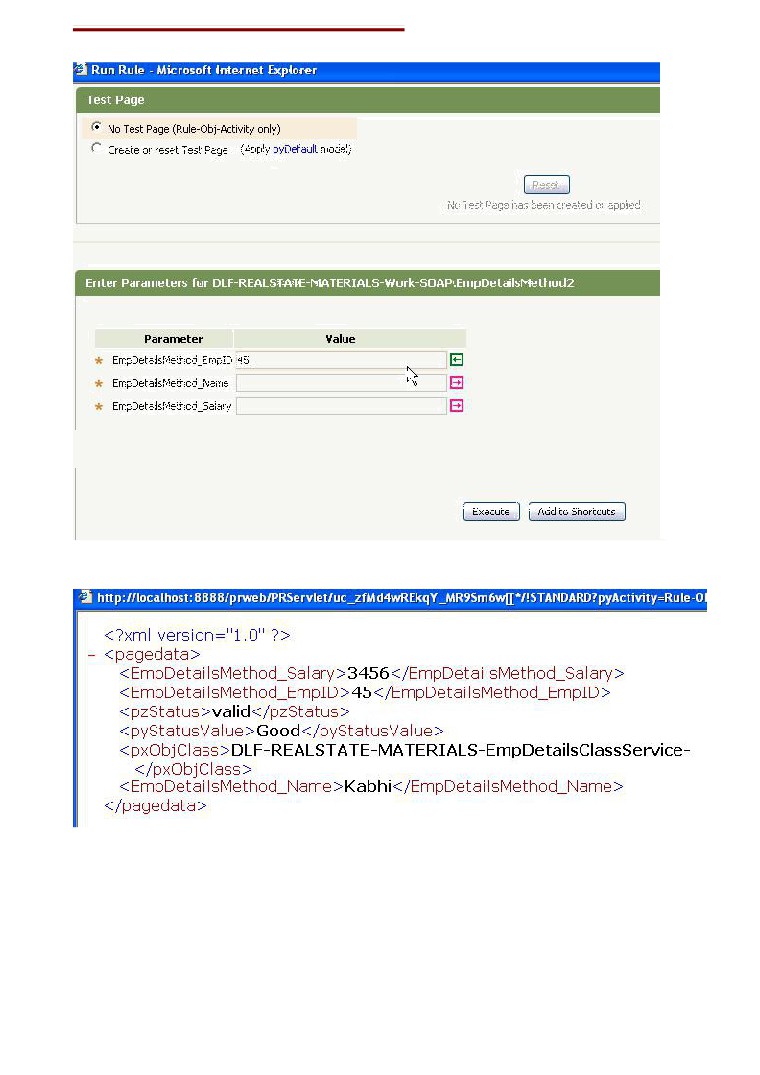
9) Obj-Open: Use the Obj-Open method to open an instance stored in the PegaRULES database or in an
external database linked to an external class, and save it as a clipboard page.
64
OpenClass: This is the Data table class,
whose instance we want to open. Here
Lock: Lock this instance, if we want to
Use
LockInfoPage: Use this page if acquiring of lock fails.
In that case, this page is created in clipboard and
Enter the property that
Select * from
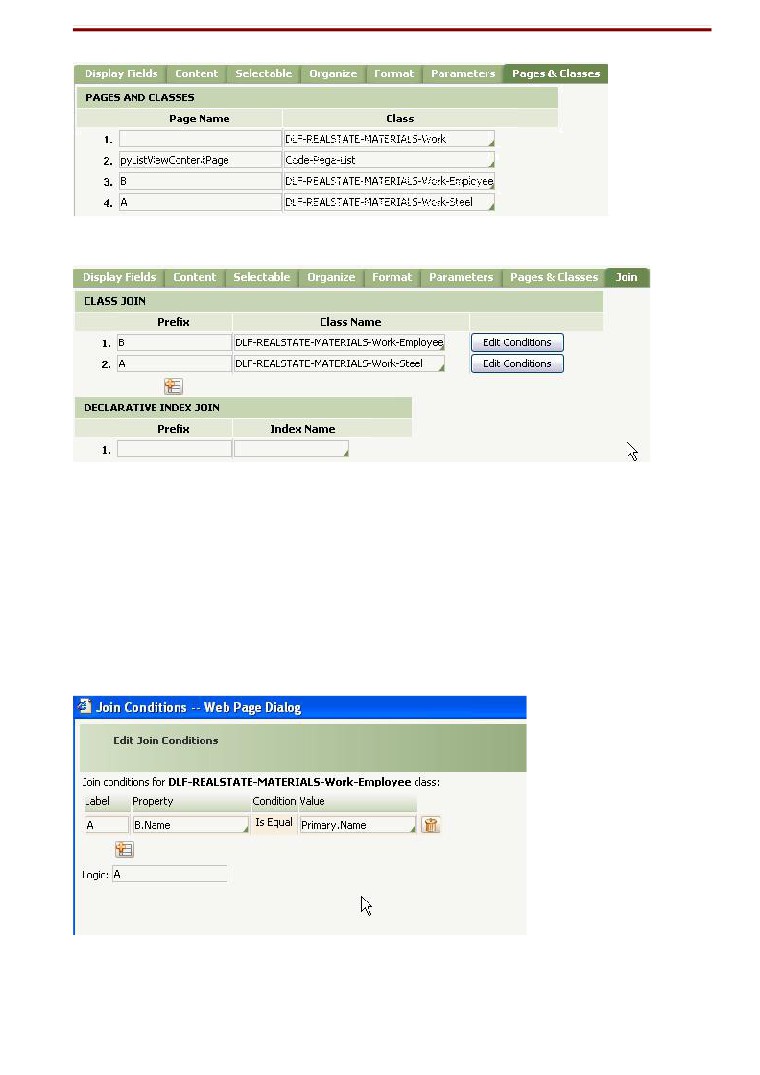
10) Obj-Open-By-Handle : This is another way to
open the database instance by using handle. Handle is
a key column (pzInsKey) which is a combination of data
class + primary key. So for the above example, the
-----
DLF-REALSTATE-MATERIALS-WORK-EMPLOYEE 23
We can put PropertyName = pzInsKey and value as DLF-REALSTATE-MATERIALS-WORK-
EMPLOYEE 23
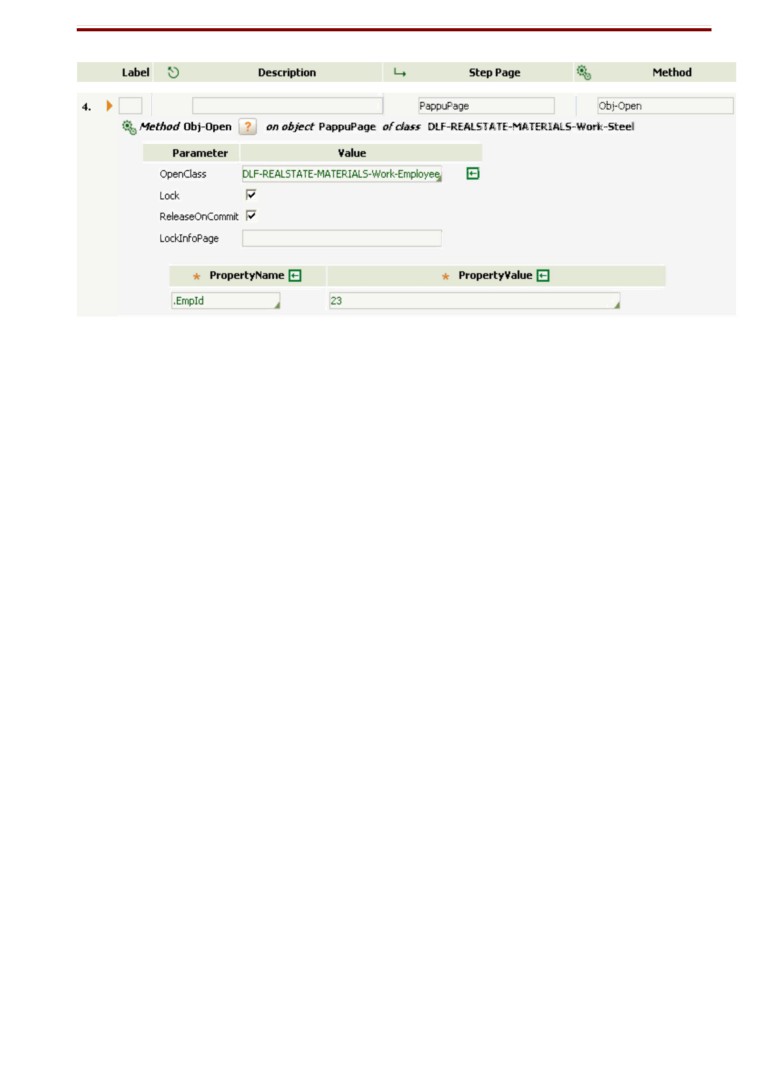
11) Obj-List : This retrieve data from a data table to the clipboard as an array of embedded pages. This
method is deprecated, as it returns the value of all the columns, hence kills the performance. Use Obj-
Browse and Obj-List-View followed by Obj-Filter Instead.
65
Page Name: Name of the page from pages and classes that will hold the record of the returned values. In
pages and classes, we put the value as: pages : MyResult. Classes : code-pega-list (Normally it should
be this class only to hold the retrieved records in embedded pages.
ObjClass: Name of the data table class whose instance needs to be searched.
RuleObjList: Optional. Identify the second key part — List Name — name of a list rule that specifies
which properties are to be retrieved.
SelectionProperty: The property specified here will take part in where clause of the query. If left
blank, all the records will come.
The query here will be: select * from <data class table> where EmpId is between 1 and 25.
13)
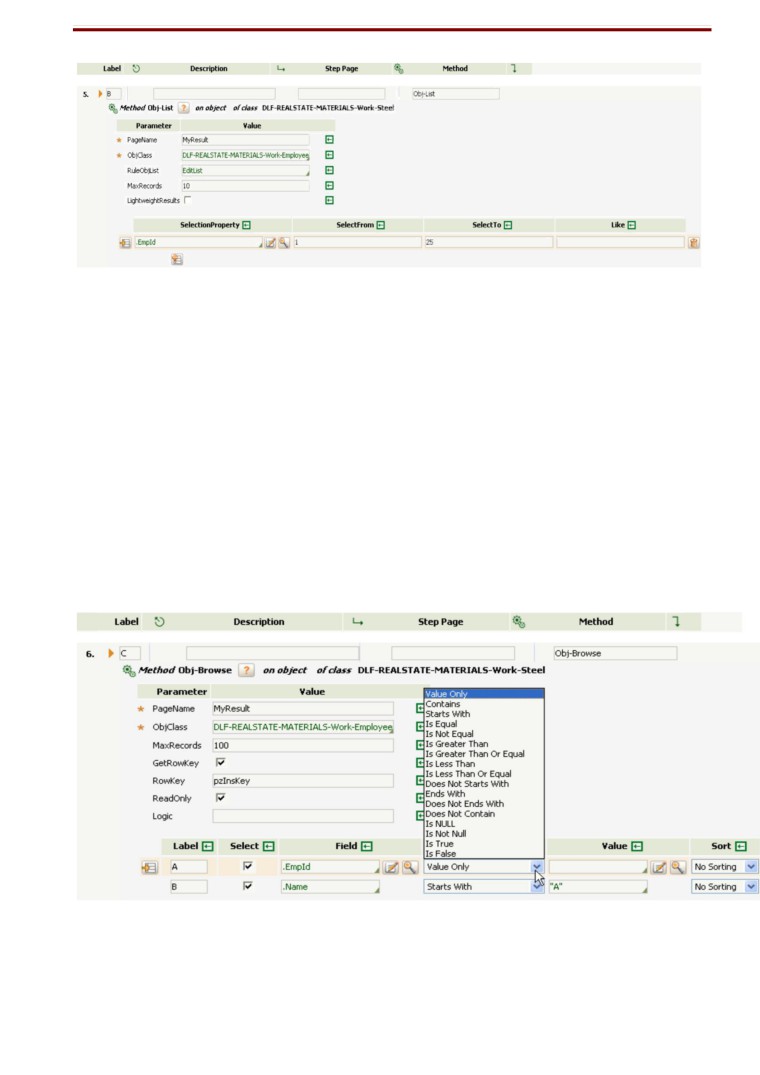
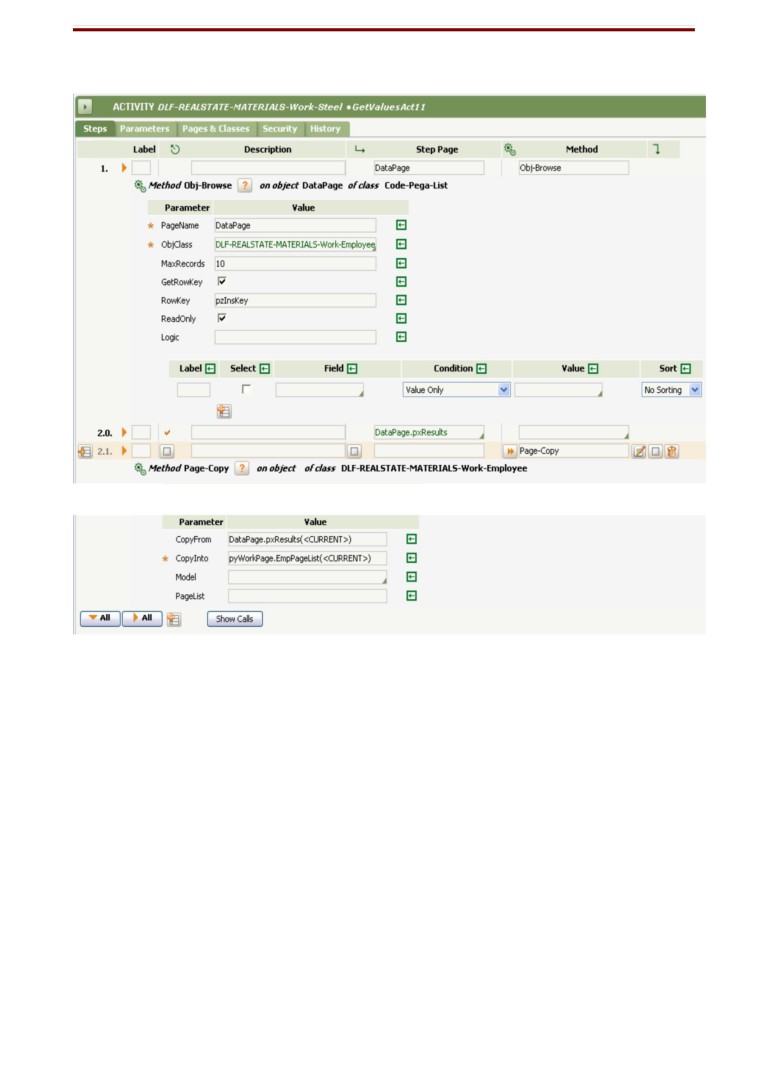
Obj-Browse : This queries the Database with only selected properties. Only
properties exposed as columns can be used as selection criteria. However, values of
properties that are not exposed as columns, including embedded properties, can be returned.
Page Name: Name of the page from pages and classes that will hold the record of the returned values.
In pages and classes, we put the value as: pages : MyResult. Classes : code-pega-list (Normally it
should be this class only to hold the retrieved records in embedded pages.
66
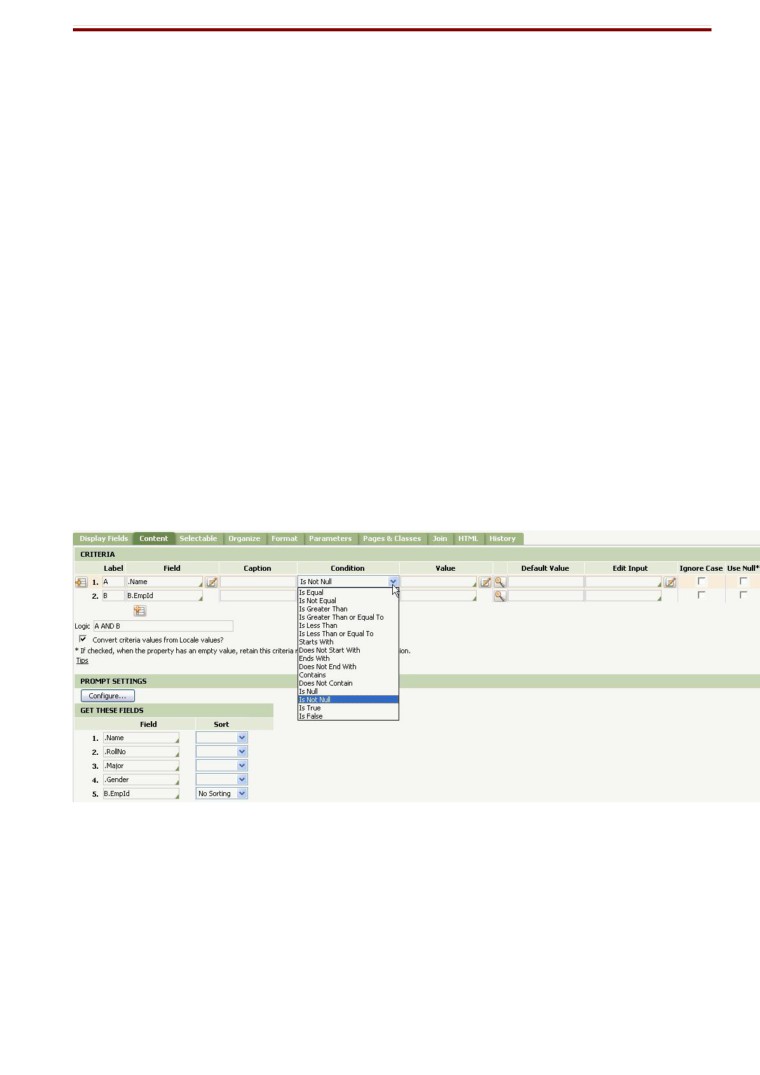
ObjClass: Name of the data table class whose instance needs to be searched.
GetRowKey: Include the primary key in the result-set.
Logic : Below logic, there are steps label (A and B). We give logic for or, and conditions. Like (A AND
B) , (A OR B), (A OR (B AND C) ).
Select: If select this check-box, only those properties will be retrieved in result-set. If check none, all
properties will be retrieved.
Field: Only exposed properties can be there in Field value. It will be used for selection criteria.
Condition: We can give a number of conditions and the property to be part of where clause must be
exposed property.
Sort: Can short ascending and descending.
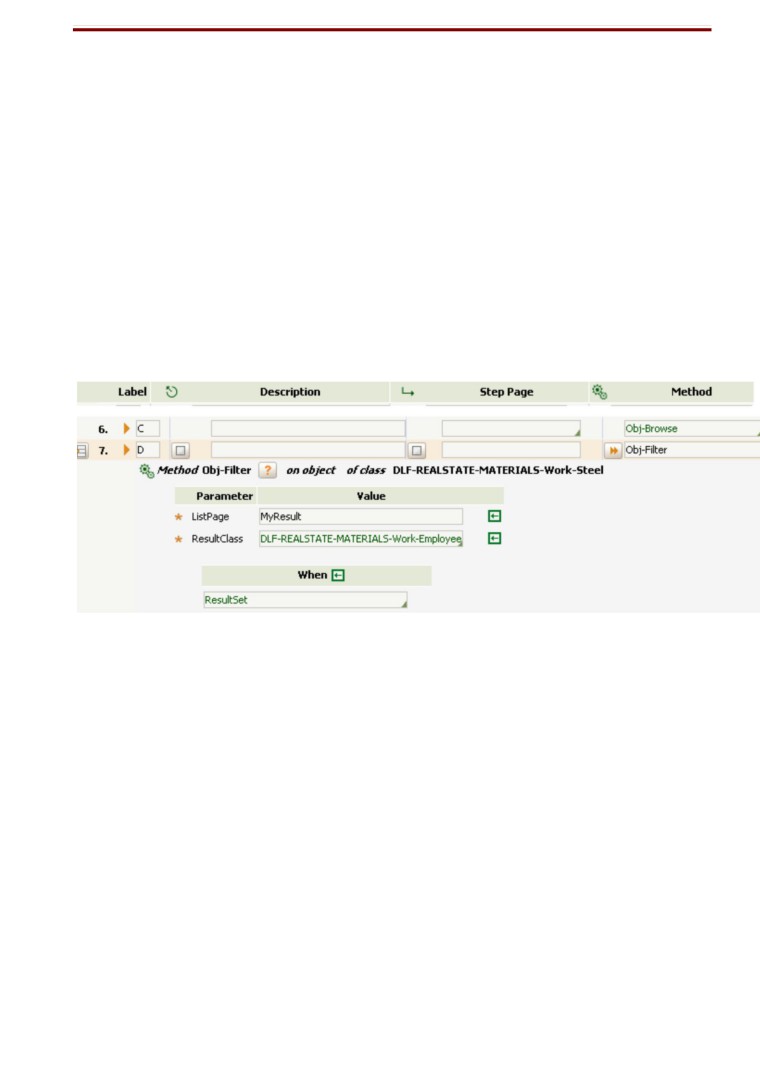
13) Obj-Filter : Use the Obj-Filter method to filter the embedded pages of a results page (such as a
Code-Pega-List page produced by the Obj-List, RDB-List, Obj-List-View or Obj-Browse methods) based
on one or more when condition rules.
We have used here Obj-Browse then Obj-Filter to filter the resultset.
List page: The page (code-pega-list) used above in Obj-browse to hold the result set as embedded
page.
ResultClass: The data table class.
When: Provide a when condition to filter the data. (Here when is .Empld < 100).
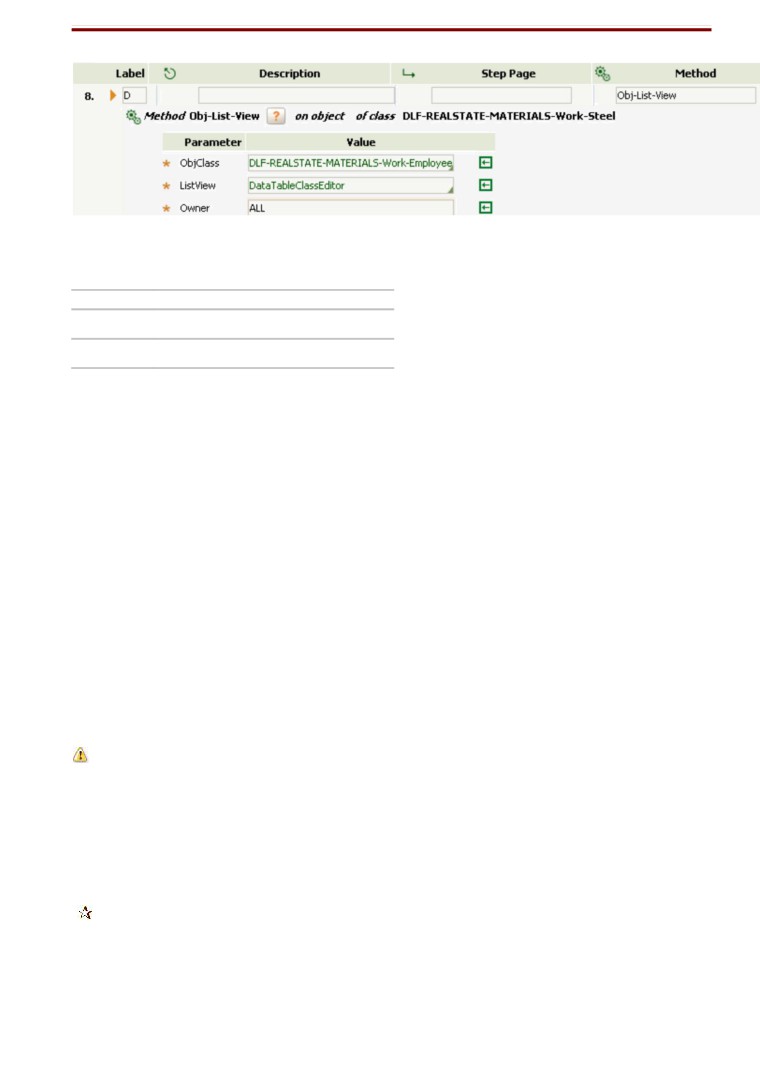
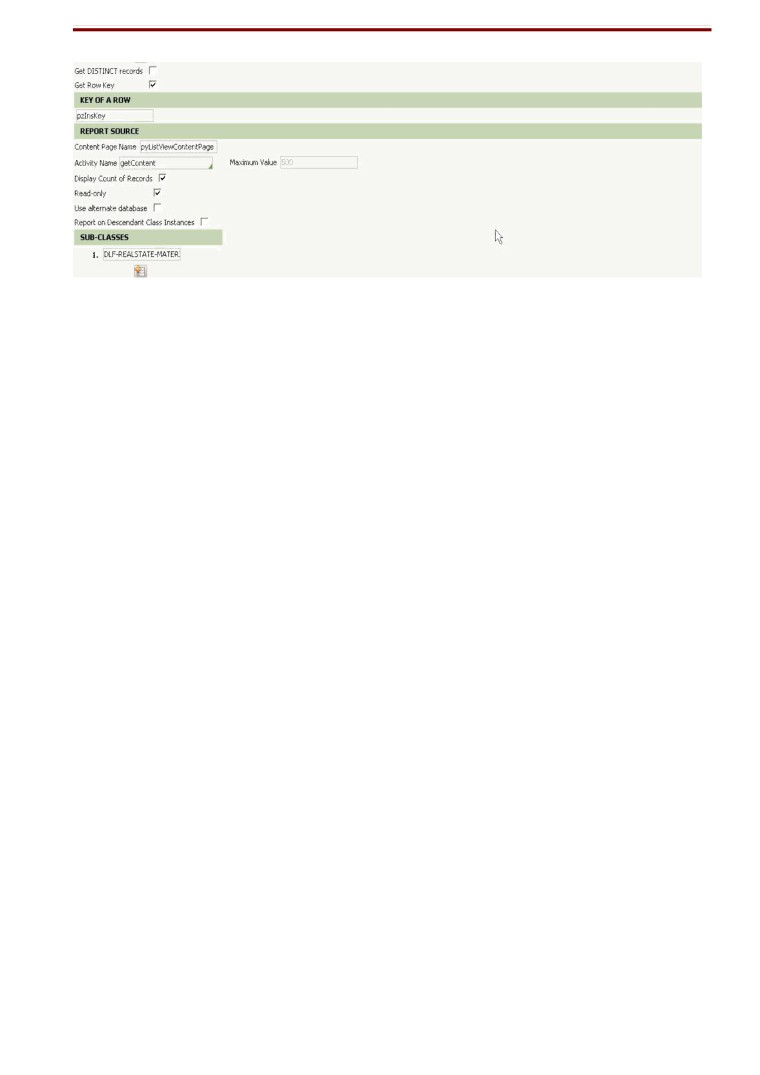
14) Obj-List-View :
Use the Obj-List-View method to execute the retrieval and sorting operations, but not the
formatting and display processing, of a list view rule.
The system uses rule resolution to find the list view rule and executes it, but does not produce any
HTML output display. The selection criteria of the list view rule and the sorting requirements (recorded
on the Content tab) are converted to an SQL query that is sent to the PegaRULES database.
The database results are organized into a results page of class Code-Pega-List. The name of
this page is determined by the Content Page Name field on the Content tab of the List View form,
(The Step Page field on the step is ignored.)
67
Parameters
Specify all three key parts of a list view rule.
Parameter
Description
ObjClass
The Data table class
ListView
The List-View Rule of the Data table class
Owner
Owner of the List-View rule
15) Obj-Save
Use this method to request that the system save a clipboard page to the PegaRULES
database or (if the page belongs to an external class) an external database.
The Obj -Save method uses properties on the page to derive the internal key under which it will
be saved. This method can create a new database instance or overwrite a previous instance with that
key.
An object that is stored in the PegaRULES database is persistent. The object is available to
other users, and remains after the requestor session that created it ends.
This method does not always cause the object to be written immediately to the database.
Often, developers use this method perform a "deferred write" operation. In such cases, later execution
of the Commit method, in the same Thread, completes the database update.
Select the WriteNow parameter to force this page (and only this page) to be written to the database
as part of the Obj-Save method. Unlike the Commit method, the Obj-Save method does not operate
on all previously marked-for-commit objects, only on the current page, and does not release locks.
You can reverse the effect of an Obj-Save method — if it has not yet been committed — with
the Obj-Save-Cancel or the Rollback method.
Cautions
0
In all but rare situations, do not save a page that contains messages and so is marked as invalid.
1
Obj-Save-Cancel
Use this method to cancel the most recent uncommitted Obj-Save method, so that the instance is not
written as part of a later Commit operation. You can also use this method to undo an Obj-Delete that
has not yet been committed.
Use the similar Rollback method to cancel all uncommitted Obj-Save and Obj-Delete
operations, not only the most recent one.
68
17) Rollback
Use this method to cancel or withdraw any previous uncommitted changes to the PegaRULES
database (and to external databases accessed from an external class) from the current Thread. All
pending Obj-Save and Obj-Delete methods are cancelled.
18) Obj-Sort
Use this method to sort the clipboard pages that are the values of a property of mode Page List. You
can specify one or more properties to sort on, and whether the sort sequence is ascending or
descending for each sort level.
Parameters
This method has two base parameters and an array of two parameters per row:
Parameter
Description
PageListProperty
Enter a property reference that identifies a target property of mode Page List to be sorted.
Class
Identify the class of the pages within the Page List property.
SortProperty
Enter the property based on which we’ll sort the pages.
Descending
Select to cause the method to sort in descending order for the property. Clear the box to sort in ascending order.
19) Obj-Delete
Use the Obj-Delete method to delete a database instance corresponding to a clipboard page and
optionally to delete the clipboard page too. You can cause the deletion to occur immediately, or (more
commonly) defer deletion until a later execution of a Commit method.
This method can operate on objects of both internal classes (corresponding to rows in a table in the
PegaRULES database) and external classes
(corresponding to rows in an external relational
database).
The Obj-Delete method uses the class of the page to obtain the appropriate Rule-Obj-Class instance.
It uses the table name, key fields, and other aspects of the class rule to mark the instance for
deletion. Unless you check the Immediate check box on the activity form, the database deletion does
not occur until the system next processes the Commit method.
You can reverse or cancel a previously executed Obj-Delete method by using the Obj-Save- Cancel
method (like the method Obj-Save can be reversed), unless the Immediate box is selected or the
Commit method has already occurred.
Parameters
This method has two parameters:
Parameter Description
Remove
If selected, the system deletes the page identified in the Step Page column of this step from your clipboard and marks the
corresponding persistent instance for deletion.
Immediate
If selected, the system deletes the database instance immediately (commits this deletion).
To delete the database instance immediately from the database, select this box. If this box is cleared, the database
instance is deleted by the next Commit operation.
69
Results
The system finds the clipboard page identified in the Step Page column of the current step and
checks whether it the current requestor holds a lock on the corresponding object.
If the object is not locked (and the class rule allows locking), the method fails and no clipboard or
database changes occur.
If the page is locked and the Remove parameter is selected, the system deletes the page. It marks
the persistent object in the database for deletion, or deletes it immediately, depending on the
Immediate parameter.
The system automatically performs index processing for an immediate delete, or later when a Commit
method follows the Obj-Delete method.
Fail and Warn conditions
These situations cause the method status to be Fail or Warn.
You cannot delete an instance without locking it first (usually with the Obj-Open
method). You cannot delete an instance while it is locked by another requestor.
20) Obj-Delete-by-Handle : Delete an instance by handle.
20.5) Commit:
Use this method to commit all uncommitted database changes. This method writes all the instances
specified by one or more earlier Obj-Save methods to the PegaRULES database (for internal classes)
and to external databases (for external classes).
Decision Methods (Property-Set-Decision-)
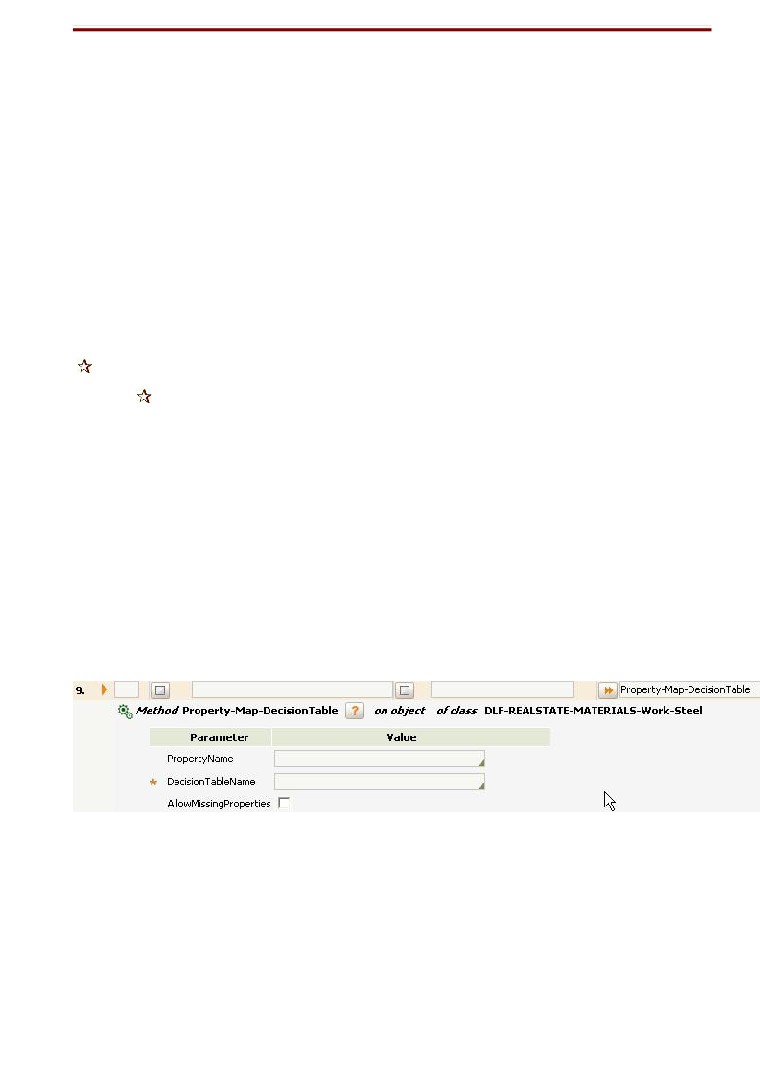
21) Property-Map-DecisionTable
Use the Property-Map-DecisionTable method to evaluate a decision table rule and save the result as the value of a
property.
PropertyName: Property to receive the return value of Decision Table.
22) Property-Map-DecisionTree
Use the Property-Map-DecisionTree method in to evaluate a decision tree rule (Rule-Declare-
DecisionTree rule type) and store the result as the value of a property.
70
PropertyName: Property to receive the return value of Decision Table.
Input: Optional. Enter a literal value or property reference that is the source value for the decision tree
evaluation.
When provided, this value is used for comparisons in the top-level structure of the true, for evaluations
with no left-hand value, such as:
if > "Hello"
When you leave this blank, the system uses the value of the Property field on the Input tab of the
Decision Tree form for the rule.
23) Property-Map-Value
The Property-Map-Value method evaluates a one-dimensional map value (Rule-Obj-MapValue
rule type) defined in the parameter. The method sets the result as a value for a Single Value property.
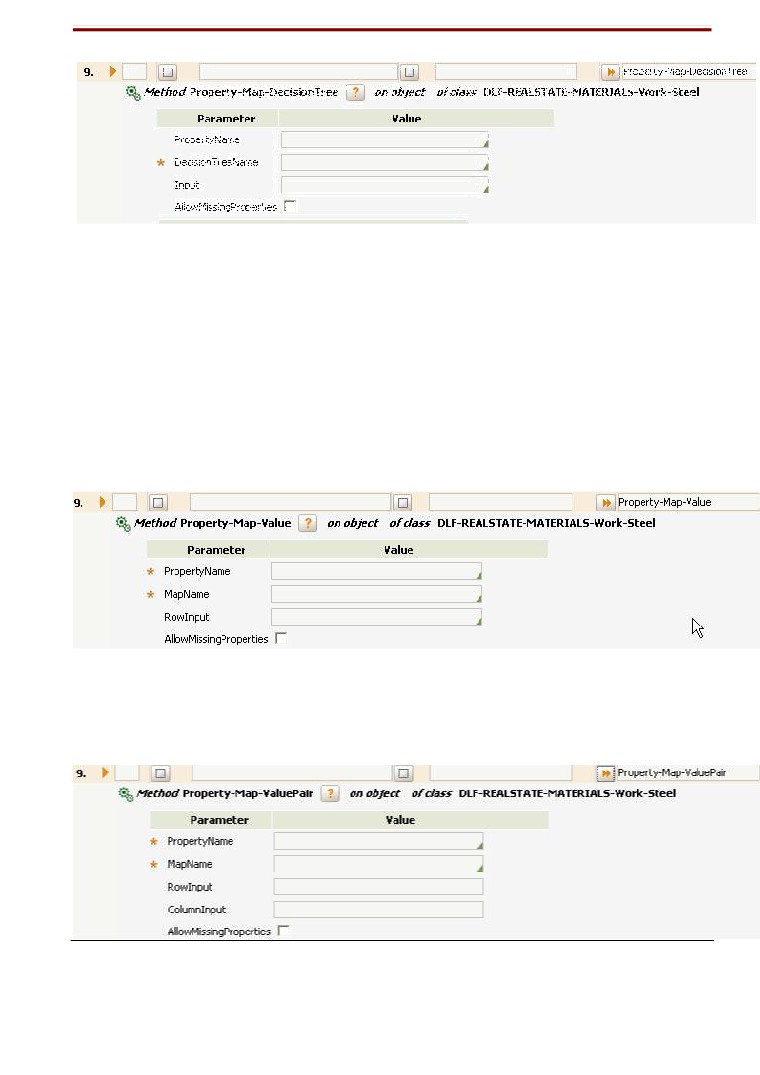
24) Property-Map-Value-Pair
The Property-Map-ValuePair method evaluates a two -dimensional map value rule identified in
the parameters. It sets the value that results into a specified property.
71
25) Property-Seek-Value:
Use this method to initiate backward chaining computations for the value of a property, based
on Declare Expression rules.
26) Property-Set-Messages
Use this method to associate a text message with a property or a step page. The system reads
the appropriate property and adds the message to the page. You can provide the entire literal text of
the message, or reference a message rule key that in turn contains message text.
Message: This field can contained a pre-defined message or a Field Value.
27) Property-Set-Special : Used to set special properties like py properties. But deprecated now. We
can use the Proprty-Set method only.
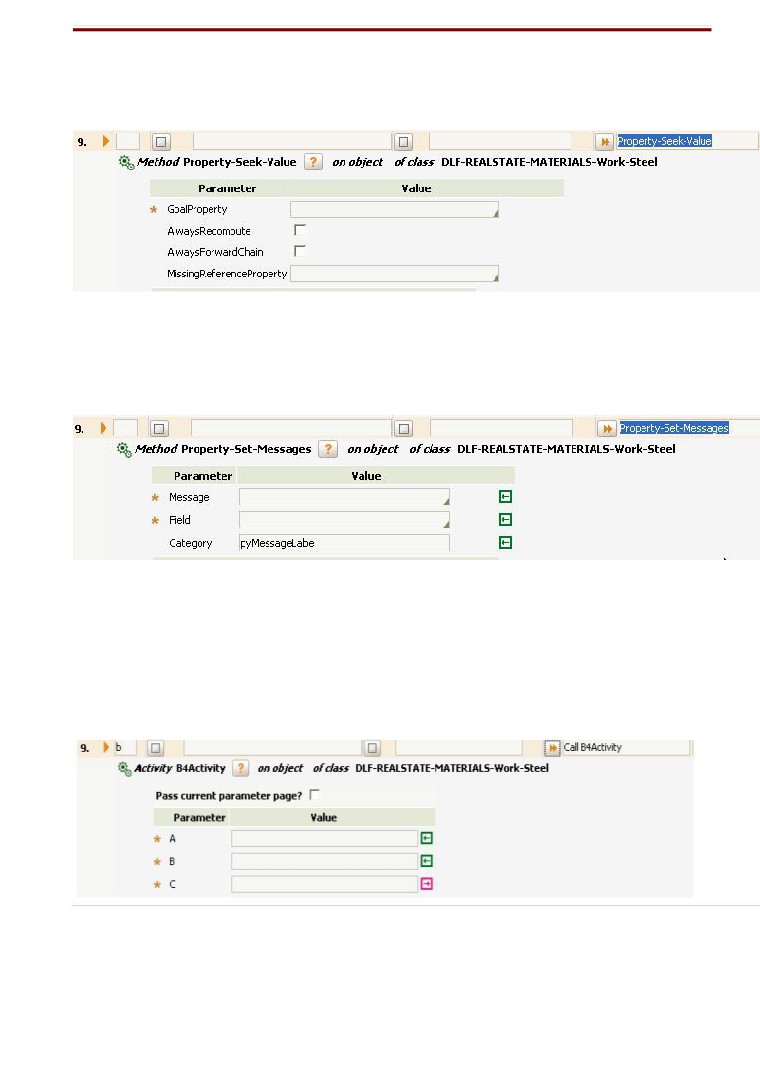
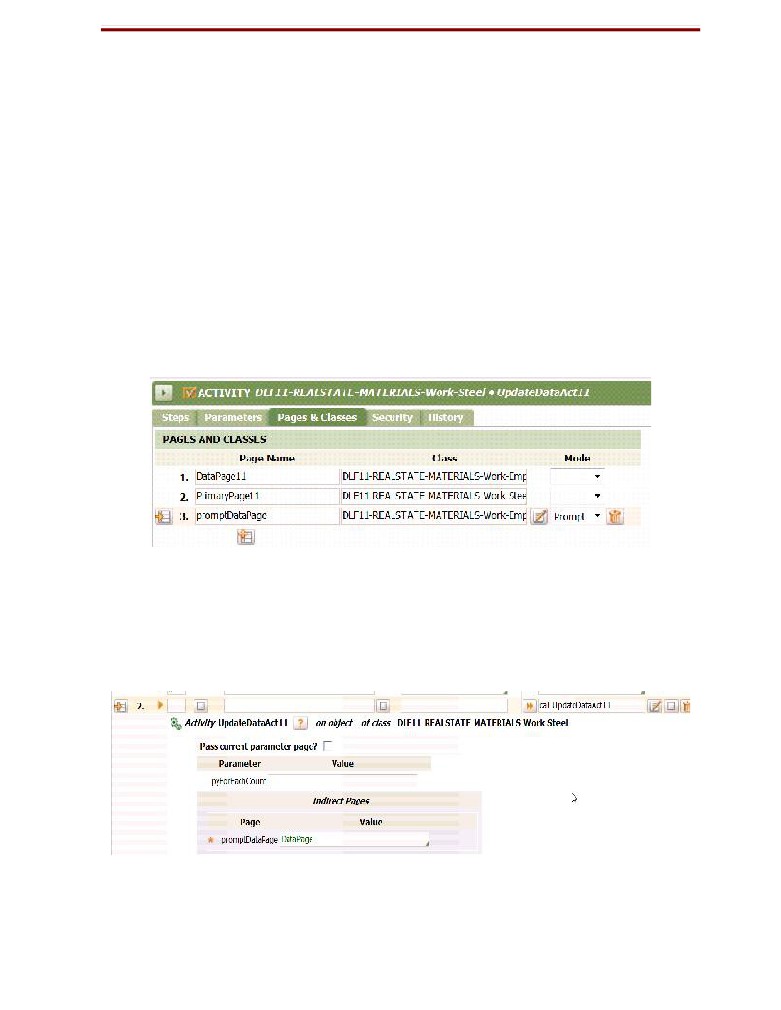
28) Call <Activity Name>
Use the Call instruction to cause the current activity find another specified activity and execute it.
When that activity completes, control returns to the calling activity.
Pass current
Select to cause the calling activity's parameter page to be passed to (shared with) the called activity, which can
parameter page?
alter its contents in any way. Clear to use the array that appears below the check box to pass parameters to the
called activity.
If you select this box, the parameter page remains available to the calling activity after the return. This capability is
72
sometimes known as call-by-reference.
If you select this box, make sure that input parameter values needed by the called activity are present on
the parameter page before calling the activity.
Or pass the parameters required by the called activity. Here we pass two input parameter (A and
B) and one output parameter i.e C.
29) Branch <Activity Name> : Similar to call but.
Use the Branch instruction to cause the current activity to find another specified activity and
branch to it without a return. When the system executes a Branch step, control transfers to another
activity found through rule resolution. Execution of the original activity pauses.
When the branched activity ends, processing of the current activity ends also; no steps after the
Branch step are executed.
You can pass parameters to the target activity, or you can share the current activity parameter page
with the target activity.
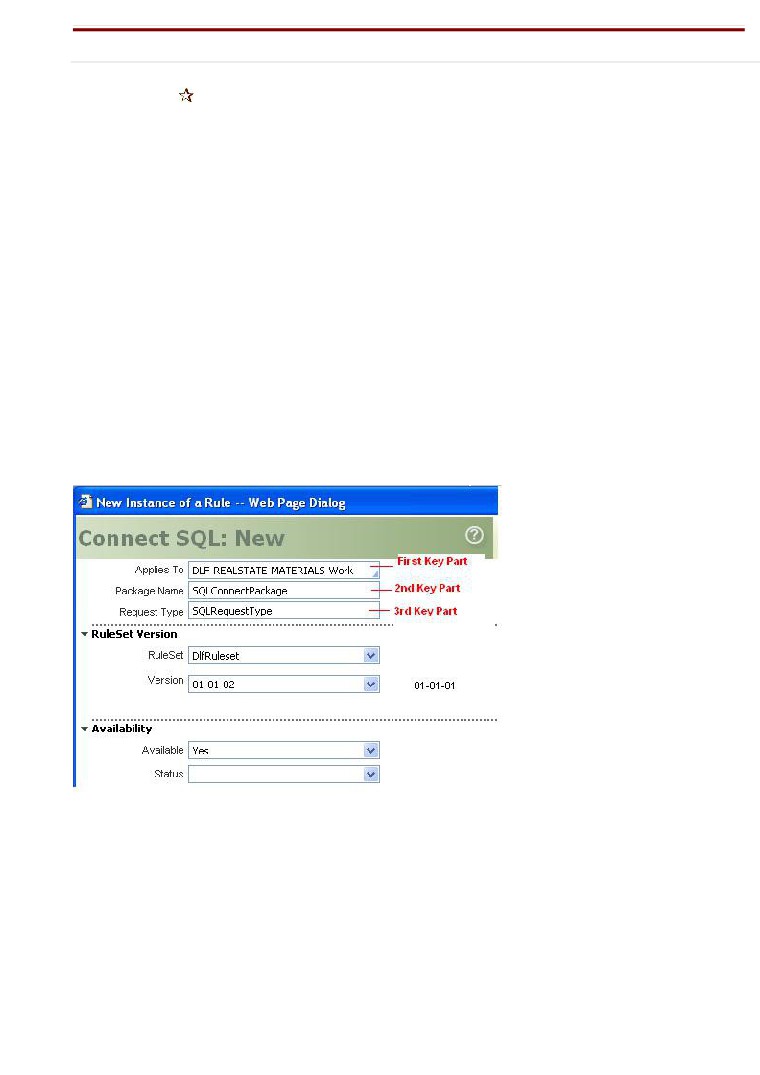
RDB Methods
The four RDB Methods RDB-Open, RDB-Delete, RDB-Save, RDB-Browse are not used individually.
But they are used in conjunction with Connect SQL rules. (New -> Integration-Connectors -> Connect
SQL).
73
30) The RDB-Open -> will use the SQL query written in the Open Tab of Connect SQL tab.
Use this method to retrieve a single row (record) of data from an external relational database and add
the retrieved data into a specified clipboard page as property names and values.
Use this method in conjunction with a Connect SQL rule that contains SQL SELECT or EXECUTE
statements in the Open tab. Define the SQL statements so that the database returns exactly one row.
OpenClass -> The data class name, whose instance we want to open.
RequestType -> 3rd Key Part of the Connect SQL rule (See in previous page)
Access-> MSSQL, ORACLE, SYBASE, DB2 etc.
31) The RDB-Delete -> will use the SQL query written in the Delete Tab of Connect SQL tab.
It has the same parameters as above.
Use this method to delete a row or rows from an external relational database using SQL. This method
operates in conjunction with an SQL statement in the Delete tab of a Connect SQL rule (Rule-
Connect-SQL rule type) that contains the DELETE, TRUNCATE or DROP SQL statement.
32) The RDB-Save -> will use the SQL query written in the Save Tab of Connect SQL tab. It
has the same parameters as above.
74
Use this method to save the contents of a clipboard page into a row of a relational database. The
system saves the properties on the specified step page to the specified table in the database.
This method operates in conjunction with a Connect SQL rule that contains SQL statements such as
INSERT, UPDATE, and CREATE statements on the Save tab.
33) The RDB-List -> will use the SQL query written in the Browse Tab of Connect SQL tab.
Use this method to retrieve rows from an external relational database and place the results as
embedded pages in a specified step page of class Code-Pega-List.
This method references a Connect SQL rule instance, and executes SQL statements stored in the
Browse tab of that rule instance. The search can do anything you can specify in a SQL statement,
such as a SELECT WHERE statement. Any constraints on the returned data are in the SQL.
ClassName
Enter a class name, the Applies To key part of a Rule-Connect-SQL rule.
Identify the exact class of the rule. The system does not use class inheritance to find the Rule-Connect-SQL rule
instance. This is also the class of the pxResults embedded pages which hold the search results. It can be a class that
you created to hold the results.
This class is distinct from the class which the RDB-List method searches, which you identify in the SQL code in the
Rule-Connect-SQL rule.
MaxRecords
Optional. Enter a positive integer that is the maximum number of rows to return in the search results.
BrowsePage
Optional. Identify the top-level page into which the search results are to be returned. The pxResults pages are
embedded in this page. If left blank, the system uses the step page you specified for the RDB-List method in the
activity step.
If you select this option, do not select the RunInParallel option. Parallel operations cannot update the single top-level
browse page.
ApplyDeclaratives
Select to cause change tracking for Declare Expression and Declare Constraint rules
processin to be applied to the properties returned by this method.
You cannot select this box if the RunInParallel box is selected.
Complex and Dynamic SQL Statements in Connect SQL.
In Connect SQL Rule, in browse tab, we can include lots of complex queries. Note the results can
be either a record or sets of record. Hence include a page/page-list accordingly in the browsePage of
RDB-Browse method.
75
0
Select MarketPrice as ".MarketPriceprop" : To include column name that includes lowercase
letters, include as.
1
WHERE zipcode={myPage.zipcode Integer} : Integer is the database specific data type.
2
References to elements of Page List and Value List properties must contain integer constant
index values such as 7 or 23 or keywords such as <LAST> or <CURRENT>.
3
You cannot use the Param keyword in these property references.
Table or Class name Literals.
the Class keyword is similar to the Table keyword. With Class keywords, use the format:
{class:ClassName}
for a direct reference to a fixed, known class. or:
{class: {page.property}
for an indirect reference that at runtime becomes the class.
For example,
{class:Data-Customer-Address-Details}
Table keyword
To use Table keywords, follow the format:
{Table:TableName}
for a direct, static reference to one Database Table instance, or:
{Table: {page.property}}
for an indirect reference to a property that, at runtime, contains in its value a Database Table name. For example,
{Table: {CustomerMaster.OracleAddressTable}}.
Use this syntax when entering a SELECT statement:
SELECT columnname AS ".propertyname" or "page.propertyname".
to select all the columns in the table. Use it to replace a SELECT * from ... statement.
For example:
SELECT {all} from {class: Data-Customer-Summary}
Calling a stored procedure
{call procedure({resultset})}
we use resultset keyword.
To create multiple resultsets in one procedure, place a {resultset} marker for each parameter for each example that returns a
resultset. For example:
{
{resultset} = call
testFunc( {dataPage.OutProperty1
out}, {dataPage.inkey1}, {resultset},
{dataPage.inkey2},
{dataPage.OutProperty2 out},
{dataPage.inkey3}, {resultset})
}
To include SQL debugging and return status information from the database software, enter a line at the top of your SQL
code in the format:
{SQLPage:mySQLPage}
76
Enter the name of page on which the system records the error messages. The page can have a class or be a
classless page.
When the Connect SQL rule executes, the system creates a page with this name and adds two properties:
0
pxSQLStatementPre — The SQL you entered in the Connect SQL form.
1
pxSQLStatementPost — The SQL you entered in the Connect SQL form tab with the references
resolved to show their values, so you can verify the references.
If errors occur, additional properties appear on this page:
0
pxRDBError — An error message from Process Commander.
1
pxRDBSQLCode — A result code from the database access driver.
2
pxRDBSQLVendorError1 — An error code from the database vendor.
3
pxRDBSQLVendorError2 — An error code from the database vendor.
4
pxRDBSQLVendorMessage1 — An error message from the database vendor software.
5
pxRDBSQVendorMessage2 — An error message from the database vendor software.
To Map to external DB. We can create a instance of Data-Admin-DB-Name.
New -> SysAdmin -> Database.
Use configuration in preferences -> configuration in prConfig.xml
Use JDBC URL : Provide JDBC URL, Username and Password.
Use JDBC Connection pool : Use JNDI Resource pool.
In Advanced Tab, we have connection pool size, and Fail-over Data base.
77
To return Multiple ResultSet
Use keyword Mutiset.
The resulsets will be stored inside the browsePage which must be of code-pega-list. But only in SQL
Server and Sybase.
ASIS KEYWORD
Used for dynamic SQLs. Store the dynamic part of SQL statements in a property in clipboard.
For example, you can create a text property named DynamicWhere and use a Property-Set method to store the
value: "pyLabel like 'Mexico%'"
Then, in a Connect SQL rule, you can use this as a WHERE clause, using the
syntax: where {ASIS: pyWorkPage.DynamicWhere}
The ASIS keyword is essential, so that Process Commander does not place spaces or double quotes around the value.
0
Java: Used to write custom java code.
1
Connect SOAP: This is used to connect to the SOAP services method. This method is used by the
connector Activity to
connect to a SOAP services. See Integration section for more details.
Similarly Other connect methods also are used to connect to the respective services.
Iteration in Activities.
Iteration in activities can be done using for loop, for each page, for each embedded page etc.
Giving 3 ways to iterate in activities.
0
Using <CURRENT>
This <CURENT> tag holds the current index of iteration. It is updated automatically in each
iteration. Note in the below screen-shot. We are iterating on the pagelist EmpPageList (This is
created in the clipboard, if we use this pagelist in repeating layout in a flow-action to collect
values).
78
Iterate on .EmpPageList. Under iteration, we have several sub-steps (1.1 to 1.4)
0
Create a new page (for data class )
1
Set Properties in the page that we want to save in data-base.
2
Primary page refers to pyWorPage here. EmpPageList (<CURRENT>).EmpId = EmpPageList
(1).EmpId in first iteration, EmpPageList (2).EmpId in second iteration etc.
3
Save the page in data-base.
So in each itration, we are collecting values for a single page or single record of repeating layout and
saving in data base. The iteration will perform 3 cycles here, as we have 3 records.
2.) Using parameter pyForEachCount
This is a parameter passed automatically to the activity by PRPC Application only when the activity
uses looping.
To access it, we just need to add this parameter as input, in the parameters tab in the activity.
79
Similar to above, Param.pyForEachCount holds the index of current iteration. The same concept as
above.
3.) Using local variable.
In parameter page, we have entry for local variable. Update a local variable there.
Now in the activity, initialize this variable to 1. Use this variable as index, and in each sub-
step, increment it manually.
Get values from Data Tables and display in flow action.
80
In Pages and classes, use these values.
0
Obj-Browse method used to get the records from the Data table.
1
Iterate on the resul-set (returned by Ob-Browse method as pageList DataPage.pxResults.
2
Copy each page from pageList to our pyWorkPage.EmpPageList (PageList declared in
our class).
All the values of the pageList will be available in the Clip-board. If we use the pagelist properties in
a repating layout, the results can be shown.
Creating WorkBasket
New-> Organization -> WorkBasket
81
Give the name of WorkGroup it contains. Similarly create a Workgroup. New -> Organization
-> WorkGroup.
Give the name of WorkBasket in the WorkGroup.
Now in the OperatorID provide the WorkGroup and WorkBasket name under work-Setting tab
82
Sending Work object to Worklist/Workbasket
An assigment is a state of a Work Object which requires some action by a user. Usually, the business
process will require that particular Work Objects be performed by specialized users. PRPC handles
this situation using Worklists.
A Worklist is, as its name indicates, a list containing the Work assignments that are assigned to a
specific operator. Within a flow, a Work Object assignment is sent to a specific user through the use of
a Router Shape. In the configuration section for the router, the developer shall specify "ToWorkList" on
the "Rule" field and then, as "Parameter", the Operator ID to whom he wants to send the Work Object
assignment.
Figure 4. Properties of a router shape using ToWorklist routing rule in PRPC 5.5
The assignment properties will need to be configured according to the rule used to route the Work
Object:
Figure 5. Setting the routing type on the properties of an assigmnet shape in PRPC 5.5
As shown in Figure 4, the ToWorklist routing rule takes as parameter a user ID, to know to the
worklist the assignment must be sent. There is an adittional option to check, before routing the object,
the availability of the selected operator. When a Work Object assignment is routed to an operator
different than the one who is working on it, PRPC shows a Review Harness as depicted in the image
below:
83
Figure 5. Work Object has been routed to a different operator in PRPC 5.5
Work Basket
A Workbasket is a queue of Work Object assignments that are not directly linked to an operator, so a
group of operators can work on the assignments contained in it. Workbaskets are related to an
organization unit, a workgroup and a calendar, and within a flow, work objects are sent to them
through the use of a Router Shape. In a similar way as with WorkLists, the router shape must be
configured using the rule "ToWorkbasket", setting as parameter the name of the selected workbasket.
Do not forget to set the routing type to "Workbasket" on the assignment's properties.
Figure 6. Properties of a router shape using ToWorkbasket routing rule in PRPC 5.5
In a similar way as when routing to Worklists, PRPC notifies the operator that the current Work Object
has been routed to a work list through a review screen:
Workbasket routing can also improved upon when used in conjunction with Skills. A specific User can
have different skills in different levels, and Work Objects assignments can be sent to an skilled
workbasket allowing only the users with a certain skill at a certain level to work on them. Again, this
configuration is made through the Router Shape, configuring it to use the rule ToSkilledWorkbasket,
which parameters are the required skills and levels and, of course, the selected workbasket.
Also a workbasket can be used in a way that only allows a subset of users to access certain work
object assignments, even if there are more users that have access to that specific workbasket. This
kind of filtering can be accomplished using skills.
84
Figure 8: displays how different skills with different ratings can be defined for an operator. Skills are
instances of Rule-Admin-Skill. PRPC provides standard skills (English, French, Java, HTML...).
In order to use a skilled workbasket, the router shape will have to be configured. The following image
displays the required rule and its parameters:
Figure 9. Properties of a router shape used for Skilled Routing in PRPC 5.5
In this case, the Router must be configured to use the rule "ToSkilledWorkbasket". As parameters,
this activity takes the destination workbasket and also the required skills and its levels. Create the skill
and it will be available for selection here. Skills can be set as "required", by checking the Required
checkbox or as "desired", without checking it.
85
Dynamic select
When we want to populate data from Database, to be filled in a dynamic select (drop-down) we need
this concept.
It always retrieves unique values in the field. Duplicate values are not shown.
Ways to do it.
1) Create an activity (to fetch data from DB)
This Activity browses a Data Table and fetches the records from it and places it in Step-page.
Now we call show page, so that it’ll provide the data in XML format, which will be used by the
dynamic select
Property to parse and display the data.
Note: The data class is DLF-REALSTATE-MATERIALS-Work-Employee
Now, we need to modify the property in the UI.
86
We want to make Name as dynamic select. So click on the
button of Name field. And in the
Display As
Give “DynamicSelect”. Now click the magnifier symbol
again near it. It opens a parameter page.
Fill the details.
Options In Dynamic Select
If we select List View: Then Provide :
0
Class name where the List View is present.
1
Name of the List View.
If we select Activity
0Class Name of Activity
1Activity Name
2Class whose properties will be returned.
87
Select ID: We can give a unique ID to this Dynamic Select Property, so that it can be referred in other
Dynamic Select.
Default Caption: The default first selected name in the drop down. Like States…
Property for Option Display: The property from the returned result -set whose value would be
shown. Property for Option Value: The name of source property that will capture the values of above
property. Normally it’s same as the “Property for Option Display”
FILTERS
Param Name: Name of the Parameter that the above List View or Activity will receive.
Select ID: Name of the Select ID (of a different Dynamic Select which will affect our value).
If you choose Advanced.
Next Page.
88
Select ID: We can give a unique ID to this Dynamic Select Property, so that It can be referred in other
Dynamic Select.
Source: Enter the query string form of the activity to call, including values for parameters. Click the
magnifying class button (
) to open an Activity Picker window for guidance on entering input
parameter values. Use URL encoding (commonly called percent-encoding) for blanks and other
special characters. Use this syntax:
pyActivity=myClass.myActivity¶m=value
Default Caption: The default first selected name in the drop down. Like States…
Value: Enter a semicolon-delimited string of property names that form the values of the HTML Option
elements in the format:
propertyName1; propertyName2;...
For example, the following string sets the values of a Dynamic Select to the class names in a
list: pyClassName.
ParentID : Optional. Enter the ID of another <SELECT > element that, when changed, triggers a refresh
of this control.
TargetID: Optional. Complete this field when the results of another Dynamic Select control on the same
harness, section, or HTML form depends on the results selected by users for this Dynamic Select control.
This technique is known as cascading.
Enter one or more semicolon-delimited text value to identify the ID(s) of the other Dynamic Select
controls whose values depend on the value selected in this Dynamic Select control. When a user
selects a value in this Dynamic Select control, the system appends the value to the Source of the
target Dynamic Select control. The activity of the latter control is then executed to populate it. The
Source of the target control must end with the following syntax:
parameterName=.
The value of the selected option in the first Dynamic Select then becomes the value of the parameter
in the activity of the target Dynamic Select.
89
Output:
Auto Complete
This is the feature similar to that we see in Google.
The concept is similar as above. We need to create an activity to browse the values from a data table.
Now we want to make Name as AutoComplete. So click on the
button of Name field. And in the
Display As
Give “AutoComplete”. Now click the magnifier symbol
again near it. It opens a parameter page. Fill
the details.
See next page
90
Activity Applies To: Name of the class which contains the activity.
Activity Name: Name of the activity.
Search Property Applies To: The data table name which will provide the data for the AutoComplete.
Display Field : Name of the property in data table.
Minimum search Characters : No. of characters after the AutoComplete will work.
If we choose Clipboard Page.
91
Clipboard Page Name, Class Name, Property Name..(Provide these Details)
Declared Pages (Rule-Declare-Pages)
Declare pages are read -only clipboard pages that can be available to multiple users on the
system (node level) or just one user (thread level).
92
Note:
The properties in the declare pages can only be modified by the Activity defined in the declare
page Load Activity. This activity is of type : Load Declarative Page.
For the page to refresh, we need 2 conditions.
1) The Refresh timings declared must be expired. 2) The when condition must return false.
0
Declare pages are not subject to Rule Resolution
Note That, If above conditions meet also, it’s not necessary that the Declarative page will be calling
the activity and refreshing at the background. If we reference the properties in the Declare Pages, in
our flow, activities, Decision rules etc, then the Declare page refreshes and calls the Load Activity
(Provided above 2 conditions satisfy).
Load Activity used in Declare Pages.
93
Circumstance
A circumstance is an optional qualification available for all rules. Using a circumstance allows your
application to support multiple variants of a rule. They allow you to specify that different rules should
be used for different situations.
For example, we have a property called
customerType. If “Gold” -> 10 % discount.
If “Silver” -> 5 % discount.
If “Platinum” -> 15 % discount.
So we create Circumstances for same rule (activities, Flow actions etc) based on this property.
Types of Circumstance
0
Single Property value Circumstance.
1
Single Property and Date Property Circumstance.
2
Multiproperty/Mutivariant Circumstance.
3
Date Range Circumstance.
1) Single Property value Circumstance.
We create a base rule. Then use the save-as button to create a circumstance, the save-as
form will provide the circumstance options and date range options.
94
2) Single Property and Date Property Circumstance.
Here we provide the circumstance based on single property as well as date property.
95
3) Date Range Circumstance.
Here we provide the date range along with the property, the circumstance will be valid.
4) Multiproperty/Mutivariant Circumstance.
For multi property/Multivariant circumstance, we need to create 2 things.
0
Circumstance Template
1
Circumstance Defination
Circumstance Teemplate.
New-> Technical -> Circumstance Template.
Provide the properties that you need for circumstance.
Circumstance Defination
New-> Technical -> Circumstance Definition
Provide the properties values that you need for circumstance in the definition.
We can create more than one definations.
96
Note: Here two definitions we have created,
one with RollNo = 1, Name= “Abhi”, Gender = Male./ RollNo=2, Name= “Kabhi”, Gender =
Female. And
RollNo = 3, Name= “Raj”, Gender = Male./ RollNo=4, Name= “Aaj”, Gender = Female.
Now Save-as your base rule and in the form provide the value of Template and
Definitions. Use -> Template instead of property.
Ruleset Versioning
While moving/migrating the application into another system, we need to lock our original ruleset
(version) and proceed with migration.
97
View -> sysAdmin -> Ruleset version. Lock the version for Unlocking/add-update this version.
Create a new version.
New -> sysAdmin-> Ruleset version.
Or you can save-as the existing ruleset version and change the patch.
If we create a new version, the while creating any rules further, we will have the option to select
between the rulesets versions.
To Migrate to another system
New -> sysAdmin -> Product.
98
See next page.
Provide the details of
0Application,
1 rule-sets,
2 classes (only data classes. Normal classes come along with rulesets).
Now click on “create a zip file”. Save the file.
Migration
Migration is a process to export the application from one System to another. For E.g the
developers develop the application in development server. After development is completed, we need
to migrate the application to Quality Assurance server (QA server) for the testers to test it. Then finally
to the production server.
Process Commander provides several tools to archive rules, data instances, and work objects into ZIP
files and move them from one Process Commander System to another.
We’ll use the product rule here to create a zip file of our application that can be migrated to another
PRPC server.
New -> sysAdmin -> product. Give product name and version.
99
Note: Lock your rule-set and create another higher version rule-set. Now migrate the lower version
locked rule-set.
0
Provide Application Name and Version.
1
Provide RuleSet Name and Version. (Work related classes are included in this)
2
Provide Classes (Derived from Data-)
3
Create a ZIP file and save it.
Reports:
Reporting is the process to represent data in a particular format which would be beneficial for decision
making. Accurate, flexible, dynamic reporting lets stakeholders know what is going on and makes
good decision-making possible. A report is a way to answer a question about your application, your
team, your sales, or some other measurable assembly of data. Reports can answer questions like
o "How long does it take for us to resolve an order we receive?"
o "Are there seasonal trends in sales that we should adjust our inventory plans for?"
0
"Which teams are processing works well, and which are having trouble meeting their
deadlines?"
Process Commander Reports assemble the data you specify and display it in customizable tables and
charts. In Process Commander, you can:
0
incorporate reports into manager and user portals
1
share reports between managers
2
export reports as spreadsheets or PDF documents
3
drill down into reports that summarize data and see the actual data that lies behind the
summary
4
add charts to summary reports, simplifying data analysis
100
List View: Displays information in a spreadsheet format about work objects of a particular class where
each row represents data about a single work object and each column presents the data held in a database
field associated with the work objects. We can also create List View to represent data from, Data tables,
External Data base etc.
Summary View: Displays summarized or aggregated information (grouped by subtotals, averages, dates,
or other factors) for work items or class instances. We can also incorporate Pie-Charts, Bars, Curves, data
grams, diagrams etc in the Summary view. These reports can further drill down to produce more grandeur
level information.
Important Terminology
Dashboard: A dashboard is an assembly of charts based on reports that is designed to provide a manager
or stakeholder with a quick view of the current status of the work the reports cover. Viewers can normally
drill down (see below) into the charts to see more details about the information they depict.
Drill down: In summary reports, and in charts associated with them, users can generally click on an entry
in the report or a section of the chart to 'drill down' into the report and see in more detail the data supporting
the top-level display.
Report Browser: The composite Manager portal includes a report browser that lets a manager create new
reports, modify existing reports, and share reports with other managers.
Report Viewer: The composite Manager portal includes a report viewer that lets a manager review, modify
(including adding charts to summary-type reports), and export reports.
Trend report: A trend report organizes data along a time line or other progress indicator. Managers use
trend reports to understand their business processes: for instance, a manager may want to see a report of
the number of sales made per month over the past year.
Relational database: A relational database stores information in multiple tables, and then assembles
information related to a particular data object based on relationships between the various tables. For
instance, in a system managing employees, the table holding the basic employee record might hold the
person's first and last name, a code for the person's department that refers to an entry in the "Dept" table, a
code for the person's job title that refers to an entry in the "Positions" table, and so on. Process
Commander Uses SQL commands (see below) to tell the database what data to retrieve.
SQL: Process Commander uses Structured Query Language (SQL) to query the database for the
information the report needs. SQL is a language designed for managing data in relational database
management systems. The Report Viewer simplifies selection and assembly of SQL statements: creating
Process Commander Reports requires no extensive knowledge of SQL.
Report definition rules, introduced in PRPC V6, simplify creating, adapting, and sharing reports. Both
managers and developers can create and manage reports using report definition rules.
101
List View Report
List View reports can be created in two ways. First from the developer portal by using New -> Reports
-> List View. And other from Managers Portal, using the report wizard.
New -> Reports -> List View.
Applies To : Name of the class whose properties will be used/displayed. Give work type (class) name
when you want to create report on work object. Give data class name if you want to represent data from a
different table/external database.
View Purpose: Just a name to describe the report
Owner: Owner of the report. Write ALL if you wish to share this report to all.
Display Field Tab
102
Category: To assign a category to this report, select from the Smart Prompt list.
Choose one of seven standard categories to cause this report to be listed in a corresponding
group on the Monitor Activity workspace (present in manager portal), (and so available to those users
who can access this workspace.) For example, choose Work Analysis to list this report in the Analyze
Quality area.
Embedded: Select if the output display of this list view is to appear within the runtime presentation of
another rule, such as a section rule or flow action.
Fixed Header: Optional. Select to indicate that the header area is to be excluded from the scrollable
area. This causes the headers to remain fixed, where as the rows are scrolled.
Enable Sorting/Filtering: Self explanatory.
SHOW THESE FIELDS:
Use to name the properties to be displayed in the report. You can use
properties from another
table/data class also. You need to declare the page and class name under
pages and classes.
Here I am using the EmpID property of data class employee. Hence use pageName.Property.
Note that in order to use the properties of different class, we need to JOIN it with our current class.
JOIN is described later in this section.
Content Tab
103
Criteria: We can provide criteria on properties. These criteria will come as where clause in the SQL query.
We can also provide values for criteria at run-time using page.propertyName or by using parameters
param.value (need to be declared in parameters tab).
Edit Input: Provide a Edit Input rule, if you want to change the format of the field.
Ignore Case and Use Null is self explanatory.
Prompt Settings: These are used to prompt to user (while running the report) a criteria value to provide at
run time.
Get These Fields: Include the properties that you want to be present in result-set. Only properties from this
list mentioned in Display fields tab will be visible in the report. We use this in cases, when we want some
properties to be present in result-set, but not shown in the Report, because they may be used for
calculation purpose etc.
Content Page Name: The page name in clipboard that will hold the records. This page will have a
pageList pxResults to hold the records. Normally we give the page which represents the class Code-Pega-
List (Mentioned in pages and classes tab).
Activity Name: By default getContent Activity (pre-defined) which queries the database to fetch result.
Mostly this is not customized.
Selectable Tab
This tab enables selection of rows. Either single selection (radio button will appear before rows) or
multiple selection (check box).
Organize Tab
104
Provides options for paging. Means if the report is very large, then it will come in pages like 1 2 3 4 … etc.
Also provides options for the buttons that will appear in the Report. Like Export to PDF, Export to
Excel etc.
Format Tab.
Describes the HTML/CSS Formatting styles for report/rows/alternate rows etc.
Also describes event handling. It can call Activity on single click or double click on rows.
Parameters Tab
Used to describe parameters. Input parameters can be used to receive values at run time.
Pages and Classes tab
105
JOIN Tab
Provide the data table name here, that you want to use in JOIN conditions in SQL query. Here we
tried to Join Employee and Steel classes (Tables).
Prefix: This value will be used to create a Page for the particular class in Pages and Classes tab.
Here B is prefix for Employee class, hence we can access the properties of Employee class by
B.propertyName (used in Display Field Tab).
Edit Conditions: Used to provide JOIN Conditions. Normally a equi-join.
See in next page.
B.Name = Primary.Name. It means (Employee class/table).Name = (Steel Class).Name.
106
Declarative Index Join:
Indexes created by Rule-Declare-Index rules can be specified here to reference embedded properties
for both display and criteria from the Applies To class. This facilitates using Rule-Declare-Index rules
for performance by avoiding retrieving properties from the BLOB (Storage Stream) column. You can
attach an alias to any declarative index that you have previously defined.
Prefix
Enter a text string to be used as an alias for the joined
declarative index class and all its properties. The prefix is
assigned to all the properties in the class and used to
reference the properties from these fields for the Display
Fields and Content tabs.
Index Name Specify the Index- class created by the Declare Index rule.
Note:
List View Reports can also be used to show data/records/tables in a section or flow actions. Drag and
Drop the list view in the particular section/flow action. We can also pass run time values to the list view
through properties and parameters. Use these parameters and properties in the Display Fields or
Criteria values.
Summary View (Rule-Obj-SummaryView)
A summary view rule defines a two-level report display, presenting summary counts, totals or
averages to be displayed initially, and allowing users to click a row to drill down to supporting detail for
that row.
Summary view rules support interactive charts, trend reports, and the use of AJAX for pop-up Smart
Info windows.
We can create Summary View reports by Report Wizard and also by Summary View
Form. New -> Reports -> Summary View
107
Applies To : Name of the class whose properties will be used/displayed. Give work type (class) name
when you want to create report on work object. Give data class name if you want to represent data
from a different table/external database.
View Purpose: Just a name to describe the report
Content Tab
Category : To assign a category to this report, select from the SmartPrompt list.
Choose one of seven standard categories to cause this report to be listed in
a corresponding group on the
Monitor Activity workspace (present in manager portal), (and so available to those users
who can access this workspace.) For example, choose WorkAnalysis to list this report in the Analyze
Quality area.
Fixed Header: Optional. Select to indicate that the header area is to be excluded from the scrollable
area. This causes the headers to remain fixed, where as the rows are scrolled.
Move Group By Caption to header: Select to present the Caption value from the current Group By
element in the display header.
108
Criteria: We can provide criteria on properties. These criteria will come as where clause in the SQL
query. We can also provide values for criteria at run-time using page.propertyName or by using
parameters param.value (need to be declared in parameters tab).
Edit Input : Provide a Edit Input rule, if you want to change the format of the field.
Ignore Case and Use Null is self explanatory.
Prompt Settings : These are used to prompt to user (while running the report) a criteria value
to provide at run time.
GROUP BY:
Provide the properties that will be used in the Group By clause of the SQL queries required to retrieve
the data.
FIELDS:
We can provide the properties here to be used in an aggregate functions like count(), Sum(), Avg() etc.
TREND REPORTING
Click on the symbol
to open a window for Trend Reporting.
109
Trend
Choose an interval, Range (buckets) or Expression. Choose:
0
Yearly, Quarterly, Monthly, Weekly, or Daily — For fixed intervals.
1
Range — You can determine the ending point of a series of past time intervals, in units of
days, weeks, calendar months or calendar quarters.
2
Expression — Enter an expression to define break points. If the expression results in a
boolean value, enter a comparison.
Select a
Select a DateTime property to be the basis of trend
Property
intervals.
THRESHOLDS
Define
Select if you want to define one or colors to identify ranges on an interactive chart (as
Thresholds backgrounds).
Configure... If you selected the Define Thresholds box, click to enter threshold values and colors for
each.
Content Page Name: The page name in clipboard that will hold the records. This page will have a
pageList pxResults to hold the records. Normally we give the page which represents the class Code-
Pega-List (Mentioned in pages and classes tab).
Activity Name: By default getContent Activity (pre-defined) which queries the databse to fetch result.
Mostly this is not customized.
Drilled Down TAB
110
DrillDown To: This option enables another layer of reporting. When the user viewing the summary
report, when he clicks on the chart/bars, they open-up into another layer of report like List View,
Summary View or Detailed View.
3 options --- List View, Summary View, Detailed View.
In case of List View and Summary View we have to provide the pre-created List View and Summary
View rules. We can also pass parameters to them.
Detailed View
Provide the properties to be shown in the detailed view report. Modify the fields.
DATA SOURCE OF DRILL DOWN VIEW : Leave this field blank in most cases, to use instances of
the Applies To key class of this rule as the source of drill-down information.
You can choose a different concrete class that contains the properties to be displayed in the drill-
down display, if:
0
All properties listed in the Criteria array (on the Content tab) are present in both the Applies
To class and the class you enter in this field, and all are exposed as columns.
1
The properties in the Group By array (on the Content tab) are present in both classes.
Organize Tab
Provides options for the buttons that will appear in the Report. Like Export to PDF, Export to Excel etc.
Format Tab.
Describes the HTML/CSS Formatting styles for report/rows/alternate rows etc.
Also describes event handling. It can call Activity on single click or double click on rows.
111
Chart Tab
Chart
Select:
Output
Image to develop a static chart and send to the browser as a PNG image. Complete the
Type
remaining details on this form.
Interactive to develop an interactive chart as an Adobe Flash file. Complete the Select output
layout field, but do not complete other fields on this tab. Then click Configure
Interactive Charts to specify parameters for this chart.
Now Press Configure Interactive Charts Button to open a dialog to configure the charts.
You can define Chart Type.
Provide Field and Name Field value, to be used in the charts.
You can define different options in Options TAB That how the chart will appear, size, what buttons to
appear in the chart etc. Color Tab to define colors.
Parameters Tab
Used to describe parameters. Input parameters can be used to receive values at run time.
Pages and Classes tab
JOIN Tab
Provide the data table name here, that you want to use in JOIN conditions in SQL query. Here we tried
to Join Employee and Steel classes (Tables).
Prefix: This value will be used to create a Page for the particular class in Pages and Classes tab.
Here B is prefix for Employee class, hence we can access the properties of Employee class by
B.propertyName (used in Display Field Tab).
Edit Conditions: Used to provide JOIN Conditions. Normally a equi-join.
See in next page.
113
B.Name = Primary.Name. It means (Employee class/table).Name = (Steel Class).Name.
Declarative Index Join:
Indexes created by Rule-Declare-Index rules can be specified here to reference embedded properties
for both display and criteria from the Applies To class. This facilitates using Rule-Declare-Index rules
for performance by avoiding retrieving properties from the BLOB (Storage Stream) column. You can
attach an alias to any declarative index that you have previously defined.
Prefix
Enter a text string to be used as an alias for the joined
declarative index class and all its properties. The prefix is
assigned to all the properties in the class and used to
reference the properties from these fields for the Display
Fields and Content tabs.
Index Name Specify the Index- class created by the Declare Index rule.
Note:
Summary View Reports can also be used to show data/records/tables in a section or flow actions.
Drag and Drop the list view in the particular section/flow action. We can also pass run time values to
the list view through properties and parameters. Use these parameters and properties in the Display
Fields or Criteria values.
Tickets (Rule-Obj-Ticket)
Tickets support business exception processing in a flow. It overrides the normal processing of a
flow, when any exception or event occurs.
To create a ticket
New -> Process -> Tickets.
To call a ticket, we need an Activity to set tickets. Here we are calling the activity from the flow action.
114
Calling TicketAct activity and passing the name of the ticket in the parameter (TicketCollectInfo).
The activity is shown below. It sets the ticket conditionally. In the pre-condition we call a when to check
if RollNo is less than 0 or negative, then it sets the ticket, otherwise removes the ticket.
Now, when the condition for Set ticket is met, the ticket is set and our flow returns back to the place
where the ticket is set. It searches the ticket in main flow as well as sub flow.
Occasionally, we can provide a HTML-Reference also to the flow action in order to set a note while
ticket is set.
In Flow action, we change the HTML tab as :
115
This HTML Reference “ActionSetTicket” creates a form to receive some note, while setting the ticket.
Output of the HTML-Reference.
Tickets (Rule-Obj-Ticket)
Tickets support business exception processing in a flow. It causes the flow to move back to a specified
place where the ticket is set. It overrides the normal processing of the flow.
However, ticket rules are optional; a ticket rule defines only a name.
Create a Ticket.
New -> Technical -> Ticket
116
How tickets are raised
An activity can call the Obj-Set-Tickets method to set a ticket, and call the same method again to reset (turn
off) the ticket.
Here the input parameter “Ticket” provides the name of the ticket. This parameter has to be passed at
the place of calling the Activity.
We can call the activity from flow action.
This flow action calls activity TicketAct (described above). It passes parameter “Collect” to the
activity. This “Collect” is the ticket name.
117
When the flow reaches this flow action, the normal processing of the work object is stopped and the
control goes back to the place where the ticket is placed.
Normal practice is to keep this flow action (which raises ticket) as a local flow action, so that user has
choice to raise ticket or move forward in the flow. Or keep the Activity that raises ticket to test a pre-
condition, which when fails raises the ticket.
Users can select the standard Work-.SetTicket or @baseclass.SetTicket flow actions when
processing an assignment.
These flow actions can be inherited (overridden) in our classes. They do the same thing as above.
They call an activity called “ActionSetTicket” which raises the ticket. They also refer to an HTML
Source (HTML tag in Flow action) “ActionSetTicket” which provides a UI in the flow, where we can
select the Ticket manually and write a note.
118
The Status-Resolved ticket
When a work object becomes resolved
(the status changes to a resolved status), Process
Commander automatically turns on
(or "raises") a ticket named Status-Resolved. Every flow
execution in process for the work object that contains a ticket with this name is interrupted and control
transfers to the ticket task in the flow.
Service Level Aggreement (SLA) (Rule-Obj-ServiceLevel)
A service level rule is an instance of the Rule -Obj-ServiceLevel type. Each service level rule
defines one to three time intervals, known as goals, deadlines, and late intervals, that indicate the
expected or targeted turnaround time for the assignment, or time-to-resolve for the work object. These
provide metrics or standards for the business process.
A developer can associate service level rules with assignments in a flow and with the entire flow.
The time interval starts when the assignment is created, not when a user begins processing
the assignment.
For assignments, the service level rule is referenced in the Assignment Properties panel of the
assignment task.
For the overall work object, the service level rule is identified in the standard property .pySLAName,
typically set up through a model for the class. (The default value is the Default service level.)
The Pega-ProCom agent detects service levels not achieved — unmet goals or deadlines — promptly.
If an assignment is not completed before the time limit, the system can automatically notify one or
more parties, escalate the assignment, cancel the entire flow, and so on.
119
1) Create a SLA.
New -> Process -> Service Level
The Escalation Activity is called, when the goal, deadline is passed.
Note: The Pega-ProCom agent is responsible for detecting the service level and calling the
appropriate activity.
Hence we need to modify the Pega-ProCom agent (rather Pega-ProCom agent schedule)
inorder to detect our SLA and call accordingly. The details to modify the Pega-ProCom agent are
given in following pages.
2) For Assignment SLA
Set the Assignment Properties for Service Level.
Note: For Service level to start, we need to route the assignment to a worklist/workbasket .
120
There are few predefined SLAs too.
3) For Work Object SLA.
After a service level rule has been configured for a work type, whenever a work object from that class
is created, a standard flow named Work-.Overall SLA starts running in the background. In its default
state, the OverallSLA flow creates an assignment named SLAProcessing in the default workbasket for
the operator's organization.
This assignment stays open until the work object is resolved. The times specified in the work object's
service level are tracked against the SLAProcessing assignment. Additionally, the OverallSLA flow
appears in the clipboard as one of the executing flows on the pyWorkPage page:
Locate and open or create the pyDefault model rule for the work type of the work object for which you
created the service level rule (Rules by Type explorer > Technical > Model).
In the model rule, configure an entry for the pySLAName property that specifies the name of the
service level you created. Save the Model . For example:
121
Now when you create a work object of that work type, flow processing tracks the service level
for the work object against the SLAProcessing assignment. Note that because you specify the service
level in a model for the work class, the service level applies to all flows that create work objects of that
class.
Note: In order to make this Work Object SLA work properly, we need to define the Workbasket of the
operator whom we route the work.
3) Configuring the Pega-ProCom Agent
We need to configure the Pega-ProCom Agent Schedule in-order to make our SLA detectable.
Open View->SysAdmin-> Agent Schedule. Open Pega-ProCom Agent.
The second No. Agent, i.e ServiceLevelEvents must be modified and enabled. It calls
Activity ProcessEvent.
In the security tab, add the Application Rule-Set.
AGENTS
Agents are internal background processes operating on the server that run activities according
to a schedule. Agents are autonomous and asynchronous. The activities they call run individually on
their own schedules and one activity does not have to finish before another one runs.
Agents route work according to the rules in your application; they also perform system tasks such as
sending e-mail notifications about assignments and outgoing correspondence.
122
Every Process Commander system includes three standard agents named Pega-ProCom, Pega-
IntSvcs, and Pega-RULES.
Agents are implemented through two Process Commander Objects:
Agent queue rules - instances of Rule-Agent-Queue. These rules specify the activities the agent runs
and the interval, in seconds, at which it runs them. There can be no more than one agent queue rule in
a RuleSet.
Agent schedule data objects - instances of Data-Agent-Queue. Process Commander generates
these schedules for each node in the system, based on the settings in the agent queue rule. For each
agent queue rule, one agent schedule is generated for each node in the system.
An agents rule provides a template that specifies the global settings for that agent on all nodes. To
modify the configuration settings for an agent, open the generated agent schedule object for a specific
node and modify the settings in the agent schedule.
The Agent Manager is a master agent that gathers and caches the agent configuration information
set for your system when Process Commander starts. Then, at a regularly scheduled interval, it
determines whether any new agents rules were created during the last period. If there are new agents
rules, the Agent Manager adds them to its list of agents and generates agent schedule data instances
for them for each node. The Agent Manager also notices when updates are made to existing agents
rules or agent schedules.
MASTER AGENTS
The PegaRULES engine runs two master agents:
Agent Manager: This master agent gathers and caches the agent configuration information
set for your system when Process Commander starts up. Then, at a regularly scheduled
interval, it checks whether any new agent queue rules have been defined. If they have, the
Agent Manager adds them to its list of agents and generates schedules (data objects) for
them for each node.
Requestor Manager: At a regularly scheduled interval, this master agent examines the
state of all the requestors in the system to see if any have timed out. If a requestor has
timed out, the Requestor Manager terminates it.
The master agents’ behavior is determined by settings in the prconfig.xml file, which is described
later in this section.
STANDARD AGENTS
By default, Process Commander relies on two standard agents: Pega-ProCom and Pega-RULES. If
your system is using the PegaDISTRIBUTION Manager application, Process Commander also uses
the Pega-IntSvcs agent.
The Pega-ProCom agent queue rule is configured to run two activities by default and two
additional activities if you enable them:
■ ProcessServiceLevelEvents - compares the current time to the times specified as the
goals, deadlines, and late times of the current assignments. This activity is enabled
by default and it runs every 30 seconds. For more information, see “Configuring the
SLA Agent” on page 7-17.
123
SendCorr - sends notify messages to users about assignments and outgoing
correspondence to work parties. This activity is enabled by default and runs every
30 seconds.
Email_CheckIncoming - checks the inboxes of any incoming e-mail accounts that have
been configured and if it finds messages, routes them according to the settings in
the e-mail account. When enabled, it runs once every 30 seconds.
GetConvertedPDFsFromPDM - checks the PDM Requests table to see if any Word
documents have been converted to PDF files. You enable this activity only if you
are using PegaDISTRIBUTION Manager and you want to use it to convert Word
files attached to work objects into PDF files. For information about this product, see
t h e PegaDISTRIBUTION Manager for Process Commander Installation and
Configuration, which is available on the Pega Developer Network (PDN). Figure 7-1
shows the Pega-ProCom agent queue rule.
Process to Create An Agent.
New->sysAdmin -> Agent.
(Note: We cannot create Agent Schedule, it’s created automatically for each node by the
Agent Manager Master Agent).
Give the rule-set Name in the form. It’s created with the same name as the rule-set. Note we
can create only one Agent per rule-set.
Now give the details.
In security tab, provide the Access Group name.
124
After this, the Agent scheduler is automatically created by Master Agent for this agent. And the activity
runs in the timely manner.
There are 2 Patterns here.
Periodic: Means the activity will be called periodically at equal interval, say 30 secs.
Recurring: Means we can specify other advanced Interval, when to call the activity.
Eg:
Daily, weekly, monthly, everyday etc.
Modes of the Agents
Legacy — Specifies that this is an agent that was created in a version prior to V5.4 and has not yet been updated.
This option is not available for agents created in V5.4 or later.
Standard — Specifies that this agent processes items from an agent queue and that it relies on the system to
provide object locking and other transactional support.
Advanced — Specifies that this agent uses custom queuing. See Pega Developer Network article PRKB-25045
Understanding agent queues. We have to use Queue-for-Agent method in an activity to enable the agent to
process the specific objects from the System queue.
This method stores a request for processing as a persistent object (entry) in the system queue. The method specifies:
Which agent is to process the queue entry
How many times the agent attempts to process the entry
How long the entry is to remain in the queue before the agent can try to process it the first time.
We can see the details in System Management Application under tools.
To check schedule agents (data agents) go to Nodes tab and check there. Click on the node.
125
In the security tab, provide the details of Access group and Tick on Bypass Activity Authentication.
SYSTEM MANAGEMENT APPLICATION
The System Management application (SMA) is a Web application that developers can use to
monitor and control caches, agents, and listeners, Requestors, Tracing and Logging.
They can also see the contents of Memory, prconfig.xml file etc. and other processing in your Process
Commander system. The URL name is prsysmgmt.
Capabilities
Using the System Management application, you can:
Review the memory used by the Java Virtual Machine on the server.
Review the most recent ServletRequest and HTTPRequest details.
Display the prconfig.xml file.
Access any requestor and view the clipboard, start the Tracer, examine performance statistics,
and terminate requestor processing.
View executing threads and their characteristics.
View, stop, cycle, or restart agents and listeners.
View open JDBC database connections.
View rule cache statistics, and empty the cache.
Force extraction and recompilation of the functions in a library.
Extract and compile one activity rule or model rule.
Start or stop remote logging.
Observe the utilization of requestor pools supporting stateless services.
Review the status of the Java class loader.
126
Tracing the Agent Activity
In SMA, we have Agent Management. We can click on Agents. We have options of
Select the Agents that we want to trace. Then Click on Delay Button. (It delays the Agents activity for
60 secs to connect to a Tracer).
Now go to Requestor Management.
Select the Requestor having a message in “Last Input Tab” : Waiting for 60 Secs for
Tracer connection. Now Click on Tracer. It will start tracing the Agent.
Logging
Each node on a Process Commander system produces two logs:
The Pega Log — also known as the console log or system log — contains messages created since the server was
most recently started. The log file is usually named PegaRULES-YYYY-MMM-DD.log, where the date portion of
the name indicates the date the application server was recently started (on the current node).
The Alert log contains only alerts and supports performance-related monitoring.
Viewing or downloading the Pega log
Select Tools > Log Files to view or download the current Pega log from the server to your workstation.
127
Listeners operate as Java threads rather than as full requestors, and so cannot be accessed with the Tracer. Accordingly,
use logs to debug listeners.
Follow the steps in the following procedures to configure a listener or service requestor to send log messages to your
workstation. Then, using a modified version of the LogFactor5 log analysis module, you can review detailed or
filtered messages. (LogFactor5 was an open source project of the Apache Software Foundation.)
Install the log4j Remote Logging package
To install remote logging client software on your workstation:
Select Tools > System Management Application to start the System Management application.
On the System Management application window, select a node. Select the Logging and Tracing > Remote Logging
menu item.
Click the link "here" in the sentence "To download log4j socket server click here." This download contains a
licensed redistribution from the Apache Software Foundation.
Save the file to a local drive and extract its contents.
Note the directory that you extracted it to so you know where to locate the startSocketServer.cmd file. This file
starts the LogFactor5 window that displays the contents of the log.
Review Internet Explorer settings to confirm that your workstation has a Java 1.4.1 or later JVM installed and
enabled.
Create a Windows shortcut for the startSocketServer.cmd file and then place it on your desktop. You then can start
LogFactor5 with a mouse click.
128
CACHE
Process Commander maintains a memory cache of recently found (and non-found) rules to improve
the performance of the engine, especially during rule resolution searches. This rule cache (also
called the rule instance cache ) operates invisibly and automatically. The system adds to the cache
any rule that is read three or more times (for some rule types, a higher limit applies). Caching
provides a substantial performance and response time improvement for all users.
Operation of your Process Commander system benefits from several caches, provided by various
software facilities.
Rule cache — Per node. Reduces PegaRULES database traffic, contains copies of rules recently
accessed or recently updated by developers. Occupies virtual memory. The PegaRULES
agent, during the periodic system pulse, invalidates rules in the rule cache that were recently
updated on another node.
Rules Assembly cache — Per node. Tracks rules for which Java generation and compilation is
complete. Formerly known as the FUA cache. Located in virtual memory; links to loaded Java
classes.
The Rules Assembly cache is an in-memory table that allows Process Commander to rapidly
identify compiled Java CLASS files that correspond to compiled and assembled rules (such as
activities, functions, and stream rules).
Rule Resolution cache — Per node. Supports faster rule lookup; in virtual memory.
Personal rules cache — Per node. Similar to the Rules Assembly cache, for rules checked out
into private RuleSets by developers.
PegaRULES database cache — System-wide. Provided by Oracle, Microsoft SQL Server or other
database software, not by Process Commander software. This can be an important factor in
performance, but managed independently of Process Commander server caches.
Rule Cache Management in SMA (Under Advanced Link)
129
Rule Assembly Cache in SMA (Under Advanced Link)
SMA LINKS
130
AES: ATOMIC EVENT SERVICES
AES is an independent, self-contained system that gathers, monitors, and analyzes
performance and health indicators from multiple SmartBPM systems across the enterprise. AES
combines server-level and BPM-level enterprise monitoring in a single web-based tool.
AES can be quickly deployed on any SmartBPM enterprise configuration. The installation and
configuration package contains all the necessary files needed to set up the AES server and configure
the nodes for monitoring. The processes are straightforward and do not require deep technical
expertise.
The AES Enterprise Health console provides up-to-the-minute enterprise, cluster, and node level
monitoring. The console tracks these key statistics and events:
Number of active requestors
Number of agents running
Percentage of JVM memory being used
Last time of system pulse
Process CPU usage
Number of database connections
SQL exceptions
Average HTTP (browser or portal requestor) response time
Rule cache enabled
Alerts and exceptions the require immediate attention
131
WorkParties (Rule-Obj-WorkParties)
A work party is a person, organization, or other actor identified in a work object, who can be the
recipient of e-mail or other forms of correspondence.
A work object may identify no work parties, one, or many work parties. The work party role
associated with each work party identifies why a party is present, and may determine which properties
are defined for that party.
Five standard data classes derived from Data-Party are available for capturing information
about work parties:
Data-Party-Com — For business organizations
Data-Party-Gov — For government organizations
Data-Party-Operator— For Process Commander users (who each have a Data-Admin-Operator ID
instance)
Data-Party-Org — For nonprofit organizations
Data-Party-Person — For people who may not be Process Commander users with Operator IDs
Your application can include other classes derived from Data-Party or from one of the above concrete
classes.
Create a Work Party as below.
Party Label : Enter a unique label that is to appear on the work object entry form to identify this party role.
For example, you can enter Lawyer or Design Manager.
Role: Enter a unique identifier for this role. This may be same as above party label.
Party Class : Any of the above Data-party classes.
132
Party Prompt: Optional. Enter a short description of the Data-Party class. This short
description appears at runtime, following the party label on the work object entry form.
Model: This is optional. This initializes the common Work-Party properties. (If this is not used, we may
have to give values to each
Properties appearing at WorkParty section in New Harness). Some of the properties are.
.pyCompany, .pyTitle, .pyFirstName, .pyLastName, .pyEmail1, .pyEmail2, .pyEmail1Type,
.pyEmail2Type, .pyHomePhone
.pyWorkPhone, .pyMobilePhone.
Attach a work party with the Flow/Work Object
Workparty Info at New/Perform Harness
CORRESPONDENCE
133
1) Correspondence is the Process Commander term for outgoing e-mail messages, printed Letters, or
facsimile transmissions produced by the system and its users. These are Typically associated with one
work object or a cover or folder and may consist of text, Images or both.
A correspondence rule is an instance of the Rule-Obj-Corr rule type.
Correspondence rules are part of the Process category
Correspondence Types
Four standard correspondence type rules are installed with your Process Commander system.
Fax : For outgoing letters to be sent by fax transmission through the Correspondence Output Server.
Mail : For outgoing postal letters (handled by the Correspondence Output Server) to be printed. Stores the
correspondence body as an instance of the Data-Corr-Letter class, and the address in the Data-Address-
Postal class.
PhoneText : For short outgoing text messages to be sent to a beeper (pager) or digital cell phones that
support the Short Message Service.
Email For outgoing e-mail messages, where the body of the message is stored in an instance of the Data-
Corr-Email class and the addresses are stored as instances of the Data-Address- Email class.
Where referenced
Rules of three other rule types can reference correspondence rules:
Flow rules, using Notify tasks
Flow action rules, indirectly through activities identified on the Action tab
Activities
Steps for configuring correspondence generation in flows :
Configure an email account object (Data-EmailAccount) that holds information about the email
server, Incoming and Outgoing mail configuration and user account flow processing
should use to send outbound email.
Create a correspondence rule (Rule-obj-corr) and/or correspondence fragments.
Create the work parties rules that associate work party roles with your work classes.
Create Models. These Models are important to set the properties of workparty.
Create correspondence, correspondence fragment, and HTML stream rules.
Configure your flows to call the standard correspondence activities and flow actions at the
Appropriate places.
General Cofiguration Steps
134
Step1 : Configure an email account object (Data-EmailAccount).
Input values for Outgoing and Incoming Mail.
Provide values for SMTP/POP3 Server, Email Address, Pasword, SSL etc.
New -> sysAdmin -> Email Acount
Step 2: Create Correspondence rule.
135
We can create our own correspondence. For creating a correspondence, we can do it in two ways.
Create correspondence rule (Rule-Obj-Corr) directly.
Create a correspondence fragment (Rule-Corr-Fragment)
Correspondence rule (Rule-Obj-Corr)
A correspondence rule is an instance of the Rule-Obj-Corr rule type. Instances of this rule type define templates, such as
preconfigured form letters, that can draw on the values of properties in the database to produce specific letters or e-mail.
New -> Process -> Correspondence.
Note: We can include text, image, properties, sections, correspondence fragments,
paragraph rules etc.
136
Rules that can be included.
All these rules, properties and fragments etc generate a JSP (uses pega custom tags). We can see
that in
Source mode.
We can also use validation of properties used. We can give a validation rule (Rule-Obj-Validate) in
prompts tab.
Correspondence fragments (Rule-Corr-fragment)
Similar to above, we can create a Correspondence fragment and use it in the Correspondence rule.
Step 3: Create WorkParties Rule: As done above.
Step 3 : Create a Model for each Role :
137
1) Configuring flows that generate automatic notification messages:
When you want to configure your flow to automatically send notification messages about assignments,
connect a notify shape to the assignment. A notify shape identifies a notify activity.
Notify Activities
These standard Work- activities have an Activity Type of Notify. They can be used in the Notify task,
represented by the Notify shape (
).
1) Notify 2) Notify All 3) NotifyAssignee 4) NotifyAllAssignees 5) NotifyParty 6) Each
Assignee.
Steps:
Drag the Notify flow shape from the shape panel onto your flow and connect it to the assignment.
In the Notify Properties pane in the left frame, enter a descriptive name for the task/shape.
In the Rule field, enter or select the name of a notify activity.
Provide values for the activity's input parameters. CorrName is always required because you have to
specify what to send.
Click Apply.
Save the flow.
Rule: Any of the above options. The description is given below.
Party Role: Provide the party role of the workparty.
CorrName:
138
Here we can provide the correspondence rule that we have created. To create a correspondence
rule:
New-> Process -> Correspondence. Write the email.
7) Create a work object to test your configuration. When the work object reaches the assignment with
the notify shape, click the attachments icon. In the History/Attachments window, expand the
Attachments section and verify that the notify message was generated:
139
Flow With ‘Notify’ Activity (Single Party same as notifyParty)
Notify : Send an E-mail message as Correspondence to a Party identified through a Parameter.
Flow With ‘NotifyAll ‘ Activity (All the Workparties identified in the work object)
Notify All : Send a Single e-mail message to each Work Party identified in the Work Object.
140
Flow With ‘NotifyAssignee’ Activity
NotifyAssignee
: Send an e-mail message to the Process Commander user who received the
assignment. If the assignment is in a workbasket rather than a worklist, an e-mail message goes to the
first operator listed in the Contacts array of the Workbasket tab.
Create Operator Ids
Create a WorkBasket
141
Flow With ‘NotifyAllAssignees’Activity
NotifyAllAssignees : Send an e-mail message to the Process Commander user who received
the
assignment. If the assignment is in a workbasket rather than a worklist, an e-mail message is sent
to each operator listed in the Contacts array.
Create Operator Id
Create WorkBasket
142
Flow With ‘NotifyParty’Activity
NotifyParty : Send an e-mail message as correspondence to a party identified through a parameter,
but only send when a threshold urgency level is reached or exceeded.
Flow With ‘EachAssignee’ Activity
143
Configuring flows that automatically generate correspondence (Utility Task)
Steps
Drag the Utility shape onto your flow in the appropriate place and ensure that it is connected.
In the Utility Properties panel in the left frame, enter a descriptive name for the task/shape.
In the Rule field, select or enter CorrNew.
Click Apply. Fields for the CorrNew activity's input parameters of appear in the Properties panel.
Enter values for CorrName and PartyRole (required).
Click Apply.
Save the flow.
Create a work object to test your configuration.
144
Configuring Flows (Flow action rules, indirectly through activities identified on
the Action tab)
145
Sending Correspondence Using “Send Correspondence” Flow
146
Configuring flows so users can add work parties to work objects
Steps:
In the Flow ,Select the Assignment and in the Assignment Properties pane in the
LocalActions Section, Select AddParty.
2 ) Click Apply and Save the flow.
Create a work object to test your configuration. When the work object reaches the assignment
with the AddParty flow action, select the action and ensure that you can add a party.
Creation of work object to test our configuration.
147
Integration with SOAP
Most systems applications require access to data or computations that are provided by another
system, or need to respond to requests from other systems for data or computations.
For E.g: Our Application may require the latest currency exchange rates, hence we need to connect
to some of the external systems providing these values.
The external system exposes certain services to the outside world that can be used by the connector
application, to get the data.
E.g: The MakeMyTrip.com connects to several external systems (Like Air-India System, Jet Airways
Systems, Indigo etc) to fetch Airline data. It sends parameter like No. of seats required, Date of travel,
Source and destination Airport etc. And receives the values from them like, seats available, price,
time of flight etc.
The Airline Systems here are external systems which act as Server as they expose a service.
MakeMyTrip.com uses connectors to connect and receive the service.
Since, Service and connectors can be running in different Operating system, written in different
language etc, hence we need a universal language to interact between the two. The common
language is xml (developed by Microsoft). The data transfer occurs between them in form of xml.
Connector capabilities, which allow your application (in the role of client), to request data or
services from another system (in the role of server)
Service capabilities, which allow your application (as a server) to respond to requests it receives
from another system (a client).
SOAP: Simple Object Access Protocol
It is a protocol that is used for the exchange of information in a decentralized, distributed environment.
SOAP is an XML-based protocol with three components:
An envelope for describing what is in a message and how to process it
Encoding rules for expressing instances of application-defined data types
A convention for remote procedure calls and responses
Services implemented using SOAP are often called Web services. The SOAP standard is maintained
by the World Wide Web Consortium (W3C) at www.w3c.org.
The web-services provides a WSDL file to connector systems which facilitates the data transfer
between the web-services and connector systems.
WSDL (Web Services Description Language) is an XML format defined by the World Wide Web
Consortium (W3C). Each WSDL file describes network services as a set of endpoints operating on
messages containing either document-oriented or procedure-oriented information.
A WSDL file describes a SOAP service. It includes XML schema information that describes the input
parameter values that need to be sent in a SOAP request message, and the output parameter values
that can be extracted from a SOAP response message.
It also specifies the delivery method (usually HTTP) and the URL of the Process Commander servlet
that processes the SOAP requests. Software tools are available that generate WSDL files from other
representations of the service.
149
Creating Service Package, Service, Connectors in PRPC
Service Package: A service package is a name that groups one or more service rules that are
designed to be developed, tested, and deployed together. For some service rule types, this
corresponds to a package of Java classes. Use a Service Package data instance to define a
package name, define access for listeners, and support deployment of services.
To define a service package, create an instance of the Data-Admin-ServicePackage class. Then use
this name as the first key part of the service rules.
New -> Integration-Resource -> Service Package.
Service Access Group: Provide the access group.
Service Type: Give Rule-Service-SOAP.
The Service Methods described in the screen-shot, will not appear now, as we have not created
services and methods. Hence do not click on the button “Show Service Methods” now.
150
Deployment Type: WSDL.
Similarly, here, we have not created Service Class yet. Hence leave this blank. Don’t Click on
Generate Deployment Files.
2) Service SOAP
A SOAP service provides service method for an external application to use. Each method in the
service package corresponds to a SOAP service rule that identifies an activity to run and maps the
incoming and outgoing data.
To call a Process Commander SOAP service, an external application collects data values, wraps
them in an XML document envelope (SOAP envelope) that contains the name of the requested
service, and posts the envelope to the URL of the Process Commander PRSOAPServlet servlet. The
PRSOAPServlet servlet routes the request to the appropriate SOAP service package and rule.
New -> Integration-Service -> Service SOAP.
Customer Package Name: Provide the value of previously created Service Package
name Customer Class Name: Provide a Unique Service Class Name.
Customer Method Name: Provide a unique Service Method name.
151
Page Class: The concrete class where my Service Activity will be present. Page
Model: Model to initialize the properties of the class in the page created.
Page Name: top-level clipboard page that Process Commander uses as the primary page by the
activity being called through the SOAP service. The activity property values may be written to or read
from this page.
Service Activity Name: Name of the Activity that the service will call to perform operation and return
data to connectors. This is the main activity in Server, which does the actual processing. This activity
is called by the Service system on request by the connector. It returns the data by output parameters
to the connector.
Execution
Mode
Select one of the following options:
Execute synchronously — select this when you want the service to run the request immediately.
Execute asynchronously — select this when you want the service to queue the request, return it after some time.
End requestor
Select to have the system end this requestor session when the activity completes.
when done?
This check box affects only stateful processing. This check box is ignored when the Processing Mode on the service
package data instance is set to Stateless.
152
My service receives one input parameter (EmpID). It serches the database and returns 2 output
parameter to the connector (Name and Salary for EmpID) system.
Mentione Request Parameter here.
Similarly we mention the response parameters here.
Save the rule.
It creates the following service rule inside the Service Soap Section of class group.
153
3) Update Service Package. Create WSDL
Now again go to Service Package that we had created before. Click on the button Show Service
Methods. It’ll register the Service class and methods. The message will come as in figure.
Now go to Deployment tab
Click on button Generate Deployment Files
It’ll generate WSDL file (.xml) to be used by the connector system to connect the service. We can
download the WSDL file and copy it in the local folder of connector system, or use the above URL
to locate it.
4) Connector (Connect SOAP)
Use SOAP connector rules when your Process Commander applications need to call an external
Web service.
We’ll use the 5.2 connect wizard to create the connector.
Note: The connector and services normally are in diferent systems. But we are creating this in same
system. We can perform the same steps in different systems also.
IN PRPC 5.5 open the wizard by Tools -> Integration -> 5.2 connect wizard
154
Source DataType: Web Service (SOAP)
Base Class: Provide an abstract class here. The connector class with properties will be created as a
child class of this.
Connector Activity Class : The concrete class which will contain the connector Activity.
Press NEXT.
Provide the WSDL URL:
E.g :- C:\PRPC\EmpDetailsWSDL.xml (if saved locally)
If not saved use the generated URL path.
Now one by one it’ll ask for Service Class, Port and Method. Select them.
155
Click NEXT.
The following Class structure is created in my application.
I had provided
Base Class: DLF-REALSTATE-MATERIALS- (Abstract class)
Hence it created Another connector class (abstract) DLF-REALSTATE-
MATERIALS-EmpDetailsClassService-
156
Click on The Connect SOAP Method EmpDetailsMethod. It’s completed by the
wizard automatically.
157
The wizard also creates a Connector Activity with the same name as of the method in the class
we mentioned in the wizard.
Normally, this Activity is created with availability = No. So it’ll not open. Just right click on it
and do a save-as with availability = Yes.
158
Open this Connector Activity.
Parameter Tab.
Pages and Classes Tab.
This Activity just creates a new page (for the connector class). Connects the input
parameter and output parameter with the properties of the connector class.
159
This Activity accepts one Input parameter (EmpID) and calls the Service Activity in the
Server, sending the I/P parameter.
Service Activity
The Activity in the server (mentioned in previous pages) takes EmpID as input and it does a
Obj-Browse in the data-table to find a matching record. If record found, it returns the name
and salary as output parameter to the connector Activity.
Pages and Classes tab.
Test Connector Activity
Open the connector Activity and Click on the Button.
. Give the EmpID I/P Parameter.
160
Output
Explaining the Concepts
161
Points to be Noted
The Connector Activity calls Service Method and sends I/P parameter. It receives the O/P
parameters, which is set in its class properties. (EmpDetails_Name, EmpDetails_Salary).
The Service Class receives I/P parameter, which sets in it’s class properties. After the processing
work, it sets the values in it’s own Class properties (Name and Salary) which are mapped with
O/P Params.
Hence we can say that the connector properties and service properties are connected via
parameters.
Calling the connector Activity in Flow.
Rule:
The name of connector Activity.
162
EmpDetails_EmpID - This is parameter that we need to provide. We provide the value of property
here i.e
.EmpDetailsMethod_EmpID. (We set the value of this property in the above Flow Action FA1).
1) Tracer
Use the Tracer tool to debug flows, activities, services, parse rules, and declarative rules.
The Tracer tool provides full debugging facilities, including step-by-step execution, breakpoints, and
watch variables.
You can pause and resume processing, view or set the value of watch variables, and drill down to
step-by-step details. You can view trace events for any requestor connected to your server node, not
just your own session.
Setup
Use these controls to set up trace conditions. Click Play (
) to start the Tracer, or Pause (
) to stop tracing.
Depending on your access role, some Tracer capabilities may not be available to you.
Button
Function
Help
few seconds until the Tracer connects.
Connection
Options
Set or change breakpoints.
163
Breakpoints
Set or change watch variables
Watch
Save Tracer output on the workstation as an Excel CSV
or XML file.
Save
Abbreviate Events?
After clicking Play (
), select to reduce the amount of
clipboard detail retained for each Tracer row.
Operations
After selecting the connection and setting other options:
Minimize the Tracer window.
Perform the work that you want to trace (or wait for it to be performed, when tracing a requestor session other than
your own session).
Restore the Tracer window to review its results.
As the target session runs, the Tracer display lists the events of each type that you selected in the Trace Options
dialog box.
At any time tracing is paused, you can change any options using the buttons in the above table. After tracing begins,
you can use these buttons:
Button
Function
Erase the displayed events.
Clear
Pause the session being traced at the next possible moment.
Pause
Resume processing after a Pause button click, or after a breakpoint event. Appears only after a pause.
Continue
Save the Tracer results in the current window into a text file in Comma-Separated-Values format or as a
more detailed XML file, depending on prconfig.xml settings. See Tracer — Adjusting the buffer size.
Save
You can open and print the saved CSV file with Microsoft Excel. (This operation is available only on user
workstations that have installed the PegaClientSupport ActiveX control.)
2) Rules-Inspector
Rules inspector is a tool used to identify few things inside UI. E.g : -
HTML Rules:- Harness, Sections, Flow Actions.
Property Rules:
Declarative Rules:
Field Value Rules:
Style Rules.
It can be started as Run -> Rules Inspector. (Now check the above things which we need to identify).
164
3) Preflight
The Application Preflight tool reports the results of several checks on the rules in the currently selected application. These
checks encourage good design and implementation practice, as codified in the guardrails and elsewhere.
A rule in your application may work correctly and save without errors, but still be marked with a warning (
).
The Application Preflight tool summarizes these warnings.
For example, a decision table rule may contain two rows that conflict — give a different result for the same inputs. You
can save the decision table rule and execute it within your application, because the uppermost row of the table is used at
runtime, and other conflicting rows are ignored. However, the conflict may indicate that the rule was not entered correctly.
You can perform the preflight check at any time during development. As a best practice, use the Application Preflight tool
before you lock a RuleSet version. Research each warning message.
Warnings are instances of the Index-Warning class, which corresponds to the pr_index_warnings database table.
Application -> Preflight
Performance and DataIntegrity warning types are considered to be high priority. They can degrade system reliability
by slowing performance (for instance, a list view that retrieves embedded properties) or by violating data integrity (for
example, an activity that uses the Commit method incorrectly). Eliminating high priority warning conditions before putting the
rules into production is strongly recommended.
165
The Download High Priority Warnings option enables you to:
Create and download Excel spreadsheets containing all high priority warnings in the RuleSets comprising your current
access group. Links within the spreadsheet enable you to open a PDN article relevant to each warning, and to
open the rule form containing the warning.
This bar chart appears when you choose Application > Preflight. It displays the number of rule instances with warnings
for each rule type for all available RuleSets in your application. You can change the rule type range in the display
using the slider widget at the top of the chart.
Displays a bar chart and summary report of rule instances that have performance-type warnings. The summary report and
Criteria functionality are the same as described above for the All Warnings by Rule Type report.
Displays a pie chart and summary report of total warnings by severity level (four levels). Level one signifies a
warning that is most likely to compromise expected processing behavior.
0
Work object forms and reports that are part of a Pega Composite application can be designed to operate
with Firefox 2.0+ browsers as well as Internet Explorer.
1
This option displays a chart that assesses the user interface rules in your application for compatibility across these
browser types. This report checks the value set in the Browser Support field (on the HTML tab) of all the harness,
flow action, section, HTML, HTML property, and HTML fragment rules in your application.
Performance tool (PAL)
Use the Performance tool to understand the system resources consumed by processing of a single requestor session, or
the SQL statements sent to the PegaRULES database by the requestor session.
Process Commander always accumulates cumulative resource statistics for the Performance tool. Use the tool to display
these statistics, and to identify incremental resources (in the delta rows) consumed by your processing. Because this feature
displays existing data, its use does not degrade processing.
The Performance tool is sometimes known as PAL. Run > Performance
Monitoring SQL operations with DB Trace
You can monitor the interactions between Process Commander's server engine and the PegaRULES database or other
relational databases, and the operation of the rule cache. Familiarity with SQL is required to interpret the output. To use this
facility:
Open the Full details window.
Click the DB Trace Options link to set up which database events are monitored. See Setting DB Trace options.
166
Click the Start DB Trace link to turn on the facility and record SQL statements that Process Commander sends to the
database software.
Click Stop DB Trace to end data collection and access the trace results as a text file or with Microsoft Excel. See
Interpreting DB Trace Results.
Unlike the resource statistics feature, the DB Trace feature is normally off. Use the DB Trace feature only for a
brief interval. When enabled, DB Trace processing can produce voluminous output and may adversely affect session
performance.
The DB Trace tool link is not displayed in a production system — a system with the Production Level on the System form
set to 5. In addition, the DB Trace is available only to users who have the PegaRULES:SysAdm4 access role. These
access roles provide access to the standard privilege named Code-Pega-.PerformanceTools.
You can start and stop this tool from an activity, by calling the standard activity Code-Pega-
Requestor.SetRequestorLevelDBTrace to turn the DB Trace tool on and off. This activity sets the
pxRequestor.pyDBTraceEnabled property; the tool closes the output text file when tracing is turned off.
System-wide database trace
An alternative approach that provides comprehensive tracing of SQL statements sent to the PegaRULES database is
the dumpStats parameter in the prconfig.xml file.
To enable this feature:
1. Update the <database> node of the prconfig.xml file to add this element:
<entry key="dumpStats" value="true" />
2. Stop and restart the application server.
This setting generates a system-wide database trace file in the ServiceExport directory that can become very large
quickly, and can affect system performance. Use this setting only for brief periods, and when a single-requestor DB trace
is not suitable.
DB Trace Dialog.
167
1) We can provide Flow-Wise Local Action in Design Tab of the Flow.
This Local Flow action will be available in all the Assignments in the Flow.
2) List Rule
A list rule is an instance of the Rule-Obj-List rule type.
A list defines an ordered array of property names from the class. Lists are referenced only in
activities, using the Obj-List method.
A list rule determines which properties of a specified class are copied into embedded pages when
the Obj-List method runs. When only a fraction of all the properties of an object are needed on the
clipboard, using a list rule improves processing efficiency by reducing memory and disk demand.
When we create a Data Table out of a Data Class, A List rule is created inside our Data Class
(Normally with Name EditList). It Contains the List of properties in the Data Class.
3) Modifying a Data Table
If we modify our Data Class by adding a new property, It’ll not reflect in the Data Table.
We need to modify the List Rule (EditList) in our Data Class. Then Open the Data table with Data
Table wizard, the new property will appear in the Data table.
4) Lock mechanism between cover and covered work objects.
If the covered objects are locked, the Cover object is also locked. Locked means only one requestor
can access it at a time. The Activity that maintains this lock is Determine Lock String in Work- class
of Pega-Procom rule-set.
168
5) How cover work object is resolved automatically.
Few important things to note here.
The covered work objects can be of different work classes (types), but Cover and Covered work
objects should be a part of same workpool.
Locking: By default, locking a covered work object also locks the cover work object. This is desirable
because the cover work object may contain totals, balances, counts, or other derived values that
require single-threaded access.
Page Names: By convention, a cover work object occupies a clipboard page named pyCoverPage; the
covered work object is on a page named pyWorkPage. Many standard activities depend on these
naming conventions.
Ticket: The standard ticket rule Work-Cover-.AllCoveredResolved alerts a cover flow that all the
member work objects are resolved. If your application is to incorporate this constraint, include this
ticket in the flow rule or rules for the cover work object.
Flow actions: The standard local flow actions Work-.AddToCover, Work-.AddCovered, and Work-
.RemoveFromCover allow user management of cover contents.
Harness rules: The Work-.NewCovered harness rule supports entry of a new cover and cover
members.
Process Engine API: Activities Work-.AddCoveredWork, Work-.AddCovered, and others support
operations with covers.
Folders:
A work object folder is a work object in a concrete class that inherits from the Work-Folder- class.
A folder object holds a collection of one or more other work objects (which themselves may be basic
work objects, other folders, or covers) providing access for analysis and reporting. By convention,
the work object ID of folders has the format F-99999.
Covers and folders are two built-in facilities that allow your application to support collections of work
objects. In contrast to covers:
One work object may be associated with multiple folders, but only with one cover.
Members of a folder can belong to different work types, which need not belong all in a single
work pool.
The relationships between folder work objects and their contents may be many-to-many
These standard rules support folders:
Work-.AddToFolder flow action — Add a work object to a folder
Work-.RemoveFromFolder flow actions — Remove a work object from a folder
Work-Folder-.Review harness — Show folder work object, includes the View Folder Contents
button (
) to access contents
Work-Folder-.Perform harness — Update folder work object and contents
169
0
Work-Folder-.ReviewforExplore harness — Split-screen presentation
1
Work-Folder-.FolderContents section — Show folder contents
2
Work-Folder-.NewWork flow — Create a folder
Who decides the pyWorkPage as default page for new W.O ?
Standard Activity: createWorkPage in Work- class of Pega-Procom rule-set.
On the Requestor page of the clipboard, the property pxRequestor.pxCurrentWorkPool
holds the value of a user's current work pool.
SYSTEM PULSE
The Pega-RULES agent performs periodic processing known as a system pulse.
This processing synchronizes the contents of the in-memory rule cache on that node with rules
stored in the PegaRULES database. The pulse helps each node coordinate processing and
synchronize operations, including the contents of the rule cache.
In a multinode clustered system, a rule updated by a user on node North is retained in the rule
cache on node North, and also committed to the PegaRULES database. For a brief interval, users at
another node in the cluster — for example South — may have a stale copy of that rule in the rule
cache on the South server node. When pulse processing for South completes, the South rule cache
has the current rule.
Between pulses, updated rules are noted in the pr_sys_updatescache table, corresponding to the
System-Updates-Cache class.
The Agent Schedule data instance named Pega-RULES.<node> defines the pulse interval. The
default interval is 60 seconds.
REQUESTOR
A requestor is the process and data associated with a user (guest or authenticated) of your
Process Commander system, or the processing and data associated with a request into your system
started by an outside system, such as a Web Applications Server or an Active Server Page on a
Web site.
Each HTTP response that presents the Process Commander log-in form results in the creation of a
guest requestor, one that is authenticated and has only access to the RuleSets and Versions in the
PegaRULES:Unauthenticated access group. To avoid tying up system resources, the default time-
out period for idle guest requestors is a minute.
Information about each type of requestors your system supports is defined in instances of the Data-
Admin-Requestor class.
Important facts about the context of each requestor are contained in the pxRequestor page of the
clipboard for that (human or electronic) requestor.
170
A requestor ID is a system-generated hash identifier that uniquely identifies a requestor session.
This is sometimes called the connection ID.
The first letter of the requestor ID identifies the requestor type:
H — Interactive, browser-based requestor
B — Background requestors, such as agents
A — Listeners and services
P — Portlet
When installed, Process Commander contains four requestor types. Typically, these are all you
need.
Name Purpose
APP
For listeners and for access to Process Commander from an external client system, such as through a service
request (other than JSR-168 requests using Rule-Service-Portlet rules). Requestor sessions using this requestor
type instance have requestor IDs that start with the letter A.
BATCH Background processing, such as performed by, listeners, services, agents, and daemons. Requestor sessions
using this instance have a requestor ID that starts with the letter B. As initially installed, all BATCH requestors have
access to the PegaRULES:Agents access group.
BROWSER
For HTTP or HTTPS access to the Process Commander portal using Microsoft's Internet Explorer Web browser on
a Windows workstation, or from a browser presenting a Pega Composite Application. Requestor sessions using
this instance have a requestor ID that starts with the letter H.
As initially installed, all BROWSER requestors have access to the PegaRULES:Unauthenticated access group.
PORTAL
For HTTP access as a portlet in conjunction with Service Portlet rules. Requestor sessions using this instance have
a requestor ID that starts with the letter P.
Agents can broadly be classified into 2 categories. Task Driven and Schedule Driven.
To avoid overwriting an existing page
You may want the activity to check whether a page with a certain name exists before you open a new page.
In the activity step's precondition, enter the following:
where myPage is the name of the clipboard page.
$NONE AND OTHER CONCEPTS
$NONE - While creating a new page using Page-New, we may sometimes give $NONE in NewClass.
This creates a classless page.
171
$CLASS - While we create a pageList or pageGroup, we give a concrete class name. But we can also
give two things there. A abstract class (But we need to provide the concrete class later in activity
using this property) or $CLASS keyword, here also we have to give a concrete class later (but it can
be any class). E.g Code-Pega-list.pxResults uses this keyword.
SHARING PAGES BETWEEN ACTIVITIES
The calling activity can provide input parameters to the called activity, or it can share its own
parameter page with the called activity, an approach known as call-by-reference.
The preferred means for passing a single page from one activity to another is to identify the page in
the Step Page field of the calling activity. The called activity receives this page as its primary page.
If you need to pass more than one page, use the indirect page mechanism:
In the called activity, identify an indirect page by the keyword prompt as the Mode field in the
Pages & Classes tab.
In steps of the called activity, refer to these pages using the syntax promptpagename. No
corresponding entry is required in the Parameters tab.
In the calling activity, pass the additional pages as arguments to the Call instruction that invokes
the second activity.
172
The value supplied for the prompt page must not be blank and must evaluate to a clipboard page
name (top-level or embedded). The keywords primary, top, local, and parent are not valid
with prompt pages; the param keyword is valid.
Indirect pages provide a generic way to pass pages not only between activities, but also to other
rule types such as list view rules and summary view rules.
Note: The clipboard page created will be only DataPage not promptDataPage.
Problem Flows and Connection Problem Flow
Flow problems are error conditions that a flow execution encounter as it executes that
prevents it from continuing. For example, the flow may reference a rule that is not found at runtime.
This is considered a flow problems (or a problem flow), and can arise from many different sources.
The system halts the progress of that flow execution and starts a flow named Work-.FlowProblems.
This flow normally notifies a user named Administrator@org.com, where org.com is the organization
of the user (requestor) who encountered the problem, and creates an assignment. Your application
can override the standard activity Work-.ToProblemFlowOperator to designate a different operator
as the recipient of these flow problems.
If you can fix the problem through a change in the flow rule, by modifying a rule, or creating a new
rule, the processing can resume.
Your organization can copy and override the FlowProblems flow and the ToProblemFlowOperator
routing activity to meet your needs.
Through an Integrator task — represented by the
shape in the Visio diagram of a flow rule
— a flow execution can call an external system such as a relational database, Enterprise JavaBean,
or Web service. The activity referenced in the Integrator shape references a connector rule (for
example, a Connect SOAP rule) that controls the communication and data exchange with the
external system.
For various reasons, a tested connector interface may fail or time out, causing work object
processing in the flow rule to halt. To facilitate detection and analysis or repair of such events, you
can designate in your application a flow rule for connector exceptions. Failure of an Integrator task
causes the designated flow rule to start. The flow rule can send out e-mail correspondence, attempt
retries, skip over the integrated step, or send an assignment to someone.
Development
See Using Error Handler Flows for Connectors, a document on the Integration area of the Pega
Developer Network, for detailed development instructions, summarized here.
To use this facility, specify the second key part — Flow Type — of a flow rule in the Error
Handler Flow field on a connector rule form. Process Commander uses the Applies To key part of
the calling flow as the first key part when retrieving the exception flow rule.
If you leave the Error Handler Flow field blank, a connector problem causes the flow
execution to fail and is reported only as Java exceptions in the Pega log of type:
com.pega.pegarules.pub.services.ConnectorException.
173
The standard flow rule Work-.ConnectionProblem provides a default approach to exception
handling. When you accept the default, a connector exception causes the following processing:
The original flow execution is paused. The ConnectionProblem flow is called with seven
parameters:
0
Operator ID of a user to notify (not used)
1
The Applies To and Flow Type key parts of the original flow execution
2
The name of the shape in which the problem arose
3
A ConnectorException type
4
An error message
5
An assignment type (Workbasket or Worklist), indicating where to place a resulting
assignment.
For all the exception types other than ResourceUnavailable, processing continues in a
FlowProblems flow. See Working with the Flows with Problems report.
If the exception type is ResourceUnavailable, up to five retries are attempted, at intervals
determined by a service level rule.
A developer accessing the workbasket can cancel the assignment
(ending both the
ConnectionProblem flow and the original flow) or attempt to restart the original flow, perhaps
after taking corrective action.
Logging:
Each node on a Process Commander system produces two logs:
The Pega Log — also known as the console log or system log — contains messages created
since the server was most recently started. The log file is usually named PegaRULES-YYYY-
MMM-DD.log, where the date portion of the name indicates the date the application server
was recently started (on the current node).
The Alert log contains only alerts and supports performance-related monitoring.
Viewing or downloading the Pega log
Select Tools > Log Files to view or download the current Pega log from the server to your workstation.
Listeners operate as Java threads rather than as full requestors, and so cannot be accessed with
the Tracer. Accordingly, use logs to debug listeners.
Follow the steps in the following procedures to configure a listener or service requestor to send log
messages to your workstation. Then, using a modified version of the LogFactor5 log analysis
module, you can review detailed or filtered messages. (LogFactor5 was an open source project of
the Apache Software Foundation.)
Install the log4j Remote Logging package
To install remote logging client software on your workstation:
Select Tools > System Management Application to start the System Management application.
On the System Management application window, select a node. Select the Logging and
Tracing > Remote Logging menu item.
174
Click the link "here" in the sentence "To download log4j socket server click here." This download
contains a licensed redistribution from the Apache Software Foundation.
Save the file to a local drive and extract its contents.
Note the directory that you extracted it to so you know where to locate the startSocketServer.cmd
file. This file starts the LogFactor5 window that displays the contents of the log.
Review Internet Explorer settings to confirm that your workstation has a Java 1.4.1 or later JVM
installed and enabled.
Create a Windows shortcut for the startSocketServer.cmd file and then place it on your desktop.
You then can start LogFactor5 with a mouse click.
1)Adding Headers and Footers in a List View/Summary View
Under Format Tab of the reports. We define two sections for Header and Footer.
2)List-to-List
Summary
A List to List control on a work object form allows a user to make multiple
selections from one list of candidates. In this example flow action from an auto
insurance application,, a user selects safety equipment from the left list, each
identified by name, and clicks an arrow to add the selection to the right list. The right list identifies
chosen safety equipment options; the left list contains all of the available options.
Additional controls (unless disabled when the rule is configured) allow the user to sort either list, to
remove previous selections, to copy all or remove all selections. The user can make further changes
until the user submits the flow action form.
175
The List to List control is supported by two Page List properties, one providing the list of source
values and one providing the list of destination values. As a result, the output of a List to List
operation is not an array of text values (such as can be stored in a Value List property), but an array
of embedded pages, identified by one visible text property such as a name.
This article presents a step-by-step procedure for adding a List to List control to a harness, section,
or flow action form. For full details on all options, consult the Help system topic.
Suggested Approach
Preparations
Identify or create these parts of the List-to-List control:
The source property, a Page List property of class Code-Pega-List.
An activity or other processing to populate the source property.
A Single Value property within each embedded page that identifies the page, for display
The target property, also a Page List property, typically part of the work object. (The embedded
pages of the target property are often of the same class as the embedded pages of the
source property, but this is not a requirement.)
Properties that are needed in the target embedded pages.
The source property structure matches those produced by the Obj-Browse, Obj-List-View, and RDB-
List methods, but your application can create the source property by any means.
Unlike the Dynamic Select control and AutoComplete control, the List to List control requires the
source property to be populated before the user sees the form containing the control.
Adding the control
To add a List to List control to a flow action, harness, or section rule:
Open the rule form. Select List to List from the Advanced control
group.
Drag the List to List icon to a cell on the form, and drop it. The cell
may change size to accommodate the large control; you can adjust
the size later.
Click the magnifying glass icon at the upper right of the cell to open
the Cell Properties panel.
No changes are needed on the Field tab of the Cell Properties
panel. On the Presentation tab, confirm that the Format is
ListToList.
Click the magnifying glass to the right of the Format field to
open the Params pop-up window.
6. Complete the Params window. Identify the source property,
the target property, and the text property to appear in the
source lists. Include double-quotes around property
references if they contain a period character.
Optionally, enter two captions, to appear above the two lists.
176
Select Copy all properties if, when a user selects an item, the system is to copy all
properties on the embedded source page, creating a page with identical properties on a new
embedded page with the target property. Alternatively, you can define a from-to mapping and control
which properties are copied.
By default, the left list displays at most 200 values, even if the source property contains more
than 200 embedded pages. By default, there is no limit on the number of pages that a user can add
to the target property. You can change either limit through parameter settings.
Click Save to close the Params window.
Optionally, complete other values on the Presentation tab and Conditions tab of the Cell Properties
panel.
Click Apply to apply the changes you made to the Cell Properties panel and Parameters window.
Click OK to close the Cell Properties panel.
Save the rule form.
Test. Ensure that your application populates the source property before the work object form (or flow
action form) appears.
A sample activity
This one-step activity creates a page SafetyEquipment of class Code-Pega-List. (Identify this page
on the Pages & Classes tab of the Activity form.)
177
When executed, the clipboard contains a page for each piece of safety equipment.
After a user submits the flow action form, Process Commander copies pages from the source property to
the target page. Six selections appear as embedded pages to property pyWorkPage.Entrants.
3) Adding attachments to work objects.
Because many applications prompt users to attach files such as correspondence to work objects,
there are several standard flow actions that create work object attachments. For example, the
standard Work-.AddAttachments flow action enables users to upload a single file and select a
category for it while Work-.AddMultipleAttachments enables user to select multiple files and choose
a category for each.
178
Using Activities to attach a file.
Summary of activity steps
Activities that create the attachment objects and link them to work objects include the following
general steps:
Create a page for the work object attachment (Data-WorkAttach-File class).
Put the file on the attachment page.
Save the attachment page (Obj-Save method).
Create a link object (Link-Attachment class) that connects the attachment to the work object with
the Link-Objects method.
How to create activities that run multiple connectors in parallel
By default, a connector takes control of the requestor session until it returns a response to the
connector activity. However, when the RunInParallel parameter is selected, the connector runs as a
child requester and the activity, the parent requestor, retains control of the session. The activity can
then call another connector with a subsequent task to accomplish, and the second connector does
not have to wait for the first connector to return a response before it can start its task.
Connector activities that run connectors in parallel should do the following:
Because each connector needs its own copy of the step page, create a separate step page for
each connector, even if they share the same applies to class. Each child requestor
(connector) makes a copy of the step page and then returns the results in its copy. Therefore,
if the activity runs each connector on the same step page, the results from the connector that
finishes last overwrite the results from the other connectors.
For each connector that runs in parallel, invoke the appropriate Connect-* method with the
RunInParallel parameter selected. (For SOAP connectors, use Connect-SOAP; for JMS
connectors, use Connect-JMS; and so on.)
After the last Connect-* step, invoke the Connect-Wait method. This method tells Process
Commander how long to wait for all the child requestors (connectors) to return their responses.
This step should use a transition to check the step status before continuing to the next step.
After the Connect-Wait step, invoke the Page-Merge-Into method to copy the returned values
from all the step pages into the appropriate page.
179
How to include an image or link as a report columnHow to include an image or link
as a report column
0
Create or edit a list or summary view rule.
1
For a list view, open the Display Fields tab. For a summary view, open the DrillDown tab and
choose Detailed View.
2
Locate the property that you would like to display as an image or with a link.
3
In the HTML Property field of the property row, choose reporting_image or reporting_link from
the dropdown list.
Click the Display Formats icon (
) located to the right of the HTML Property field.
In the Value fields, enter the
ImageSourceName (reporting_image HTML property only) - name and location of the image file to
display in the report
ActivityName - the name of the activity that is called when the image or link is clicked.
ActivityClassName - the class name of the activity
Target - the name of the window. In addition, the following values can be used:
0
_blank - the HTML is loaded into a new, unnamed window
1
_parent - the HTML is loaded into the current frame's parent. If the frame has no
parent, this value acts like the value "_self"
2
_self - the current document is replaced with the specified HTML
3
_top - the HTML replaces any framesets that may be loaded. If there are no framesets
defined, this value acts like the value "_self"
Note: You can specify the size and other characteristics of the display using the remaining parameters
180
How to rename Rule-Set?
Select Tools > Rule Management > Copy / Move Ruleset. Select the rule-set and give new name and save.
JavaScript and Client-Side validation in Pega.
You can make use of client-side scripts as follows::
Create and text a JavaScript script. Include the validation that you want to do.
Create a text file rule
(Rule-File-Text rule type) with "js" as the final key part. Upload the
JavaScript file to the rule. Having the body of the script in a versioned rule file is beneficial.
On the Harness rule form, update the Scripts and Styles tab to specify the text file rule containing
the script.
Update the HTML Property rule associated with the specific field. Attach an event such as
OnChange or OnSubmit.
Rule Availability
Final
Use the Availability value of Final to signal that this rule is the final version and should not be
changed. If the Availability of a rule is set to Final, that means that you may use this version of the
Rule, but you cannot save it into the same RuleSet, or a different RuleSet, unless you change its
name. Normally, if you wish to change a rule in a locked RuleSet version (the activity “Display”), you
would perform a “Save As” of that Rule into your application RuleSet, with the same name, and
make your changes. If the rule is marked Final, however, you may only do a “Save As” and copy it
with a different name (activity “DisplayInvoice”).
No/Draft
When a rule is marked No/Draft , the system treats it as though it were not present at all; the system
ignores the rule and uses other rules. The Not Available label applies to one rule only. When the
system is gathering all the rules to consider for a rule resolution, any rule marked Not Available is
simply discarded.
181
This availability is sometimes referred to as the “draft” availability, as it can be used to test “draft”
rules before actually putting them into production. You can create a copy of a rule you wish to
change, make the change, and set availability to “No/Draft” in the main system, so the system will
ignore that rule. You can then check out the rule into your personal RuleSet and change the
Availability to “Yes” to test your change locally. This allows you to verify that the rule displays the
behavior you want, before setting the Availability of the changed rule to “Yes” for all users.
Blocked
Unlike rules marked “No,” rules marked Blocked are still considered by rule resolution. If the
rule resolution process completes, and the one rule that is the final result of that process is marked
Blocked, then the process returns “not found.”
You can think of Blocked as blocking not just the rule, but the process.
Blocked vs. No
When the system is determining which rule to use, the Availability values of BLOCKED vs.
NO will change what rule is chosen.
If there were two versions of the activity DISPLAY:
Acme-.DISPLAY
AcmeCo:05-02
Acme-.DISPLAY
AcmeCo:05-01
if the 05-02 version of the rule were set to NO, the system would use the 05-01 version. if the 05-02
version of the rule were set to BLOCKED, the system would not use the 05-01 version, but would
return “not found.”
Withdrawn
Occasionally, you need to delete a rule from an application. If the incorrect rule is stored in an
unlocked RuleSet version, you can easily delete it. However, if the application has been moved to
other systems, however, or the rule is in a locked RuleSet version, it is no longer possible to change
or delete that rule. Instead, you can withdraw the rule.
1) Where we define the WorkIDPrefix and Status of New W.O?
A: In the pyDefault Model of Work- class. We can override it in our Application Details Tab.
Here we can define different WorkIDPrefix for different class.
2) Pega Portals
PRWeb : Used for Development Purpose. We have developer/Manager/User portal
here. PRDBUtil: Supports installation and upgrade processing.
It has few functions like
182
Testing the data base connections configured in Appln Server.
Upload Application files
Setup organization
Download rule utility logs
Complete the Pega Installation process
Configure JMX settings etc.
PRsysmgmt: For SMA.
Organization: Can have Access group and Rule set.
Division: Only Access Group.
Rule Resolution Takes pattern inheritance as precedence over direct inheritance. Model chaining
does the opposite.
pzPVStream: The only one column in pc_work by default which stores work object as BLOB.
pc_assignment_worklist/workbasket: The table where W.O assignments related info are stored.
Name of BRE in Pega: PegaRules.
Process Commander: It’s an application that provides a highly interactive graphical development
and execution environment with dashboards for process monitoring also.
3 tier Architecture for Pega.
Client Tier (Dev/Man Portal) -> Appln Server Tier (Rule cache, BRE, DB Roles, Data Dictionary) ->
DB Tier.
Declarative rules are fired automatically -> by Agents.
If we create a new page by Page-New method, we can provide a model to initialize the properties of
the method.
pzInsKey: Combination of Class name + primary key
SendEmailNotificationWithAttachment: Activity that send email with attachment. We have to give
attachment page name in parameter.
Difference between Decision Tree/Table.
Decision table can be edited in excel.
Decision trees can have nested if and test on multiple properties.
Trees can call other decision rules. Table can call only tables.
Application Server
1) Creating a JDBC Connection
183
Go to Admin Console of Websphere. Give username and password.
There is a link under JDBC - Data Sources. You can add a new data source here.
In Tomcat, we have datasource description in context.xml file. We can use them to create resources
in web.xml
The standard function callActivity( ) in the Pega-RULES Utilities library calls an activity, but returns
only void, not a value result. You can execute an activity in an expression, but only for its side
effects. Identify the primary page, the activity, and the parameter page. For example:
@Pega- RULES:Utilities.callActivity(pyWorkPage,
MyActivity, tools.getParameterPage());
Agile Software Methodologies
Agile software development is a software development methodologies based on iterative and
incremental development, where requirements and solutions evolve through collaboration
between self-organizing, cross-functional teams.
It promotes adaptive planning, evolutionary development and delivery, a time-boxed iterative
approach, and encourages rapid and flexible response to change.
Twelve principles underlie the Agile Manifesto, including:[7]
Customer satisfaction by rapid delivery of useful software
Welcome changing requirements, even late in development
Working software is delivered frequently (weeks rather than months)
Working software is the principal measure of progress
Sustainable development, able to maintain a constant pace
184
Close, daily co-operation between business people and developers
Face-to-face conversation is the best form of communication (co-location)
Projects are built around motivated individuals, who should be trusted
Continuous attention to technical excellence and good design
Simplicity
Self-organizing teams
Regular adaptation to changing circumstances
SCRUM Methodologies
Scrum is an iterative, incremental framework for project management often seen in agile software
development, a type of software engineering.
Although the Scrum approach was originally suggested for managing product development projects,
its use has focused on the management of software development projects, and it can be used to run
software maintenance teams or as a general project/program management approach.
Characteristics
Scrum is a process skeleton that contains sets of practices and predefined roles. The main roles in
Scrum are[7]:
the “ScrumMaster”, who maintains the processes (typically in lieu of a project manager)
the “Product Owner”, who represents the stakeholders and the business (Client’s Voice)
the “Team”, a cross-functional group who do the actual analysis, design, implementation, testing,
etc.
Daily Scrum Meeting. Scrum of Scrums meeting. Story points.
About Direct Capture of Objectives
Direct Capture of Objectives (DCO) is a suite of features that enable project team members
to directly capture, organize and manage business specifications inside of Process Commander and
associate them with the specific parts of the application that are implementing them.
Designed as an enabling technology suite, it can be used collaboratively and productively by project
teams that include members of the business analyst, user, developer, quality assurance and IT
communities of your organization. By removing redundancies and disconnects, it helps close gaps
in the development process by fostering a Build for Change mindset that encourages reuse of
application assets, automates common project activities, and generates on-demand, up to date,
accurate project documents.
DCO is not a methodology in and of itself. It is an agile process that is adaptable to any size project
and can be used in conjunction with any implementation methodology. When applied consistently,
DCO saves you time, effort, and budget dollars while improving and maintaining project and
application quality.
The end result and benefit of using DCO is a clear 360 degree view of your Process Commander
application through a project life-cycle.
185
Direct Capture tools include:
Application Profiler — captures objectives, use cases, requirements, processes, interfaces, reports,
correspondence, and case type relationships; estimates project sizings; documents the collected
information as an application profile document; jump starts application development by providing
the information as input to the Application Accelerator.
Application Accelerator — jump starts the creation and extension of your application and automates
best practices for application design; consuming information from an application profile, it creates
organization and class structures, case type relationships, and draft processes and user interface
elements so you can see the working application based on the captured information.
Application Document wizard — supports rapid and iterative documentation of the application as
development progresses using your predefined templates and content settings.
Application Use Case — allows business users to describe at an atomic, granular level the steps
required to build an application in business language; stored as business rules and linked to
processes and other application components to provide development and testing detail and
traceability as development progresses.
Application Requirement — allows business users to describe capabilities that the application must
fulfill and define success criteria; stored as business rules and linked to other rules to provide
development and testing detail and traceability.
Rational Unified Process (RUP)
Pegasystems implementation methodology is based on Rational Unified
Process. The focus is on
project management,
186
return on investment,
conformance to best practices and compliance
requirements, communication with stakeholders,
creation of physical artifacts that help ensure project success.
Advantage of RUP.
Develop software iteratively
Manage Requirements
Use Component based architecture
Visually model software
Verify the Quality
Control changes to software.
Pegasystems' methodology includes the following
phases:
Business Value Assessment phase
— Assess
return on investment, define success criteria,
understand high-level requirements. Produces
a project plan, scope document, and project
sizing estimate
Conception phase — Analyze the problem domain,
define requirements, establish a scalable
architectural foundation, and identify high-risk
elements. Produces a requirements document,
a high-level design document, test plan, and
deployment plan.
Elaboration phase — Design solutions tailored to the business requirements
Construction phase — Iterative development following a build order. Built the application to meet business
requirements.
Transition phase — Deploy, validate, test and use.
Typical Interview Questions by Pega PS for Medco Account
Technical Questions
What are the various phases in Pega SmartBPM methodology?
-
Using SmartBPM” & “Getting Started with PRPC Using Pega Scrum”.
The SmartBPM implementation methodology (v2) is used within Pegasystems own Professional
Services teams — and by partners and others — to organize and run application development
projects.
In contrast to many more prescriptive, rigid methodologies, the SmartBPM methodology is an
adaptable process framework. The methodology is closest in approach to the popular Rational
Unified Process (RUP), and is compatible with Unified Modeling Language (UML) approaches.
187
Flexibility allows the team to adapt the methodology to large and small projects. The processes can
be right-sized to project needs. Experience shows that the SmartBPM methodology can be followed
without conflicting with most organization's existing (post-1990, non-waterfall) methodologies and
project management approaches.
Large applications are subdivided into functional slivers of limited scope, to reduce risk and allow
benefits and return-on-investment to start earlier.
Benefits
The list of expected benefits from the methodology may be familiar — they are similar to those
claimed by almost every methodology .
However, important differences in Pegasystems' approach help to realize these benefits:
Manage projects in a structured, repeatable fashion
Common terms and language used by all stakeholders
Support iterative, rapid application development
Generated documentation matches current implementation
Promote and encourage reuse
Promote and encourage compliance with industry standards
Manage project risks
Enabling tools
Wizards and tools built into Process Commander directly support teams during each phase
— not just during the development (Construction) phase — of their projects.
By capturing even preliminary ideas about system objectives, system participants (actors),
assumptions, interaction scenarios or use cases, Process Commander provides value and useful
foundations very quickly. Information is saved in a single repository — a RuleSet — rather than in
disparate formats based on Microsoft Word, Excel, Visio, and other general-purpose tools.
Since these early ideas naturally evolve and change, the internal Process Commander
representation of them can be updated too, providing a project history and avoiding the need to
switch tools when "real development" starts.
188
As suggested by the diagram, these features of Process Commander (V5.4+) can directly support
the methodology:
The Application Profiler, recording application objectives, requirements, use cases and roles
The Application Document wizard
The Enterprise Application Accelerator
Auto testing facilities
The Project Explorer and Project Management Framework
Phases:
The methodology identifies five major phases: Pre-inception, Inception, Elaboration,
Construction, and Transition. But as suggested by the diagram, these phases overlap both during a
single iterative development of each "slice" of the application, and they overlap because more than
one slice may be developed at once.
189
The Pre-Inception Phase
The Pre-Inception phase is primarily for knowledge transfer and education. The goal is to provide the
business participants with terminology that will assist with requirements gathering, objective
determination and scope definition.
The Inception Phase
During the Inception Phase the team defines the scope of the sliver being implemented. This phase
produces three artifacts:
An Application Profile
A project sizing
A high-level project plan
These three deliverables help to define the scope, effort and timelines of the application. The
tangible result of the Inception phase is an approved Application Proposal.
The Elaboration and Construction Phase
The Elaboration/Construction phase is focused on the Direct Capture of objectives as well as
iterative construction tasks associated with requirements and use cases.
Direct Capture of Objectives (DCO) allows information to be entered once and reused many times —
for planning, documentation, and testing. DCO can drastically reduce the effort and elapsed time
otherwise needed to keep documentation up to date.
During this phase, business users participate in periodic reviews of the application as it advances
and grows iteratively, identifying at the earliest moment any divergence in requirements and
development efforts.
The Enterprise Application Accelerator, Auto Test features, Application Preflight tool, and Auto Test
facilities can be helpful during this phase.
190
This phase can be iterated rapidly, without advancing to the Transition phase. Progress and results
can be assessed often, even biweekly.
The Transition Phase
The Transition phase is used to test and to ensure the quality of the application. Application quality
includes:
System testing
Interface testing
Performance testing
User acceptance testing (UAT).
191
Go-Live
A Go-Live occurs when an application is moved — often just one sliver at a time — into a production
environment and business users begin using the application to perform real work.
What phases have you worked on in your previous projects? Inception, Elaboration, Construction
etc. - Say all & think of some examples of what you did based on the understanding from
above link.
What are the Guardrails in Pega? Mention the guardrails with an explanation of each, some if not
all. - You can find this easily in PDN / Pega Help.
The Ten Guardrails to Success are design guidelines and recommended best practices for Process
Commander implementations.
Suggested Approach
Following the fundamental principles promoted in the Ten Guardrails to Success leads to rules-
based applications that are well designed, straightforward to maintain, and architected to Build for
Change™. They are your keys to success with Process Commander.
Adopt an Iterative Approach
0
Define an initial project scope that can be delivered and provide business benefit within 60-90
days from design to implementation.
1
Document five concrete use case scenarios up front and evaluate them at the end to calibrate
benefits.
2
Use your scenarios as story boards and ensure that each delivers a measurable business
benefit.
192
Establish a Robust Foundation
0
Design your class structure complying with the recommended class pattern.
1
It should be understandable, be easy to extend, and utilize the standard work and data
classes appropriately.
2
Use your organization entities as a starting pattern, and then proceed with class groups.
3
Lead with work objects. Create the class structure and “completed work” objects early.
4
Position rules correctly by class and/or RuleSet.
5
Actively use inheritance to prevent rule redundancy.
Do nothing that is Hard
0
Use “out of the box” functionality as much as possible, especially in the initial project release.
1
Avoid creating custom HTML screens or adding buttons.
2
Always use the “Auto Generated HTML” feature for harness sections and flow actions.
3
Always use the standard rules, objects, and properties. Reporting, Urgency, Work Status, and
other built-in behaviors rely on standard properties.
4
Never add a property to control typical work or for managing the status or timing of work.
Limit Custom Java
0
Avoid Java steps in activities when standard Process Commander rule types, library
functions, or activity methods are available.
1
Reserve your valuable time and Java skills for implementing things that do not already exist.
Build for Change ™
0
Identify and define 10-100 specific rules that business users own and will maintain.
1
Activities should not be on this list. Use other rule types for business-maintained logic.
193
Design Intent-driven Processes
0
Your application control structure must consist of flows and declarative rules, calling activities
only as needed.
1
Use flow actions to prompt a user for input.
2
Present fewer than five connector flow actions for any individual assignment. If you need
more than that, you need to redesign the process.
3
Create activity rules that implement only a single purpose to maximize reuse.
Create Easy-to-Read Flows
0
Your flows must fit on one page and must not contain more than 15 SmartShapes (excluding
Routers, Notify shapes and Connectors) per page.
1
If a flow has more than 15 SmartShapes:
o Create a subflow.
o Use parallel flows to perform additional functions
194
Monitor Performance Regularly
0
Evaluate and tune application performance at least weekly using Performance Analyzer
(PAL) to check rule and activity efficiency.
1
Use PAL early to establish benchmarks. Compare these readings to follow on readings;
correct application as required.
Calculate and Edit Declaratively, Not Procedurally
0
Whenever the value of a property is calculated or validated, you must use declarative rules
wherever appropriate.
1
Create a Declare Expressions rule instead of using a Property-Set method in an activity.
2
Use a Declare Constraints rule instead of a Validation rule.
195
Keep Security Object-Oriented, Too
0
Your security design must be rule-based and role-driven based on who should have access
to each type of work.
1
Never code security controls in an activity.
2
Use the standard access roles that ship with Process Commander only as a starting point.
3
Use RuleSets to segment related work for the purpose of introducing rule changes to the
business, not as a security measure.
What are the basic Pega classes? Work-, Data- etc. - You can find this easily in PDN / Pega
Help.
A base class is one of twelve standard abstract classes that are immediately below the top class in
the hierarchy. This top class, known as the ultimate base class, is identified by the symbol
The three base classes of greatest interest to application developers are Data-, Assign- and Work-.
The base classes are:
Base class Description
Assign- Assignment instances, each identifying a step in a workflow that requires human input or work by an outside
organization, person, or system.
Code-
Classes that directly reference server program code. Pages belonging to classes derived from the Code-
base class exist only temporarily in memory, and are not saved in the PegaRULES database.
Data-
Parent class of concrete classes containing reference data, including data for system administration and
security.
DCOMSOffice- Reserved.
DocletGenerator- Reserved.
Embed-
Defines the structure of pages embedded within other pages. Pages belonging to classes derived from the
Embed- base class cannot be renamed or directly saved.
19
6
History-
Append-only instances record the change history of objects in another class.
Index-
Secondary access keys defined to provide fast retrieval of other instances.
Link-
Instances that record associations between two objects.
Log-
Parent of concrete classes containing cumulative logs of important system-wide events.
PegaAccel-
Parent of special classes that support the Application Accelerator tool.
Rule-
Rule types, for defining applications.
System-
Contains operational status information about the entire Process Commander system.
Work-
Work objects, covers, and folders.
Custom classes that are immediate child classes of the ultimate base class are known as top-level
classes. These are different from base classes.
Types of classes - Abstract and Concrete, explain about them. - You can find this easily in PDN /
Pega Help.
An abstract class is a rule (an instance of the Rule-Obj-Class class) created to support the
definition of rules, including other classes. Such rules can be inherited by subclasses of the
abstract class. Rules with a class as a key part (such as properties, activities, flows, models,
and so on) can apply to an abstract class.
In the Class Explorer display, a shape identifies an abstract class.
A class that is not abstract is concrete. Unlike abstract classes, concrete classes can have
instances stored in the database. A selection on the Class rule form determines whether a
new class is abstract or concrete.
An abstract class can be a child — a subclass — of a higher abstract class.
A dash or minus character (-) as the last character in the class name indicates an abstract class.
For example, the Work-Cover- class is an abstract class, while Work-Cover-General is a
concrete class
A concrete class can have instances stored in the database. In contrast, an abstract class
cannot have any instances.
A selection on the Class form determines whether a class is concrete or abstract. On the Class
Explorer display, the shape identifies a concrete class.
For all but a few classes, a dash or minus sign (-) character as the last character in the class
name indicates that the class is abstract and can contain other (abstract or concrete) classes.
For example, the Rule- class and Work-Cover- class are abstract classes, while Work-Cover-
General is a concrete class.
Concrete classes usually appear near or at the bottom (leaf nodes) of the class hierarchy, but
may appear anywhere below the top level.
197
Kinds of inheritance - Pattern/Direct. which takes precedence and how do you let Direct take
precedence (by un-checking the checkbox in Class form) - You can find this easily in PDN /
Pega Help.
Inheritance is a primary benefit of object oriented technology. Process Commander offers multiple
types of inheritance that can maximize reuse of your rules while allowing localized overriding as
appropriate. Also called polymorphism, inheritance allows a rule created for one class
(possibly an abstract class) to be applied to other classes that inherit from it:
Process Commander provides two types of class inheritance, both of which allow rules of ancestor
classes to be inherited:
Directed inheritance — Allows you to name a parent class, choosing a name that's not related to the
name of this class
Pattern inheritance — The system determines the name of the parent class is based on an initial
portion or substring of the name of the class. Segments of the name are delimited by a dash (-)
character.
Pattern inheritance:
During rule resolution, pattern inheritance causes a class to inherit rules first from classes that
match a prefix of the class name.
Select the Find by name first (Pattern)? check box on the Class rule form to instruct the
system to use pattern inheritance for this class.
The algorithm
For a class using pattern inheritance, the following is a simplified description of the rule resolution
algorithm:
Search each class formed by repeatedly truncating the original class name, stopping if the needed
rule is found.
If the pattern search finishes without finding a rule, go back to the original class and use directed
inheritance to find the parent of the original class.
If the parent class identified in step 2 was searched during step 1, skip it and skip to step 5.
If the parent class was not previously searched, search it. Stop if the needed rule is found.
If not found, determine whether the parent class uses pattern inheritance. If so, repeat this algorithm,
starting at step 1, with the parent class.
Otherwise, identify the parent of the parent. Continue at step
What kinds of Declarative rules used with some e.g. - You can find this easily in PDN / Pega
Help.
Allow for dynamic processing of property values
0
Do not need to be explicitly called
1
Declarative rules need / should not be referred from any rule. They are always in force
198
Declarative rules will be in force automatically and hence you need not call these rules
explicitly
Types of Declarative Rules:
Constraints rules (Rule-Declare-Constraints)
Declare Expression rules (Rule-Declare-Expressions)
Declare Index rules (Rule-Declare-Index)
Declare OnChange rules (Rule-Declare-OnChange)
Declare Trigger rules (Rule-Declare-Trigger)
1)Constraints rules :
Create constraints rules to define and enforce comparison relationships among property
values. Constraints rules can provide an automatic form of property validation every time the
property's value is "touched", in addition to the validation provided by the property rule or other
means.
The system evaluates constraints automatically each time a property identified in a constraints rule
is changed. This technique is known as forward chaining.
Where referenced
No other rules explicitly reference constraints rules. When you save a constraints rule, Process
Commander enforces it immediately and thereafter. The system automatically adds a message to
any property that is present on the clipboard and fails a constraint
Delegation
After you complete initial development and testing, you can delegate selected constraints rules to
line business managers. The Constraints tab of the Constraints form provides managers with
access to the fields most often updated.
Provide bounds(limits) on the value that a property can hold. For example:
0
Property cannot be negative
1
Property cannot be greater than a certain value
Can target more than one property in a single constraints rule
2) Declare Expression
rules: Purpose
Use Declare Expression rules to define automatic computations of property values based on
expressions.
199
Don't confuse Declare Expression rules with simple expressions. Expressions — a syntax that
includes constants, function calls, operators, and property references — are used in many situations
in addition to Declare Expression rules.
Forward chaining
Often, Process Commander recomputes target property values automatically each time any of the
other input values in the expression change, or when a value for this property is accessed, changed,
or using other criteria. This technique is known as forward chaining.
For example, you can declare that a property named Order.TotalPrice is always the sum of:
OrderLine(1).TotalPrice
OrderLine(2).TotalPrice
OrderLine(3).TotalPrice
and so on. You can also declare that OrderLine().TotalPrice is always equal to .Quantity multiplied
by.UnitPrice.
Backward chaining
In an activity, the Property-Seek-Value method can access the computational relationships among
properties in a Declare Expression rule to identify source values needed to compute a missing
property value. This technique is known as backward chaining.
For example, consider a single Declare Expression rule defining Circumference as 3.1416 times
Diameter with Change Tracking set to Whenever used. This rule can be used in either forward-
chaining or backward-chaining mode:
If step
3 of an activity causes the value of Diameter to be set, an updated value for the
Circumference property is available at the start of step 4 (forward chaining).
If step 1 of another activity uses the Property-Seek-Value method with Circumference as the
target, and no value for Circumference is found, the system seeks a value for Diameter
(backward chaining).
Delegation
After you complete initial development and testing, you can delegate selected Declare
Expression rules to line business managers. The Expressions tab of the form provides managers
access to the fields most often updated.
** For example, we can declare a R-D-E for property called “Area” , so that whenever it’s value is
accessed from clipboard, it’s value is equal to the product of properties, Length and Width. Once the
R-D-E is saved for the property “Area”, any change to a Length or Width value, regardless of how it
occurs, causes an immediate recomputation of the value of the Area property.
200
3) Declare OnChange rules:
Purpose
CreateDeclare OnChange rules to run an activity automatically at activity step
boundaries(limitations) when the value of a specified property changes. This capability provides a
form of automatic forward chaining.
For example, a Declare OnChange rule can update a year-to-date counter property (an integer) to
track how many times a work object status changed in value. Another Declare OnChange rule can
compute the average dollar amount of work objects entered by a work group, in real time.
For example If you specify more than one property, they all must be on same page. For example,
we can create a declare onchange to call an activity that send a mail to employee when ever either
HRA or Basic or SpecialAllowance are changed
Where referenced
No other rules explicitly reference Declare OnChange rules. After you save a Declare OnChange
rule, Process Commander immediately thereafter runs it when and as needed
4) Rule-Declare-Index:
Declare Index rule are defined for defining criteria under which Process Commander
automatically maintains index instances for faster access. An index can improve search and
reporting access for properties that cannot be exposed as database columns because they are
embedded within an aggregate property.
8. Function alias. - You can find this easily in PDN / Pega Help.
Use an alias function rule to define prompting for a function rule for users who maintain decision
rules. The alias rule provides an optional natural-language description and prompting that supports
certain selection lists on decision rule forms.
201
Complete and test the function rule itself before defining a function alias rule that references it.
You cannot define an alias for a function rule that returns a complex Java type (that is, a type
other than a Java.lang.String type or a primitive type such as int).
Where referenced
Alias function rules are useful for functions that managers or less technical developers may use
frequently in decision tree rule, when condition rules, Declare Expression rules, and constraints rules.
Utility functions and e.g. of where it is used .This was asked as an example of Reusability
guardrail, question #2. - - You can find this easily in PDN / Pega Help.
instances of the Rule-Utility-Function rule type You can call these functions in expressions
and activities.
Rule-Utility-Function instances, when generated into Java, are public static Java methods
which are grouped into libraries (Rule-Utility-Library rule type).
PAL:
Use the Performance tool to understand the system resources consumed by processing of a single requestor
session, or the SQL statements sent to the PegaRULES database by the requestor session.
Process Commander always accumulates cumulative resource statistics for the Performance tool. Use the tool
to display these statistics, and to identify incremental resources
(in the delta rows) consumed by your
processing. Because this feature displays existing data, its use does not degrade processing.
The Performance tool is sometimes known as PAL.
Question on how to copy rules from one ruleset to another? Mention the Ruleset maintenance
wizard and specify how you do it. Have list views, get list of rules in each, check if any rules
are checked out etc. Please take a look at the steps in this wizard. (This question was asked
in most of his interviews) -> Check all the items under Tools -> Rule Maintenance
Copy a Version of a RuleSet to another RuleSet name
To copy the contents of a RuleSet version to another RuleSet name:
Select Tools > Rule Management > Copy/Move RuleSet.
0
Move from the left box to the central box the RuleSet version you want to copy (the
Rule Management wizard allows you to copy versions, but not full RuleSets). Select
the Copy radio button.
202
1
On the right side of the form, specify the name and version of the RuleSet you wish to
copy to. Specify whether source rules are to overwrite any existing rules in the target
RuleSet.
2
Click Next. A review form appears. If all is as you want, click Next.
3
When the process is complete a report will appear. You can review the list of rules
that were copied and those that were skipped. You can export this summary for
further review. When you are finished, click Done.
Can a work user access the clipboard and if so what can he/she see?
-> It’s based on the role / privilege. Find out the role / privilege associated for clipboard.
Data-Party classes? Gov, Div, Org etc. - You can find this easily in PDN / Pega Help.
Work party data classes
You can use data classes derived from the Data-Party class to organize your role
and work party data into meaningful categories. Using sub-classes enables
you to produce reports based on their classes. You can also associate each
class with a model that defines the initial properties you want to include when
you design the PartyDisplay section rule. The system is delivered with five
standard Data-Party sub-classes as follows, which include example definitions
for each:
Data-Party-Com — Business organizations
203
Data-Party-Gov — Government organizations
Data-Party-Operator— Process Commander users (who have Operator IDs)
Data-Party-Org — Nonprofit organizations
Data-Party-Person — Parties who are not Process Commander users
You can create your own sub-class and an associated model.
What is used for a non numeric subscript? Value group/page group - Go through the property
rule details.
Value group/page group - Go through the property rule details.
Page Group and Value Group members/properties are retrieved/identified by using non
numeric subscript called keys
For Example:
Single property -, Page -, Value List -, Page List--, Value List—, Page Group -
Phone
street
city
Page
Zip
Address(1)
Address(2)
Phone(1)
street
street
Page
city
city
List
Phone(2)
Zip
Zip
Address(Home)
Address(Work)
Phone(Home)
street
street
Page
city
city
Group
Phone(Work)
Zip
Zip
Agent calls an activity to start a flow. There's an error and activity doesn't start, what could be the
possible reasons and how will you debug?
Check if the activity's 'Authenticate' checkbox has been checked. Agents are
unauthenticated/guest users. Also check Pega logs.
Which frameworks have you worked on? CPM is used in this project.
Question on Smart Dispute how Q&A kind of questions have been done in SD?
Done any CTI integration? CTI will be used for a future phase.
What is REST? Protocol used in HTTP. Please read on general REST features.
REST stands for Representational State Transfer. (It is sometimes spelled "ReST".) It relies on a
stateless, client-server, cacheable communications protocol -- and in virtually all cases, the HTTP
protocol is used.
REST is an architecture style for designing networked applications. The idea is that, rather than
using complex mechanisms such as CORBA, RPC or SOAP to connect between machines, simple
HTTP is used to make calls between machines.
In many ways, the World Wide Web itself, based on HTTP, can be viewed as a REST-based
architecture.
RESTful applications use HTTP requests to post data (create and/or update), read data (e.g., make
queries), and delete data. Thus, REST uses HTTP for all four CRUD (Create/Read/Update/Delete)
operations.
REST is a lightweight alternative to mechanisms like RPC (Remote Procedure Calls) and Web
Services (SOAP, WSDL, et al.). Later, we will see how much more simple REST is.
Despite being simple, REST is fully-featured; there's basically nothing you can do in Web
Services that can't be done with a RESTful architecture.
REST is not a "standard". There will never be a W3C recommendataion for REST, for example. And
while there are REST programming frameworks, working with REST is so simple that you can often
"roll your own" with standard library features in languages like Perl, Java, or C#.
2. REST as Lightweight Web Services
As a programming approach, REST is a lightweight alternative to Web Services and
RPC. Much like Web Services, a REST service is:
Platform-independent (you don't care if the server is Unix, the client is a Mac, or anything else),
Language-independent (C# can talk to Java, etc.),
Standards-based (runs on top of HTTP), and
Can easily be used in the presence of firewalls.
Like Web Services, REST offers no built-in security features, encryption, session management, QoS
guarantees, etc. But also as with Web Services, these can be added by building on top of HTTP:
For security, username/password tokens are often used.
For encryption, REST can be used on top of HTTPS (secure sockets).
205
... etc.
One thing that is not part of a good REST design is cookies: The "ST" in "REST" stands for "State
Transfer", and indeed, in a good REST design operations are self- contained, and each request
carries with it (transfers) all the information (state) that the server needs in order to complete it.
3. How Simple is REST?
Let's take a simple web service as an example: querying a phonebook application for the details of a
given user. All we have is the user's ID.
Using Web Services and SOAP, the request would look something like this:
<?xml version="1.0"?>
<soap:Envelope
xmlns:soap="http://www.w3.org/2001/12/soap-envelope"
soap:encodingStyle="http://www.w3.org/2001/12/soap-
<pb:GetUserDetails>
<pb:UserID>12345</pb:UserID>
</pb:GetUserDetails>
</soap:Body>
</soap:Envelope>
(The details are not important; this is just an example.) The entire shebang now has to be sent
(using an HTTP POST request) to the server. The result is probably an XML file, but it will be
embedded, as the "payload", inside a SOAP response envelope.
And with REST? The query will probably look like this:
Note that this isn't the request body -- it's just a URL. This URL is sent to the server using a simpler
GET request, and the HTTP reply is the raw result data -- not embedded inside anything, just the
data you need in a way you can directly use.
It's easy to see why Web Services are often used with libraries that create the SOAP/HTTP
request and send it over, and then parse the SOAP response.
With REST, a simple network connection is all you need. You can even test the API directly,
using your browser.
Still, REST libraries (for simplifying things) do exist, and we will discuss some of these later.
Note how the URL's "method" part is not called "GetUserDetails", but simply "UserDetails". It is a
common convention in REST design to use nouns rather than verbs to denote simple resources.
The
letter
analogy
A nice analogy for REST vs. SOAP is mailing a letter: with SOAP, you're using an envelope; with
REST, it's a postcard. Postcards are easier to handle (by the receiver), waste less paper (i.e.,
consume less bandwidth), and have a short content. (Of course, REST requests aren't really limited
in length, esp. if they use POST rather than GET.)
4. More Complex REST Requests
The previous section included a simple example for a REST request -- with a single parameter.
REST can easily handle more complex requests, including multiple parameters. In most cases,
you'll just use HTTP GET parameters in the URL.
206
For example:
If you need to pass long parameters, or binary ones, you'd normally use HTTP POST requests, and
include the parameters in the POST body.
As a rule, GET requests should be for read-only queries; they should not change the state of the
server and its data. For creation, updating, and deleting data, use POST requests. (POST can also
be used for read-only queries, as noted above, when complex parameters are required.)
In a way, this web page (like most others) can be viewed as offering services via a REST API;
you use a GET request to read data, and a POST request to post a comment -- where more
and longer parameters are required.
While REST services might use XML in their responses (as one way of organizing structured data),
REST requests rarely use XML. As shown above, in most cases, request parameters are simple,
and there is no need for the overhead of XML.
One advantage of using XML is type safety. However, in a stateless system like REST, you
should always verify the validity of your input, XML or otherwise!
How do you use XMLs in Pega? Obj, Parse etc.
Parse XML:
Use Parse XML rules with services and connectors to map data from an XML text message
into clipboard property values. Each Parse XML rule contains an array of parsing instructions
that let Process Commander interpret an incoming XML document or message.
The incoming message may arrive using an e-mail protocol or by SOAP over HTTP protocol.
The message may be a request for service or a reply from a connector.
Use the Application Explorer to access parse XML rules that apply to the work types in your
application. Use the Rules by Type Explorer to list all parse XML rules available to you.
XML Stream:
Use this method to save the contents of an XML Stream rule after stream processing
completes as the value of a Single Value property. The property value can then be mapped
as output and conveyed to an external system.
The target property value is the XML text from an XML Stream rule (Rule-Obj-XML rule type),
after stream processing. Stream processing evaluates directives and clipboard references.
Parameters
This method has three parameters:
Parameter Description
PropertyName
Identify a Single Value target property to receive the value produced by stream
processing.
If the property is on the step page, precede the property name with a period.
If this property is on a different page, include the page name in the reference and
207
ensure that this page appears on the Pages & Classes tab of the Activity form.
XMLStream
Enter the Stream Name key part of an XML Stream rule to process.
XMLType
Enter the third key part of an XML Stream rule to process.
Cautions
0
You can't use this method for a property that is also the target property of a
Declare Expression rule. You can't save the Activity form if such a conflict is detected.
1
Don't attempt to set the value of a property that has a name starting with pz;
changes to such properties are reserved.
2
Use the standard activity Work-.UpdateStatus — not this method — to change the
value of a work object status (pyStatusWork property).
UI development what all do you need to do? Skins, portals, flow actions, sections, harnesses.
Mention the Application Skin wizard and other wizards used in UI development.
About Flow Action rules
New
Form
Help Setup
Action
Security
Pages & Classes
HTML
History
More...
Purpose
A flow action rule controls how users interact with work object forms to complete assignments. After
selecting one flow action, users may fill in a section of the form to complete (perform) the assignment.
Where referenced
In a flow rule, developers can associate flow actions with connectors (arrows) and with assignment
tasks. At runtime, the flow actions associated with an assignment determine the choices available to
users as they perform the assignment.
Controls
Containers
Basic
208
Advanced
Short Descriptions
Choose the wording for the Short Description field carefully, so that it is meaningful in context to application
users who must select one action from the list. Starting each Short Description text with an action verb such as
"Approve", "Reject", "Send", or "Transfer" is often helpful to users. This is known as intent-driven processing.
On Perform work object forms presented with the default action section, the form area
created by a flow action normally appears in yellow, headed by an action list:
The text in the Short
Description field appears as user-visible text in the action selection list.
Two other formats are supported. See Presenting flow actions — Comparing three approaches.
Access
Use the Application Explorer or User Interface slice (
) to access the flow action rules that apply
to the work types in your application. Use the Rules by Type Explorer to list all the flow action rules
available to you.
Delegation
After initial development and testing, selected flow action rules can be maintained by line business
managers rather than by application developers. The Form tab of the form provides managers
access to the fields most often updated.
About Harness rules
New
Layout
Scripts and Styles
Pages & Classes
HTML
Display Options
History
More...
Purpose
Use harness rules to define the appearance and processing of work object forms used in your
application to create work objects and process assignments.
Like section rules, HTML rules, property rules, and others, harness rules define the structure,
appearance, and behavior of the forms used in applications to create and update work objects and
assignments.
Process Commander includes more than a dozen standard harness forms for entering, reviewing,
updating, and processing work objects and assignments. Your application can override the standard
rules to extend and tailor them to specific needs.
Before creating or editing harness, section or flow action forms, set the Skin preference (in the Run
Process area of the General Preferences group) to the skin that application users are expected to use.
This provides the closest approximation during development of the runtime look and feel of the form.
Beginning with V5.5, you can use harness rules to define composite portals, as well as work
object forms. For this advanced special use, see How to create a composite portal.
209
Controls
Column Repeat
Layout
Tabbed
Row Repeat
Repeat
Basic
Advanced
Applications without work object forms
Work object forms defined by harness rules are typical, but not required, elements of a Process
Commander application. Some business process management applications use an external portal
or external system and call Process Commander services to create work objects, advance them
through a flow, perform flow actions, and so on. The Process Engine API is a collection of standard
activities that apply to the Work- base class to support such headless applications.
Where referenced
Each flow rule that creates a new work object identifies a harness rule to capture initial information
about that work object.
Standard activities that apply to the Work- class look (using rule resolution) for harness rules with
specific names, such as New, Perform, and Review. To display a work object form defined by a
User interaction with work object forms
For basic information about using work object forms defined by harness rules from an application
user perspective, see Using work object forms.
Rule forms
Beginning with V5.5, a few rule forms are defined through harness and section rules. This
capability is reserved. If your application includes custom rule types, use the Form Builder tool, not
harness rules, to define forms.
Access
Use the User Interface slice (
) or Application Explorer to access the harness rules that apply to the work
types in your application. Use the Rules by Type Explorer to list all the harness rules available to you.
210
Category
Harness rules are instances of the Rule-HTML-Harness class. They are part of the User Interface category
About Portal rules
New
Skins
Tabs
Spaces
Custom
Options
History
More...
Purpose
Use portal rules to create a custom portal layout for a group of users. You can determine:
The portal type — Developer, composite portal (V5.5+) or older legacy types
For composite portals, the harness rules that define each space
CSS styles for the portal window, reports, and work object forms
For legacy User portals, the gadgets, workspaces and workspace labels
Contrasting composite portals and legacy User portals
Introduced with V5.5, composite portals are defined by harness rules and section rules. Unlike
legacy user portals, composite portals when appropriately configured can operate with both
Internet Explorer
6/7 browsers and Mozilla Firefox 2+ browsers. Composite portals are
recommended for new development. The parts — known as spaces — of a composite portal
are defined on the Spaces tab.
Introduced with V5.1, traditional portals include the standard WorkUser and WorkManager
portals, which operate only with Internet Explorer 6/7. Traditional portals operate in V5.5 as in
earlier releases. Traditional user portals are built from gadgets — special HTML rules —
rather than harness and section rules. Gadgets are referenced on the Options, Tabs, and
Custom tabs. Through activities and HTML rules, you can create additional gadgets for
traditional portals, and determine their appearance and behavior. See How to customize User
portal layout and behavior.
Access
Use the Rules by Type Explorer to list all portal rules available to you.
Where referenced
Portal rules are referenced in the Settings tab of the access group form. Users associated with that
access group see the corresponding portal layout.
Category
Portal rules are part of the User Interface category. A portal rule is an instance of the Rule-Portal rule type.
Standard Portal rules
Your system contains a few standard portal rules. Use the Rules by Type Explorer to see a complete list of the
standard and custom rules available to you.
You cannot alter the standard portal rules. To tailor the User, Manager, WorkManager or WorkUser portal,
copy the standard rule into an application RuleSet and alter your copy. The Developer portal rule is final.
211
Recommended portal rules
Owner
Purpose
Developer
Supports the Developer portal. Recommended. See Developer portal basics.
Select Allow rule check out? on the Security tab of the Operator ID instance for operators who use this portal.
Manager
Composite portal
for managers and supervisors. Introduced in V5.5. Similar in capabilities to the traditional
WorkManager portal, introduced in V5.2.
User
Composite portal
for workers. Introduced in V5.5. Supports mulitple open work objects; otherwise similar in
capabilities to the traditional WorkUser portal, introduced in V5.2. Supports full localization. See User portal
basics.
Other standard portal rules
Owner
Purpose
TabbedWorkSample
Sample traditional portal with Type (on the Skins tab) of Custom.
Traditional portal rules
These portals support special situations and provide backward compatibility.
Owner
Purpose
WorkManager
Traditional. Supports managers and supervisors, who can use the Monitor Activity workspace and
the Scan Station tool. Supports full localization and IE 6/7, but not FireFox. See User portal basics.
You can override this standard portal with another (in an application RuleSet with the same name)
using the Application Skin wizard. See About the Application Skin wizard.
WorkUser
Traditional. Accesses the Process Work layout only, for application users who are not managers.
Supports full localization and IE 6/7, but not FireFox. See User portal basics.
You can override this standard portal with another (in an application RuleSet with the same name)
using the Application Skin wizard. See About the Application Skin wizard.
SysAdminDD
Supports administrators, providing access to the Version 4.2 Administer and Manage Rules
workspaces.
About Portal rules
How to create a composite portal
Show all
A composite portal is a user portal defined by a set of harness rules and section rules. Compared
with the fixed-layout portals WorkManager and WorkUser, composite portals provide additional
flexibility in appearance, user interactivity, and functional capabilities.
Version 5.5 includes two composite portals as working examples:
User — For application users. Supports log off, find work, enter new work, news, show full profile,
recent work, and multiple work object forms, using the Multiple Document Interface (MDI)
form of the Work Area View control.
Manager— For line managers and supervisors. Provides all the facilities of the User portal plus
additional facilities similar to the traditional WorkManager portal: a process dashboard with 4
charts, Monitor Activity reports, and access to the worklists and workbaskets associated with
a work group.
212
Step 1. Plan
A composite portal provides users or managers with specific functions and capabilities.
The portal consists of multiple spaces, each defined by a harness rule with a specific arrangement
of panels (forming a panel set). Panels within a panel set are identified by position as Top, Bottom,
Left, Right, and Center; most panel sets contain a subset of these five. Each panel set can present a
section rule that at runtime delivers capabilities.
Navigation from space to space is typically provided by a dynamic menu, buttons, or links.
Plan the purpose and panels of each space. Consider the size of each panel and how well it can support
the intended functions. If you plan to offer a dynamic menu to allow switching among spaces, identify the
panel that is to contain the menu. See Harness rules — Adding a dynamic menu.
Step 2. Create an application skin
Process Commander contains two standard skin rules CompositeBrand and MetalBrand recommended
for composite portals. These rules are final, but you can copy either (using a new name) to use as a
starting point for your application's skin rule. Use the Style Viewer to review the style names and style
presentation for these or any other skin rules. See About the Style Viewer tool.
As a best practice, create at least an initial version of the application skin rules using the Application
Skin wizard before you develop other parts of the user interface, such as the portal, work object
forms and flow action forms. You can evolve and refine the skin later by rerunning the Application
Skin wizard. See About the Application Skin wizard.
Then, select Edit > Preferences... and access the General preferences group. Update the Skin field
in the Run Process Group to identify this skin. This allows you to see a presentation of composite
harness, section, and flow action rules that is closer to the runtime presentation that users will
experience. CSS styles in a skin control not only colors and fonts, but also field widths and heights,
margins, and padding. See Developer Portal basics — Setting Preferences.
Step 3. Create a harness rule for each space
Create a harness rule for each space.
In most cases, set the Applies To class to a work class, such as the class group of the
application, or by convention to the Data-Portal class.
On the Layout tab, click the down-arrow (
) at the right end of the Layout control group (
) and select the Panel Set control (
). Select a panel layout that is appropriate for
the space, in terms of arrangement and sizes of panels. See Harness rules — Adding a
Panel Set control.
Save the harness rule.
If your portal is to have multiple spaces, ensure that each space offers a mechanism to switch to
others. Use OnClick="pega.desktop.showSpace('Sname')" where Sname is the name of the
space to change spaces. Users can switch spaces using links, buttons, or a MenuBar control. See
Harness rules — Adding a Menubar control.
Step 4. Add sections to the harness rules
Add a section to each panel of the harness rules.
213
You can use any of the standard sections listed below, which replicate many of the functions of the
gadgets used in standard V5.4 portals. You can also refine and evolve these sections in an
application RuleSet version.
Certain sections require parameters. See Section form — Completing the Parameters tab and Pega
Developer Network article PRKB-25448 How to use parameters in section rules.
Step 5. Complete the portal rule
Create a portal rule.
On the Skins tab, set the Type to Composite.
On the Skins tab, identify the application skin you developed.
Complete the Spaces tab. Link each space to a harness rule created in an earlier step. Identify
one space as the default space. Enter a distinct name for each space. One space must be
named Work.
See About Portal rules.
Step 6. Adjust access groups and application rules as necessary
Most composite portals use the standard section @baseclass.NewWork to allow users to enter new
work objects. At runtime, this section allows users to identify the application — not a work pool
within an application — to which the new work object belongs. To support this capability:
Each access group should identify a composite portal in the Default Portal field (on the Settings
tab. Leave the Secondary Portal Layouts array blank or list alternate composite portals only.
Do not mix traditional and composite portals in one access group.
Leave the Work Pools array (on the Layout tab of the Access Group form) blank.
Update the Work Types area on the Details tab of the application rule. Identify each work type, a
name, and a work object prefix. (The prefix value you enter here supercedes any prefix set in
the model.)
Step 7. Test and evolve
Save all rules.
Select Edit > My Profile > Access Group.
On the Settings tab of your own Access Group form, add the portal rule into the Secondary
Portal Layouts area. Save.
Select File > Open > Portal > (portal) to open the composite portal.
Test and evolve.
Available standard sections
The following standard sections are designed for composite portals. All are in @baseclass. Some
are very easy to customize and adapt. Together, these can provide your composite portals with
capabilities very similar to the gadgets used in the older WorkUser and WorkManager portals, but
these section rules are easier to evolve. Review the Parameters tab of each section to tailor the
appearance and behavior of the section.
Section
Description
Contains a two-by-two layout with an interactive chart in each cell, using the Chart control. See
DashboardReports
Harness, Section, and Flow Action rules — Adding a Chart.
FindWork
Allows users or managers. to search for work
objects. Results are always limited to those work types
that belong to the currently selected application.
The DisplayOption parameter has three values:
Advanced — default, includes the search bar
and supports Lucen-based full-text searh as well
as work "Entered by me", "Resolved by me" and
other choices as shown..
Basic — search by work object ID only
Classic — matches the gadget in the WorkUser portal
Optionally, can allow users access to full-text search of work objects.
MyDelegatedRules
Presents a list of rules delegated to this user as links, arranged horizontally or in a vertical list.
When clicked, each link opens the appropriate version of the associated rule.
Presents a Log off button or Log Off link, depending on the value of the LogOffDisplay section
parameter.
Logoff
Use this section only directly in a panel of a panel set. Do not use this section in an IAC form.
Do not use this section as an included section within other sections, unless you can provide a
custom JavaScript that targets the top level.
Displays the text of the Data-Broadcast message (if any) associated with the operator's current
News
organization unit. Using the Edit button, the operator can update this message. See About
Broadcast data instances.
Starts entry of a new work object form. Complete the DisplayOption parameter to control the
presentation of starting flows: as a select list, menu option, labeled buttons, or links. Buttons or
links can be presented horizontally or in a vertical list.
NewWork
If a user has access to two or more applications, work object entry can occur only for one at a
time. The user selects an application from those listed in the user's access groups. (Each access
group identifies a single application.)
The set of work objects that a user can enter depends on the currently selected application, the
list of work types on the Details tab of the associated application rule, and privileges required (if
any) by the Security area of the Process tab of the starter flow rule.
Provides links to 20+ standard reports and charts for managers, similar to the initial presentation
MonitorActivity
of the Monitor Activity workspace in the WorkManager portal.
A simple section that presents the user's name, portal layout, current application, access group,
Profile
and other facts.
RecentWork
Contains an advanced control that lists work objects recently updated by this operator.
Allows users to find work objects using full-text search, when configured. See How to enable and
SearchField
control the full text search facility.
Displays a drop-down list of the workbaskets available to this user. When a user selects a
Workbaskets
workbasket, the assignments in the workbasket appear.
Contains a ListView control linked to the standard list view rule Assign-WorkList.ListViewEmbed
Worklist
See Harness, Section, and Flow Action forms — Adding a ListView control.
Provides the capabilities of the RecentWork, FindWork, NewWork, Profile, and News in a vertical
WUNavigation
presentation, with added space to improve the presentation.
User portal basics
215
About Section rules
New
Layout
Parameters
Pages & Classes
HTML
History
More...
Purpose
Use section rules in conjunction with harness rules to define the appearance of work object forms,
rule forms, or composite portals. A section rule defines the appearance and contents of one
horizontal portion of a form. Harness rules define complete forms that support all user interactions
that create, update, and resolve work objects.
Process Commander contains dozens of standard harness and section rules. You can copy and
tailor these standard forms to meet your application needs.
Controls
Row
Column Repeat
Layout
Repeat
Tabbed
Repeat
Basic
Advanced
Where referenced
Rules of the following types can reference a section rule:
Harness rules
Other section rules
List view and summary view rules, as the contents of a pop-up Smart Info window.
Paragraph rules, as the contents of a pop-up Smart Info window.
Access
Use the User Interface slice (
) or Application Explorer to the access section rules that apply to the work
types in your application. Use the Rules by Type Explorer to list all the section rules available to you.
Development
For section rules that use the SmartFrames format, you can maintain the section rule directly from the Harness
rule form (as well as from the Section rule form).
216
Category
Section rules are instances of the Rule-HTML-Section class. They are part of the User Interface category.
About Skin rules
New
Styles
History
More...
Purpose
Use skin rules to identify a collection of CSS styles to be used in a portal. Separate style collections
apply to the workspace, work object forms, and reporting.
Where referenced
Skin rules are referenced in the Skins tab of the Portal form. Users associated with the portal rule
(through an access group data instance) are presented the corresponding portal layout.
To support application testing while using the Developer portal, you can also reference a skin rule
in the Run Process In group of the General preferences. If not blank, this skin overrides — for tests
and previews only — the skin identified in the portal.
Wizard
You can define a skin rule for User portals through the text file rules, binary file rules (for images)
and the Skin rule form, or create the major colors, fonts, and other visual elements through a guided
workflow. See About the Application Skin wizard.
Access
Use the Rules by Type Explorer to list all skin rules available to you.
Category
Skin rules appear are part of the User Interface category. A skin rule is an instance of the Rule-
PortalSkin rule type.
About the Application Skin wizard
Show all
The Application Skin wizard (sometimes referred to as a "branding" wizard) enables you to quickly
develop and put into production a skin rule that reflects your corporate or departmental standards.
A skin comprises a set of Cascading Style Sheet (CSS) files stored in your application. The wizard
contains a wide range of functions and controls that let you create and edit these files. You can design
the color schemes, images, text, and sizing of the interface components that comprise your User portals,
reports, and work forms. The wizard helps you reduce or eliminate manual CSS coding.
To start the wizard, select Application > New > Skin from the Developer portal menu.
Skins produced from this wizard are not suitable for the Developer portal. Use these skins only
with User portals.
When you create a skin, you associate it with a user or manager portal rule so that it can be applied
across the interface components in your application. When users log onto the system, the name of
the portal rule assigned to their access groups is available. The system identifies the skin
associated with the portal rule. You specify the portal rule in the Default Portal Layout field in the
users' access group rule form.
217
The wizard defines an application skin (Rule-PortalSkin rule type) and its associated CSS style
sheet text files ( Rule-File-Text rule type). The skin references images as binary file rules (Rule-File-
Binary rule type) and is linked to portal rules (Rule-Portal rule type).
The wizard and composite portals
As of V5.5, you can build composite portals that reference panel sets using harness rules and
section rules. Unlike traditional user portals, which used special HTML rules in a pre-defined
structure, you can configure composite portals in a variety of layouts. These portals are supported
by Internet Explorer 6/7 and Mozilla Firefox 2+ browsers. The expanded capabilities of the wizard
are designed to take advantage of this flexible approach to UI design.
To present composite harness, section, and flow action rules that resemble what users will see at
runtime, select Edit > Preferences > General Preferences and update the Skin field in the Run
Process Group of your own Developer portal preferences to identify this skin. See Developer Portal
basics — Setting Preferences.
You can also use the wizard to develop skins for traditional portals. Steps 8A through 8D contain
additional design elements that apply to traditional portals only.
You can reapply the Application Skin wizard to the skin rule that it created in an earlier run to make
adjustments as often as needed.
Before you begin
Colors and fonts
Choose colors and fonts in advance. Using any graphics program, identify the RGB Hex code for the
colors you plan to use. Choose only fonts that are present on both your own workstation and on all
application users' workstations.
Use only a limited number of colors and fonts. The colorful examples in this Help System are
designed to highlight the impact of specific styles and elements and do not represent good design.
Images
If your portals include custom images for headers, tabs, or workspace backgrounds, create
the image files with any graphics program. Process Commander associates graphics images with
binary file rules. Upload each image into a binary file rules in your application RuleSet.
When you create a binary file rule for use with the the Application Skin wizard, set the App Name to
webwb. On the Main tab, set the Relative Path to images. Valid file types are GIF, JPG, and PNG.
After you have created these binary file rules, you can select them for use as background images or
logos from within the wizard. Clicking the magnifying glass icon (
) to the right of an image field
opens the Image Catalog. Only images belonging to RuleSet versions in your application appear.
When you select an image, the appropriate height and width fields (if any) auto-populate with that
image's dimensions. There are no size limitations for images. You cannot change the height or
width of an image itself using the wizard — only the height and width of the container in which it is
displayed such as the left and right sections of tabs.
Starting and using the wizard
Verify that all rules that you are modifying, including the skin, style sheet, and portal are checked
in.
Select Application > New > Skin. The wizard presents this series of steps in the navigation panel:
218
Step 1 identifies the name and RuleSet version of the skin rule and other associated rules to be
created.
Step 2 displays the Quick Create feature enabling you to, in one step, create default fonts, and
the main and accent colors for your portals, work forms, and reports. You can also add a top
header logo for traditional portals.
Step 3 defines general appearance of most UI elements including background, fonts, and links. It
also defines the appearance of the panels built into a harness rules (used for composite
portal types), and enables you to add custom styles.
Steps 4A through 4E define the appearance of smart and custom layouts, as well as bar, tab,
accordion, and repeating (tab, row, and column) layouts.
Steps 5A and 5B define the appearance of menus and grids.
Steps 6A through 6C define the appearance of labels, buttons, and error sections.
Steps 7A and 7B define report components including title bars, columns, and headers.
Steps 8A through 8D define the appearance of UI elements that are unique to traditional (non-
composite) user portal rules.
Navigation
You can open any step without proceeding through them sequentially. Click directly on a step in the
navigation panel to open its screen. A check mark appears next to the step when you go to another
step. Alternatively, use the Next >> and << Back buttons to navigate.
Some steps contain a set of collapsed sections. You can expand them all by selecting the expand
button (
) at the top- right corner of the wizard screen.
As you work with the wizard, click Preview to open in a new window a rendering of most UI
elements as configured so far. By default, they are displayed individually as used in composite
portals, work forms, or reports.
Some elements do not display in preview mode. In those cases, save the skin to a composite-
type portal and open the section to review the changes (specify the skin in the Developer's portal
preferences section).
To view the rendering on a standard Pega portal, open a separate window by clicking Preview
Traditional Portal in the preview window.
Creating an application skin
When you save your work for the first time by clicking Finish or Save, the wizard creates a
skin rule and six CSS text files referenced by the skin. Optionally, two traditional portal rules
(WorkUser and WorkManager) are copied into your application and are associated with the skin.
Once saved, you can re-open a skin in the wizard at any time to modify it. The Application Skin
wizard does not create a work object for processing and resolution.
After you complete your work and deploy the skin, confirm that the RuleSet containing the new skin
rule appears in the RuleSet list of application users who are to use the new portals. If the skin is
created in a new RuleSet, verify that the portal rule using the skin is specified in the user access
group. Have application users test the resulting portals to ensure that all clickable elements and
other important information are easily located.
219
Standard Skin rules
Your system contains seven standard skin rules, with availability set to final (
). You can copy them
(using a new name) and alter the copy.
To review the appearance styles definied in a skin, select Tools > Style Viewer. Select User for the
Baseline Style field, Work for the Style Type, and the CSS skin you want to review
Name
Description
Basic
Classic
Styles initially released with Version 4.1 in May 2004, for traditional portals.
CompositeBrand Recommended. Lighter styles for composite portals, introduced with V5.5.
Developer
Recommended. Metallic look with compact work object styles, initially released with Version 5.3 in 2007.
Referenced in the standard portal rule Developer.
Metal
Metallic look, initially released with Version 4.2 SP5 in November 2005, for traditional portals.
MetalBrand
Metallic styles for composite portals, introduced with V5.5.
StandardBrand Recommended. Gray and blue styles for he traditional portals. Introduced with V5.5.
User
Metallic look with compact work object styles, initially released with Version 5.3 in 2007. Referenced in the traditional
portal rules WorkUser and WorkManager.
Ever used a Collection? What is it used for?
Types of correspondence? email, phone, phone text
Correspondence
Correspondence is the Process Commander term for outgoing e-mail messages, printed letters, or
facsimile transmissions produced by the system and its users. These are typically associated with one
work object or a cover or folder and may consist of text, images, or both.
A correspondence rule is an instance of the Rule-Obj-Corr rule type.
Correspondence rules are part of the Process category
Correspondence Types
Four standard correspondence type rules are installed with your Process Commander system.
Fax : For outgoing letters to be sent by fax transmission through the Correspondence Output Server.
Mail : For outgoing postal letters (handled by the Correspondence Output Server) to be printed. Stores
the correspondence body as an instance of the Data-Corr-Letter class, and the address in the Data-
Address-Postal class.
220
PhoneText : For short outgoing text messages to be sent to a beeper (pager) or digital cell phones that
support the Short Message Service.
Email For outgoing e-mail messages, where the body of the message is stored in an instance of the
Data-Corr-Email class and the addresses are stored as instances of the Data-Address- Email class.
Where referenced
Rules of three other rule types can reference correspondence rules:
Flow rules, using Notify tasks
Flow action rules, indirectly through activities identified on the Action tab
Activities
0
How do you use Break Points in Tracers?
Breakpoints are, as the name implies, points in which the execution of an activity is halted for various
reasons. This might be, for example, to check how data evolves within a loop. Breakpoints may be
set in specific steps for this tracing.
Figure 5. Setting a breakpoint
As shown in Figure 5, an activity can be selected, among all the accesible classes, and a
breakpoint can be set on any step. Also, a breakpoint for "all" steps can be set.
To resume the execution, just click the Continue button. It will be automatically resumed in an hour.
Methods used in saving to DB?
RDB-save
OBJ-save
221
Rules that will be created using Application Accelerator.
Agents - question on Agent scheduler, recurring and periodic settings
Use of Broadcast option in Correspondence.
To Send mail to all work parties.
Have you integrated the Pega project with multiple legacy systems in the backend and other
Pega applications? Explain your experience.
Knowledge of Correspondence feature? What are some Correspondences you have worked with
in the past?
Pega Framework Questions
What are some Pega Frameworks you have used? (Mention those that you have knowledge of
even though you haven’t worked with them directly in a project)
Have you worked with CPM-HC? (Mention even if you have just worked with CPM. Also mention
if you have knowledge of those frameworks and haven’t worked with it actually. You can
mention you have done some POCs in the lab etc.)
Have you worked with CMF (Care Management Framework)? (Don’t say you have worked with
CMF if you haven’t, because client knows CMF is very new and not many projects have
happened on CMF. You can say you have knowledge of CMF)
CPM-HC
0
What are the advantages of using CPM-HC?
1
What is CTI? How is it useful? (Computer Telephony Integration).
Non-Technical Questions (Typically asked by Medco Managers)
Team Dynamics:
0
How will you resolve problems in your team and between teams? Question on team
dynamics.
1
How will you cope up working in a multiple vendor environment? How would you
collaborate with consultants from other vendors?
2
This project involves taking over work from the existing vendor. How would you work
with them collaboratively even when the environment is a little hostile and they are
reluctant to share information?
Onsite-Offshore Pega Project Experience:
0
Have you worked in onsite-offshore projects involving Pega earlier?
1
What are some things that you feel worked well with offshoring and what are some
things that didn’t work well - how would you change things that didn’t work well?
2
We are looking for leads at onsite who can get things done by the offshore team. Do
you think you can handle it?
What are some things that you would do when you have to take-over an in-flight project from
another vendor?
222
Reports
What type of Reporting features are provided by Pega?
A. List View and Summary View
What is the difference between ListView and SummaryView ?
A summary view rule defines a two-level report display, presenting summary counts, totals or averages to be
displayed initially, and allowing users to click a row to drill down to supporting detail for that row.
Summary view rules support interactive charts, trend reports, and the use of AJAX for pop-up Smart Info
windows.
A summary view rule is an instance of the Rule-Obj-SummaryView rule type. This rule type is part of the
Reports category.
A list view rule, an instance of the Rule-Obj-ListView rule type, defines a report. Users can personalize list view
reports easily and interact with them.
Use the Report wizard to define list view reports and link them to our portal.
How to call a listview from an Activity?
In an activity, the Obj-List-View can execute a list view rule.
What is Paging in a listview?
To divide the ListView in to different pages and set the number of records to be displayed in a page.
What is exposing a property?
Exposing a property means to make a property as a separate independent column so that it can be used
in sql queries and as a criteria in reporting.
Steps are as follows,
6. How to expose a single value property?
Process Commander stores the values of all aggregate properties and some Single Value properties in a
BLOB column (the Storage Stream) usually in a compressed form. Such properties cannot support selection in
list view and summary view reports, and can slow retrieval and processing in other operations
0
Select Tools > Database > Modify Database Schema.
1
A list of databases identified in Database data instances appears. Select a database and click Next .
2
A list of tables in the selected database appears from Database Table instances. Select a table.
3
Click Explore Columns .
4
The resulting List of Classes window displays the number of rows in the table, the number of columns in
the table and a list of the classes assigned to that table. The Properties Set to Be Visible value counts the
properties for which the Column Inclusion value is Required or Recommended. This Column Inclusion
value is advisory, and does not indicate whether the property is exposed — corresponds to a column.
The Count column shows the total count of properties in this class plus those its parent classes.
5
To see the columns currently defined in this table, click the numeric link labeled Number of columns in this
table.
6
The List of Database Columns window shows the column name, column data type, and column width in
bytes for each column in the table.
How to expose aggregate property?
Declare Index rule is a better approach.
Create a concrete class derived from the Index- base class.
Create Single Value properties in the new class to hold values of the embedded values.
Create a Declare Index rule with the appropriate embedded Page Context value that copies the embedded
values into a new Index- instance.
Save the Declare Index rule. It executes immediately, adding and deleting instances of the new class.
Expose database columns corresponding to the Index- class.
Reference the Index- properties in the list view rule.
Can we refer the property without exposing in Reports?
We can refer the propertys in Display tab without exposing.
But we can’t refer the property without exposing in Critera fields of the Content tab.
What is the activity responsible for getting the data in List View?
getContent Activity
What the class of getContent Activity?
Embed-ListParams class.
11. Can or have you customize the getContent Activity?
Yes
12. How to customize the getContent Activity?
Step1: Create Activity in Our Class and create the New
page Step2: write a query and store in variable.
Step3: call the listview as Call Rule-Obj-ListView Step4:
Write the another activity in Embed-ListParams
Step5: create the parameter. This parameter get the sql query from previous
activity Step6: write Java method The java code in this method is
Get the page from pyContentPage if page already exists. If page is not available it creates the new
ContentPage.
In this code get the sql query from the above parameter and pass this query and above created ContentPage as
parameters to this tools.getDatabase().executeRDB(query, pagename) method.
How do we get the data from the two different tables?
Using Join tab in Reports
How do we fetch the data from two different tables with out using two different tables?
Write a database View. In this view logically combine the Two different tables.
Create class for this logically combined Table.
Write the List View. Applies to class is class of the Combined table. So we can refer the properties of both the
tables in list view.
What is the use of HTML property in ListView?
HTML Property rules appear in list view and summary view rules to define the appearance of values in reports.
Consider this scenario: I need to generate a list view report of all the work objects created on a particular
date and then I need to include this list view in a section. How this can be done?
Select .pxCreateDateTime ( an exposed property ) under criteria and give the value you are looking for.
To include it in a section, check the embedded check box and customize the HTML of the section. In that we
need to access the list view in a JSP tag or In section Property is DisplayAs ListView.
What is the difference between List View and Obj-List?
List view is generally used for complex queries where sorting is required and also we can retrieve less
information using Paging.
Explain in brief the configuration of a list view?
List view (an instance of Rule-Obj-ListView ) is used to define a custom report or personal version of a report.
A list view can be configured as follows:
Applies to class of list view will be taken as the database table map for the search criteria.
Display fields tab is used to depict the fields that are displayed along with category and to enable/disable
sorting
Content tab is used to depict the criteria, fields to be retrieved, key of each row (if selected) and Report
source (Page name where the values should be saved and the activity to be called)
In organize tab we specify to enable/disable paging, page size, mode, alignment etc.
We can also configure additional buttons and their fragments here.
Format tab is used to depict the formatting of the list (like even/odd coloring) and details on single click etc.
List view can be accessed from an activity or html as follows:
0 Call Rule-Obj-ListView.ShowView activity with classname and list view name as parameters
1 <pega: ListView name=” {name of list view}” classname= “{Class name of list view}”>
A list view can be used for complex retrievals from database by not specifying the display, format and
Organize tabl.
PyAction in that case would perform instead of refresh.
Explain in brief about the configuration of a summary view?
Summary views are used to create reports which are grouped by certain criteria and can be later drilled
down. A Summary view can be configured as follows:
Applies to class of summary view will be taken as the database table map for the search criteria
Category is used to know under which tab the report should come.
Criteria is used in the where class (this can be asked to user by enabling prompt user)
Group by and field functions (like count) are used for initial display. If we have more than one group by
it is Displayed one after another on clicking +
Drill down fields are used to display the fields when we click on the assignment.
Format is used to tell how to format the display and charts can also be used.
Summary view can be accessed from an activity or html as follows:
Call Rule-Obj-ListView.ShowView activity with classname and summary view name as parameters
<pega: SummaryView name=”{name of summary view}” classname={Class name of summary view}”>
Agents:
1. What is an Agent?
An agent is an internal background process operating on the server that runs activities on a periodic
basis.
Agents route work according to the rules in our application.
Agents also perform system tasks such as sending e-mail notifications about assignments and
outgoing correspondence, generating updated indexes for the full-text search feature, synchronizing
caches across nodes in a multiple node system, and so on.
How do we create an Agent?
New SysAdmin Agents
Rule Set name is the Agent
name
Agent is instance of Rule Agent Quiee.
Do we need to create Agent Schedule?
No. Agent schedules cannot be created manually.
The Agent Manager on our Process Commander system generate at least one agent schedule instance
for each agents rule.
By default, the Agent Manager checks for new or updated agents rule once every ten minutes.
After we create an agents rule, the Agent Manager generates one Agent Schedule instance for each
node running on your Process Commander system the next time it checks for new agents rules.
Do we need to migrate Agent Schedule to other environment?
No
5. What are the Agent running time intervals?
Each agent activity runs individually on its own interval schedule, as a separate requestor thread.
0
Periodic — The agent runs the activity and then "sleeps" for the number of seconds entered in the Interval
column.
1
Recurring — The agent runs the activity based on a specified calendar schedule (for example, every
Monday at 5:00 P.M.).
What are the Agent Running modes?
Queue mode indicates whether the agent uses the agent queue capability to process items from the agent queue.
This feature allows the agent to temporarily skip over items that fail — for example, because a needed resource
is locked — and try again later to process the item later.
0
Standard — Specifies that this agent processes items from an agent queue and that it relies on the system to
provide object locking and other transactional support.
1
Advanced — Specifies that this agent uses custom queuing
2
Legacy — specifies that this is an agent that was created in a version prior to V5.4 and has not yet been
updated. This option is not available for agents created in V5.4 or later.
What is the use of referring Access Group in Agents?
Agent activity calls another activity. This called activity may not appear in agent rule set. So setup of the Rule
set list and Roles by providing Access group in security Tab.
Select the access group to use for the legacy and advanced agents listed in this rule. This field is ignored for
agents with a type of Standard.
How do we Troubleshoot or Trace an Agent?
0
< env name="agent/enable" value="true" />
Verify above tag in prconfig file. Value of the above tag is true or false.
1
In Agent Schedule, schedule tab verify the check box Enable this agent is Checked or Not. And also verify
the Enabled? Check box is checked or Not.
2
Same thing also check in Agents Rule.
In Tracer we can trace the particular operator or particular Agent.
In prsysmgmt portal, In Agent Management select the particular Agent and Delay the Agent and then run the
Tracer.
We can use the Agent Management link in the System Management Application to monitor and control agent
processing.
Agent runs on different nodes, select the particular node and run the Tracer.
What are the Agents for SLA and Correspondence?
The agents in the Pega-ProCom RuleSet process e-mail, service level rules, and assignments, archive work
objects, and so on.
The agents in this rule provide the following types of processing:
Processing service level events and escalation
Applying a flow action to assignments in bulk
Sending out e-mail correspondence
Archiving and purging work objects, attachments, and history
Retrieving PDF files from the PegaDISTRIBUTION Manager
Running tests defined through the optional Automatic Testing facility
Checking incoming e-mail
The activity System-Queue-ServiceLevel.ProcessEvents supports service level processing for both
assignments and work objects.
The activity Data-Corr-.Send supports outgoing e-mail if your system contains one or more Email Account
data instances with a second key part of Notify.
10. Who will create Data-Agent-Queue?
The Agent Manager is a master agent that gathers and caches the agent configuration information set for our
system when Process Commander starts. Then, at a regularly scheduled interval, it determines whether any
new agents rules were created during the last period. If there are new agents rules, the Agent Manager adds
them to its list of agents and generates agent schedule data instances for them for each node.
11. What are the Standard Agents?
our system includes three standard agents rules. Because these agents rules are in locked RuleSets, we cannot
modify them. To change the configuration settings for the agents listed in these rules, update the agent
schedules generated from the agents rule.
Pega-IntSvcs,
Five agents in the Pega-IntSvcs RuleSet process queued service and connector requests and perform
maintenance for PegaDISTRIBUTION MANAGER (formerly called Correspondence Output Server, or COS).
Pega-ProCom,
The agents in the Pega-ProCom RuleSet process e-mail, service level rules, and assignments, archive work
objects, and so on. The agents in this rule provide the following types of processing:
Processing service level events and escalation
Applying a flow action to assignments in bulk
Sending out e-mail correspondence
Archiving and purging work objects, attachments, and history
Retrieving PDF files from the PegaDISTRIBUTION Manager
Checking incoming e-mail (deprecated in V5.3)
Pega-RULES
The agents in the Pega-RULES RuleSet perform general system housecleaning and periodic processing. The
agents in this rule provide the following processing:
System Cleaner
Rule Usage Snapshot
System Pulse
Static Content Cleaner
System Indexer
System Work Indexer
What is the use of Data-Agent-Queue?
When you need to modify the behavior of an agent listed in an agents rule in a locked RuleSet (any of the
standard Process Commander agents rules, for example) you do so by editing one or more of the
generated agent schedule instances.
0
To monitor the Agents the url path
Service Level Agreements:
What is an Service Level Aggrement?
A service level rule is an instance of the Rule-Obj-ServiceLevel type. Each service level rule defines
one to three time intervals, known as goals, deadlines, and late intervals, that indicate the expected
or targeted turnaround time for the assignment, or time-to-resolve for the work object.
The goal time is the smallest time interval, the deadline time is a longer interval, and the late interval
defines post-deadline times. Each time interval is in days, hours, minutes, and seconds.
What are the types of SLA? Where they can be defined?
Service level rules can be associated with a work object or an assignment.
For assignments, the service level rule is referenced in the Assignment Properties panel of the
assignment task.
For the overall work object, the service level rule is identified in the standard property .pySLAName,
typically set up through a model for the class. (The default value is the Default service level.)
0
How do we do Escalation?
Escalation refers to any processing within a Process Commander application that causes high-
priority work objects to become visible to users and managers and to be processed sooner rather than
later.
The numeric property known as urgency determines the order that assignments for that work object
appear on worklists. Escalation recalculates the urgency value to reflect its age, impending due date,
or explicit management inputs.
Escalation can occur through a service level rule associated with the flow and through background
processing by the Pega-ProCom agent.
1
What are SLA's, how are they different from Agents?
A service level rule is an instance of the Rule-Obj-ServiceLevel type. The service
level can define a goal and a deadline times for processing an assignment, and can
execute activities if the goal or the deadline is not met. This assignment-level service
level is distinct from any service level associated with the entire flow.
At runtime, an internal countdown clock (measuring the completion of the assignment
against the goal and deadline times computed from the service level rule) starts when the
assignment task is created.
An agent is a background internal requestor operating on the server. These requestors
can periodically monitor conditions and perform processing as necessary.
Most agents are defined by an Agent Queue rule (Rule-Agent-Queue), which includes
a list of the activities they perform.
2
How to implement SLA's? Is is possible to define a SLA for the entire work object? If yes,
how?
SLA’s are always associated with an assignment. Just drag a SLA shape and provide an instance of
Rule-Obj-ServiceLevel.
Yes, SLA can be defined for the entire workobject by defining it in the
model. The property for this is pySLAName.
3
How to restrict a flow to particular users?
By using privileges and when conditions under process tab of the flow instance.
Flow Actions
1. What are the types of Flow Actions?
A flow action rule controls how users interact with work object forms to complete assignments.
Each flow action is defined by an instance of the Rule-Obj-FlowAction rule type.
Flow actions are of two types:
Connector flow actions appear as lines on Visio presentation in the Diagram tab of a flow rule. A line exits
from an assignment shape and ends at the next task in the flow. At runtime, users choose a connector flow
action, complete the assignment, and advances the work object along the connector to the next task.
A local flow action, when selected at runtime, causes the assignment to remain open and on the current
user's work list. Local flow actions are recorded in the Assignment Properties panel and are not visible on
the Visio flow diagram.
2.
What is the Difference between Connector Flow Action and Local Flow Action?
A local flow action permits users at runtime to update, but not complete, an assignment. Local flow actions
always are optional. Users may perform none, one, or multiple local flow actions, or repeat a local flow action
multiple times.
At runtime, users choose a connector flow action, complete the assignment, and advances the work object
along the connector to the next task.
0
Explain about Pre Activity?
At runtime, the system runs this activity before it does other processing for this flow action. This
activity is not visible on the Visio flow diagram. This activity executes only once, the first time a
user selects this flow action for this assignment.
1
Explain about Post Activity?
Activity to run after other successful processing of this flow action.
For screen flow rules By default, when this flow action appears as a step in a screen flow rule, and
the user at runtime clicks away to a different step in the screen flow rule, this activity rule does not
run. To cause this activity to execute when the user clicks away to a different step, select the Post
Action on Click Away? check box on the Assignment shape properties panel.
2
Explain about Local Flow Action?
A local flow action permits users at runtime to update, but not complete, an assignment. Like
connector flow actions, local flow actions are referenced inside an assignment task in a flow.
At runtime, users can select local flow actions to update assignment or work object properties,
change the assignee, and so on but do not complete the assignment. If a service level rule is
associated with the assignment, the service level continues to run.
Local flow actions always are optional. Users may perform none, one, or multiple local flow actions,
or repeat a local flow action multiple times.
On the Action tab of the Flow Action form, we can mark a flow action rule as local, or connector, or
both.
How do we make one Local Action available in all Assignments?
On the Design tab of the Flow form, we can list local flow actions that are to be available at every
assignment in the flow.
Property’s :
0
What is the Property?
A property is an instance of the Rule-Obj-Property rules type. Property
defines and labels a value that can be associated with a class.
For instances contained in the database, a property often corresponds to a relational database column.
What are the Property Modes?
Single
Array or List
Group
Value modes
Single Value
Value List
Value Group
Page modes
Page
Page List
Page Group
Java Object mode
Java Object
Java Object List
Java Object
Group
Java Property
Java Property
Java Property List
modes
Explain with an example the difference between Rule Edit Input and Rule Edit Validate?
Edit input rules are instances of the Rule-Edit-Input class. They are part of the Property category.
An Edit Input rule provides a conversion facility.
Use Edit Input rules to convert data entered by a user (or received from an external system) from a format
that our application doesn't use into another format.
Edit input rules performconversions, notvalidations. This rule type does not cause any response to a
userabout the validity of the input.
Edit input rules use Java code for the conversion.
We can reference an edit input rule in the Edit Input Value field on the Property form.
Edit validate rules are instances of the Rule-Edit-Validate class. They are part of the Property category. Use
the Edit Validate form to define a Java routine that tests the validity of an input value in an activity that
processes user input.
Properties rule (of modeSingle Value,Value ListorValue Group) may reference an
editvalidate rule on the
Advanced tab.
Use the Property-Validate method in an activity to execute the edit validate rule when a value is
submittedthrough a user input form.
How Rule Edit Validate is different from Rule Obj Validate?
Edit Validate is to validate a single property at a time but obj validate rules are used to
validate all the properties in a single go. Obj Validate method is used for this purpose.
How one single property can be represented in different forms on a screen?
By using HTML Properties at the section level, not at the property level.
0
Consider this scenario : I have a property of type decimal, I need to restrict it to two
decimal places only. How easily this can be done?
By using a qualifier “pyDecimal Precision” under Qualifiers tab.
1
How to implement dynamic select and smart prompt? What's the major difference
between them?
Implementation of Dynamic Select:
In properties panel select Display As is
DynamicSelect. Write Activity for generating
Dynamic Select.
By using Show Page method display the data in XML format.
Dynamic Select is a drop down from which we can only select a
value.
Smart prompts acts both as a text box and a drop down.
Smart prompts are implemented by using ISNS_FIELDTYPE, ISNS_CLASS,
ISNS_DATANODE.
2
What is the difference b/w Page and Page List property, how are they Implemented?
Page property refers to a particular class and is used to access the property of that class.
Page List Property also refers to a particular class, but it’s a collection of individual pages of
the same class which can be accessed through numeric indexes.
9. What is HTML Property?
HTML Property rules are instances of the Rule-HTML-Property class. They are part of the
Propertycategory.
Use HTML Property rules to control how properties appear on work object forms, correspondence, and
otherHTML forms, for both display and for accepting user input.
For properties of modeSingle Valuean HTML Property rule may be identified in the Display Property
field
of the Property rule form.
HTML Property rules also may appear in list view and summary view rules to define the appearance
ofvalues in reports, and in harness, section, and flow action rules that define work object forms.
10. Explain about Special Properties?
Standard properties means all the properties in the Pega-RULES, Pega-IntSvcs, Pega-WB, and Pega-ProCom
RuleSets have names start with px, py, or pz.
These three prefixes are reserved. We cannot create new properties with such names. We can override these
standard properties with a custom property of the same name (without changing the mode or Type).
Px: Identifies properties that are special, meaning that the values cannot be input by user input on an HTML
form.
Py: Properties with names that start with py are not special, meaning that values can be input by users on an
HTML form.
Pz: Properties with names that start with pz support internal system processing. Users cannot directly
manipulate pz properties. our application may examine these values, but do not set them. The meaning of
values may change with new product releases.
VALIDATIONS
Validation rule is used to validate the value against the some other value. Once the
validation fails the system add error message to that field in clipboard.
3
What types of validations are there?
0 Client Side Validations
1 Server Side Validations
4
What are the Methods we have used for validations??
0 Obj Validate we can referred this method in Activities and in flow actions at Validate
Rule field.
1 Edit Validate
we can refer this in property form at edit validate field and in activities
through property validate method.
Note: I think Obj Validate is used for Server Side Validation and Edit Validate is used for
Client Side Validation.
5
How do you add custom message to the Property when it fails the Validation.
For this we have to use theProperty.addMessage(“your message”) tag.
Message is set to the property and the checked in the clipboard also , the messages got
set successfully. But the message is not displayed beside the field in the screen.
Why..?
If the property has a html property, the tag <pega:include name =”Messages”/> tag must be
include
Methods:
Explain the operation of Activity-End method?
Use the Activity-End method to cause the system to End the current activity and all calling activities.
Ex:if Alpha calls Beta, which calls Gamma, which calls Delta, which performs the Activity-End method, all
four activities are ended.
0
Explain about Exit-Activity method?
The Exit-Activity method ends the current activity and returns control to the calling activity.
1
Explain about Page-Copy method?
Page-Copy method is used to copy the contents of a source clipboard page to a new or previously created
destination clipboard page. The source page is not altered.
After this method completes, the destination page contains properties copied from the source page, and can
contain additional properties from a model.
2
Explain about Page-New method?
The Page-New method is used to create a page on the clipboard. The new page may be a top-level page or an
embedded page.
We can identify a model to initialize the newly created page. The model can set values for one or more
properties.
3
Explain about Page-Remove method?
Page-Remove method is used to delete one or more pages from the clipboard. The contents of the database
are not affected.
Explain about Page-Set-Messages method?
Use the Page-Set-Messages method to add a message to a clipboard page. Like a message associated with a
property, a message associated with a page normally prevents the page from being saved into the database.
0
Explain about Property-Set-Message?
Property-Set-Message method is used to associate a text message with a property or a step page. The system
reads the appropriate property and adds the message to the page. We can provide the entire literal text of the
message, or reference a message rule key that in turn contains message text. (Rule-Message rule type).
1
Explain about Property-Map-DecisionTable method?
Use the Property-Map-DecisionTable method to evaluate a decision table rule and save the result as the value
of a property.
2
Explain about Property-Map-DecisionTree method?
The Property-Map-DecisionTree method is used to evaluate a decision tree rule (Rule-Declare-DecisionTree rule
type) and store the result as the value of a property.
3
Explain about Property-Map-Value?
The Property-Map-Value method evaluates a one-dimensional map value (Rule-Obj-MapValue rule type) defined
in the parameter. The method sets the result as a value for a Single Value property.
The related method Property-Map-ValuePair works similarly for two-dimensional map values.
Explain about Property-Remove method?
Property-Remove method is used to delete a property or properties and its associated value from the
step page or another specified page. This does not affect the property rule, its definition.
Explain about Property-Set method?
Property-Set method is used to set the value of one or more specified properties.
13. Explain about Show-HTML method?
The Show-HTML method is used to cause the activity to process an HTML rule and send the resulting HTML to
a user for display by Internet Explorer. This may involve the interpretation of JSP tags (or the older directives),
which can access the clipboard to obtain property values, or can insert other HTML rules, and so on.
14. Explain about Show-Page method?
The Show-Page method is used to send an XML representation of the step page to a user's Internet Explorer
browser session, as an aid to debugging.
Note: Use Show-Page and Show-Property only for debugging.
15.
What is the difference between Call and Branch?
The Call instruction calls the another specified activity and execute it. When that activity completes, control
returns to the calling activity.
Use the Branch instruction to find another specified activity and branch to it without a return.
When the system executes a Branch step, control transfers to another activity found through rule resolution.
Execution of the original activity pauses.
When the branched activity ends, processing of the current activity also
ends. No steps after the Branch step are executed.
OBJ Methods:
At runtime, five methods (Obj-Browse, Obj-Filter, Obj-List, Obj-List-View, and RDB-List), list view rules, and
summary view rules use a page of the class Code-Pega-List
Code-Pega-List class as a source of search criteria and to hold output. Typically, such pages are named Results,
pyQueryResultPage, or pyViewLookupList. Search results (which support rows of report output) are stored as
pages in the pxResults() property, a Page List.
Code-Pega-List is a concrete class, pages of this class exist only on the clipboard. They are never saved to the
PegaRULES database.
17. Explain about Obj-List Method?
Obj- List method is used to retrieve data to the clipboard as an array of embedded
pages. This method creates one embedded page for each instance retrieved.
The Obj-List-View method often produce more efficient SQL statements and provide better performance than
the Obj-List method.
18. Explain about Obj-Browse method?
Obj-Browse method is used to search instances of one class and copy the entire instances, or specified
properties, to the clipboard as an array of embedded pages.
Only properties exposed as columns can be used as selection criteria. However, values of properties that are
not exposed as columns, including embedded properties, can be returned.
19. Explain about Obj-List-View method?
Obj-List-View method is used to execute the retrieval and sorting operations, but not the formatting and
display processing, of a list view rule.
The system uses rule resolution to find the list view rule and executes it, but does not produce any HTML
output display.
20. Explain about Obj-Open method?
Obj-Open method is used to open an instance stored in the PegaRULES database or in an external database
linked to an external class, and save it as a clipboard page.
The system uses the specified class and key fields to find and open the object and place its data into the
specified step page. The system searches up the class hierarchy as appropriate to find the instance. If it finds
the specified step page, the system clears any data that is on it and reuses the page. If no existing page has a
name matching the specified step page, the system creates a new page.
0
Explain about Obj-Open-By-Handle method?
Use the Obj-Open-By-Handle method only if we can determine the unique handle that permanently identifies
which instance to open. Otherwise, use the Obj-Open method.
22 Explain about Obj-Delete method?
Obj-Delete method is used to delete a database instance corresponding to a clipboard page and optionally to
delete the clipboard page too. We can cause the deletion to occur immediately, or until execution of a Commit
method.
This method can operate on objects of both internal classes
(corresponding to rows in a table in the
PegaRULES database) and external classes (corresponding to rows in an external relational database).
The Obj-Delete method uses the class of the page to obtain the appropriate Rule-Obj-Class instance. It uses the
table name, key fields, and other aspects of the class rule to mark the instance for deletion.
We can reverse or cancel a previously executed Obj-Delete method by using the Obj-Save-Cancel method.
Explain about Obj-Save method?
Obj-Savemethod is used to save a clipboard page to the PegaRULES database or if the page belongs to
anexternal class save a clipboard page to an external database.
The Obj-Save method uses properties on the page to derive the internal key under which it will be
saved.This method can create a new database instance or overwrite a previous instance with that key.
We cannot save a page that is locked by another requestor.
We cannot save a page that our session does not hold a lock on (if the page belongs to a lockable
class),unless the object is new, never yet saved.
We cannot save pages of any class derived from theCode-base class or theEmbed-base class.
Such pagesexist only on the clipboard.
Explain about Commit method?
Commit method is used to commit all uncommitted database changes. This method writes all the instances
specified by one or more earlier Obj-Save methods to the PegaRULES database (for internal classes) and to
external databases (for external classes).
24. Explain about Obj-Validate method?
Obj-Validate method is used to apply a validate rule (Rule-Obj-Validate rule type) for the object identified on
the primary page or step page.
A validate rule (Rule-Obj-Validate rule type) can call edit validate rules (Rule-Edit-Validate rule type).
25. Explain about Obj-Sort method?
Obj-Sort method is used to sort the clipboard pages that are the values of a property of mode Page List.
We can specify one or more properties to sort on, and whether the sort sequence is ascending or descending
for each sort level.
RDB Methods:
Use Connect SQL rules and RDB methods only with an external database. Do not use Connect SQL rules or
RDB methods for the PegaRULES database(s). Because not all properties in the PegaRULES databases are
distinct database columns, use the Obj-Open and Obj-Save methods, not the RDB- methods, with the
PegaRULES database to prevent loss of data.
26. Explain about RDB-List method?
RDB-List method is used to retrieve rows from an external relational database and place the results as
embedded pages in a specified step page of class Code-Pega-List.
This method references a Connect SQL rule instance, and executes SQL statements stored in the Browse tab
of that rule instance. The search can do anything we can specify in a SQL statement, such as a SELECT
WHERE statement. Any constraints on the returned data are in the SQL.
Explain about RDB-Open method?
RDB-Open method is used to retrieve a single row (record) of data from an external relational database and
add the retrieved data into a specified clipboard page as property names and values.
Use this method in conjunction with a Connect SQL rule that contains SQL SELECT or EXECUTE statements
in the Open tab. Define the SQL statements so that the database returns exactly one row.
0
Explain about RDB-Save method?
RDB-Save method is used to save the contents of a clipboard page into a row of a relational database. The
system saves the properties on the specified step page to the specified table in the database.
This method operates in conjunction with a Connect SQL rule that contains SQL statements such as INSERT,
UPDATE, and CREATE statements on the Save tab.
29. Explain about RDB-Delete method?
RDB-Delete method is used to delete a row or rows from an external relational database using SQL.
This method operates in conjunction with an SQL statement in the Delete tab of a Connect SQL rule (Rule-
Connect-SQL rule type) that contains the DELETE, TRUNCATE or DROP SQL statement.
Circumstance
What is Circumstance? How it works?
A circumstance is an optional qualification available for all rules. Using a circumstance allows our
application to support multiple variants of a rule. For example, variations of an ordinary rule instance
can be created for different customer status levels or for different geographic locations.
A circumstance-qualified rule instance (often referred to as a "circumstanced rule") is always
based upon an unqualified rule instance (base rule).
We can circumstance a base rule with a single property and its value, or with multiple properties and
their values (called multivariate circumstancing).
The circumstanced rule is executed during rule resolution if the value of the circumstance property
on the rule matches that property's value on the clipboard at runtime.
How do we create the circumstance-qualified rule?
To create a circumstance-qualified rule, first define an unqualified or base rule instance (with the
Circumstance values left blank).
If the original rule has an Applies To class as an initial key part, the circumstance-qualified rule
must have the same Applies To class or a subclass derived from that class.
Explain about single circumstance and multivariate circumstancing?
If we use a single circumstance property, we define the property name and its value directly in the
Save As form.
If we use multivariate circumstancing, two rules in the Save As form:
Explain about circumstance template rule?
Circumstance template rule is used to identify properties for multivariate circumstanced rules.
Explain about Circumstance definition rules?
Circumstance definition rules contain a table of values for the properties in circumstance template
rules.
Availability:
How to change Rule Availability?
To change the availability setting of a rule, click the Availability toolbar button (
).
We may need to check out the rule first. A dialog box appears.
Select one of five Availability values
Yes, No/Draft Mode, Blocked, Final, Withdrawn.
NOTE:
Class, library, RuleSet Name, and RuleSet version rules are always available. We cannot
changethe availability of instances of these rule types.
Rules in an override RuleSet cannot have availability values ofBlockedorWithdrawn.
Explain if the Rule Availability is set as YES?
A circle and dot indicates that this rule is available. Rules with a Yes value are visible to rule
resolution processing and can be executed.
Explain if the Rule Availability is set as No/Draft Mode?
An empty circle indicates a rule that is not available. Set the Availability of a rule to No/Draft
Mode to cause the rule to become invisible to the rule resolution algorithm for all users (including
ourself), and to bypass validation of non-key fields. The No/Draft Mode setting is useful in
experimentation and troubleshooting to assess the effect of two rule versions.
Explain if Rule Availability is set as Final?
A rule is marked as final, no one can create a second rule with the same visible key in any RuleSet
other than the RuleSet that the first rule belongs to. If the RuleSet version of a final rule is locked,
we cannot create a second rule with the same visible key in any RuleSet.
We can override a final rule through a higher version in the same RuleSet.
Many rules in the Pega-RULES and Pega-ProCom RuleSets are marked Final because correct
operation of these rules is essential to ensure the integrity and security of our system.
Other standard rules have the Available field set to Yes rather than Final we can override those
rules in our application.
NOTE:
We cannot use circumstances or time-qualified rules to override a final rule.
Explain if Rule Availability is set as Blocked?
A circle within an X indicates that this rule has Availability set to Blocked. Set the value of this
property to Blocked if we want rule resolution processing to halt (with no rule found) when it
encounters this rule. The rule form colors change from greens to grays.
This is a stronger form of No/Draft, because it affects all lower-numbered versions of the rule,
and versions (in other RuleSets) that are below this version in the user's RuleSet list. A blocked rule
does not prevent rule resolution from finding (and running) higher-numbered versions in the same
RuleSet, or finding rules with the same visible key in a different RuleSet that is higher on the
RuleSet list.
NOTE:
Rules in an override RuleSet cannot have availability values of Blocked.
Explain if Rule Availability is set as Withdrawn?
A withdrawn rule is never selected by rule resolution.
Withdrawn rule masks from rule resolution any other rules which meet all of these tests:
0
The other rule belongs to the same RuleSet
1
The other rule belongs to the same major version of the RuleSet.
2
The other rule has the same Applies To class (if relevant and other key parts match)
3
If circumstance-qualified, is qualified with the same circumstance type and value.
NOTE:
Rules in an override RuleSet cannot have availability values of Withdrawn.
Case Management:
Explain about Work Object?
A work object is the primary unit of work completion in an application, and the primary collection
of data that a flow operates on.
As an application is used, work objects are created, updated, and eventually closed (resolved).
Every work object has a unique ID (property pyID), an urgency value, and a status (property
pyStatusWork).
Explain about Work Object ID?
A work object ID is the permanent, external identifier of a work object.
If we don't specify a prefix (on the Details tab of the application rule), the Work-.GenerateID
activity uses W- as the prefix and no suffix. The Work-Cover-.GenerateID activity uses C- as the
default prefix. Conventionally, the F- prefix is used to identify folder work objects.
Where we determine the prefix and suffix of of the Work Object ID?
The prefix and suffix are determined by a model rule pyDefault for the work type or the class
corresponding to the class group. The model is referenced on the Process tab of the flow rule that
creates the work object.
Cover:
Explain about Cover?
a cover is a work object in a concrete class derived from the Work-Cover- abstract
class A cover work object is parent to one or a few other related work objects.
Typically one work party such as the customer party is present in the cover work object and also
present in all the covered work objects associated with it. The covered work objects are the children
in a parent-child relationship.
A cover work object provides a coordinate processing of related work objects. By default, the system
prevents the resolution of a cover work object unless all of its "member" covered work objects are
resolved.
How do we create the Cover Work Object from Activity?
In activity We are creating Work Object and Add to the Cover At a time By using the method
AddCoveredWork.
AddCoveredWork Creates a new covered work object using the primary page data. This activity
assumes the cover is already locked. Due to above Reason we are locked the cover by using Activity
Obj-Refresh-And-Lock.
This activity saves the new covered work object on the deferred list.
How the Cover Work Objects are Working?
For example, if a single customer request causes a user to create three separate work objects, these
work objects may follow separate flows, be handled by separate departments, and not otherwise
affect each other. The cover object provides a way to consolidate, view, and manage the outstanding
service requests of this customer. After all three covered work objects become resolved, the cover
work object can be resolved.
How the Covers as seen by application users?
Work object forms support working with covers and its covered objects:
0
Click the View Contents button (
) at the top right of the cover work object form to access the
member work objects.
1
From the ALL tab, select any single cover member work object using the drop-down list or click
a row.
2
Click the yellow cover ID link to return to the cover-only display.
By convention, the work object IDs of covers have the format C-999999; basic work objects have
the format W-99999.
Folders:
Explain about Folder?
A work object folder is a work object in a concrete class that inherits from the Work-Folder- class.
A folder object holds a collection of one or more other work objects (which themselves may be basic
work objects, other folders, or covers) providing access for analysis and reporting.
By convention, the work object ID of folders has the format F-99999.
How do we create a Folder by using Activity?
AddToFolder Activity Adds a work item to the folder.
This activity creates a link between work item and folder and adds appropriate status messages.
What is the difference between a Cover and a Folder? Which one is tightly coupled?
A cover is a work object that is also a parent to one or a few other related work objects. Internally, a
cover is a work object in a concrete class derived from the Work-Cover- abstract class. A cover work
object provides a means to coordinate processing of the related work objects. Normally, the system
resolves a cover work object once all its "member" covered work objects are resolved.
A folder is a work object in a concrete class that inherits from the Work-Folder- class. A folder
object holds a collection of one or more other work objects (which themselves may be basic work
objects, other folders, or covers) providing access for analysis and reporting, but not for primary
processing.
Cover is tightly coupled because a Workobject can be associated with many folders but it can be
associated with only one cover.
Activities:
What are the Pega Activities we used?
Work-.Add Creates a new work object (without any cover work object) and performs a Commit
method, which saves the work object and releases all locks.
Work-.AddWork Use Work-.AddWork rather than Work-.Add in situations where the Commit
method is not wanted until later.
AddCoveredWork Creates a new cover work object but does not perform a Commit method, so
current locks are retained.
Work-.AddCovered Use Work-.AddCovered rather than Work-.AddCoveredWork to commit the
new work object.
AddWork Creates a new covered or non-covered work object. Called with a primary page that
inherits from the Work- base class. Commits the new work object if there is no flow execution to
start; if it starts a flow execution, the commit operation typically occurs when that flow execution
creates an assignment.
New Called by harness processing to create a (non-covered) work object and display the work object
form.
NewCovered Called by harness processing to create a covered work object and display the work
object form.
Assign-Worklist Creates a normal assignment (Assign-Worklist class) added to a user's worklist.
Assign-Workbasket Creates a normal assignment
(Assign-Workbasket class) added to a
workbasket. If the workbasket doesn't exist, the assignment can be routed to the current user.
Notify Send an e-mail message as correspondence to a party identified through a parameter.
NotifyAll Send a single e-mail message to each work party identified in the work object.
ToCreateOperator Route the assignment to the user who entered the work object.
ToWorkbasket Routes the assignment to a workbasket identified in a parameter. ToWorklist
Routes the assignment to the worklist of a specific user, identified in a parameter.
CorrNew Send correspondence (that requires no user interaction), and save it as an attachment to the
work object. For email output, can send all work object attachments or selected work object
attachments as email attachments. The optional Priority parameter allows the outgoing mail to be
marked as high or low priority in certain e-mail client programs, such as Microsoft Outlook.
Assign-.NewDefaults Called from Work-.NewAssign and Work-.NewAssignBasket on the
assignment. Allows the developer to customize or extend the steps that are performed when a new
assignment is created.
Work- .NewDefaults Called from Work -.New and Work-.NewCovered. Override to customize or
extend the steps that are performed while creating new work page for the New harness.
What's the difference between parameters and local variables? How are they used in an activity?
Values stored in parameter values can be shared between two activities but the scope of local
variables is confined to the activity in which they are declared.
Parameters can be referenced as Param.parametername.
Local variables are referenced as Local.variablename.
How can we pass parameters between activities? Explain.
By using In/Out parameters. In parameters means that its expecting a values from another activity
and Out parameter stores the values to be used by another activity.
Explain with an example how can we reuse an activity?
By parameters itself. Say for example we have an activity to append two strings which keeps
changing as the application proceeds.
So declare two parameters of type Strings and pass different values to it, but the business logic to
append them will always remain the same, only parameter values keeps on changing.
What is a step page what role does it play in an activity?
Each step in an activity may have a designated step page. When creating or updating an activity, the
developer identifies an existing or new clipboard page for the method (or instruction) in that step to
act on, in a column of the tab labeled Step Page.
The step page becomes the primary page for the duration of this step's execution.
So any rule referenced in this step will be looked upon in the class associated with that step page, if
there is no step page than the Applies To class will considered.
How to write a java code in a activity? Explain with a small example.
Just by using an API “java” in method tab.
Eg. If we want to access a clipboard property then the java code will be
like, Tools.findPage(“pageName”).getString(“.PropertyName”);
Consider this scenario, I have an activity in ruleset A and I want to call this activity from an
acitivity in ruleset B.Is this possible? If yes, how?
Yes, this is possible through ruleset prerequisites.It is defined under Rule-Ruleset-Version.
Note : Process Commander enforces RuleSet version prerequisites only during development (as a
developer adds or saves rules) and as rules are imported during Import Archive operations.
Prerequisites are not enforced at runtime; the user's RuleSet list and the rule resolution algorithm
determine which rules are available for the user to execute.
What is show-page and show-html? Explain with example.
Show-Page is used to display any clipboard page in XML form (name-value pair).
Show-HTML method is used to cause the activity to process an HTML rule and send the resulting
HTML to a user for display by Internet Explorer. Also known as stream processing. This may
involve the interpretation of JSP tags (or the older HTML directives), which can access the clipboard
to obtain property values, or can insert other HTML rules, and so on.
Explain about Onchange Activity?
OnChange activity to be executed automatically by a Declare OnChange rule, Such activities must
not use any methods that directly change the properties or the database.
Declare Expression rules do not evaluate during the execution of an OnChange.activity. OnChange
activities must not perform any forward chaining themselves.
Explain about Trigger Activity?
Trigger activity to be executed automatically by a Declare Trigger rule. Because triggered activities
run during database commits, they cannot themselves commit database transactions.
0
How do we create a Work Object from Activity?
First Create NewPage with a Page New
Within the Page New step specify the
“model” and
“NewClass” On the new page Set the properties
.pyFlowName with FlowName
.pyDescription
.pyOrigOrg
.pyLabel
Call Add activity in the next step and specify the StepPage where we have to call the
WorkObject Call Add Creates the WorkObject where the activity belongs to type of the
class.
Decisions:
Decision Rules are categorized into
1
When condition rule
2
Decision tree rule
3
Decision table rule
4
Map value rule
Explain about WHEN condition rule?
This returns True or False as result.
Evaluates relationship among one or more property values and return true or
false.Based on simple if/then/else conditions.
Explain about DecisionTree rule?
DecisionTrees are instances of the Rule-Declare-DecisionTree rule type.
Decision tree accepts one input property value, but can evaluates numerous
properties. Best used for complex if/then/else statements.
DecisionTree can capture and present business logic in the form of one or more if/then/else
conditions.
DecisionTree can be refer from three other
rules From decision shape of flow rule.
In an activity we can evaluate the DecisionTree using Property-Map-
DecisionTree. DecisionTree can be referring from Rule-Declare-Expression.
0
Explain about DecisionTable?
Decision table are instances of the Rule-Declare-DecisionTable rule type.
Decision table contain one or more rows each containing test conditions and a result to
return.
Returns a value when all tests are true for a row.
If there is no result in a cell it is true by default. If
no rows are true it returns the otherwise row.
Decision tables can capture and present business logic in the form of one or more if... then...
else conditions.
Decision table can be referred from three other
rules: From decision shape of floe rule.
In an activity we can evaluate the decision table using Property-Map-
DecisionTable Decision Table can be referred from Rule-Declare-Expression
Explain about Map Value Rule?
A map value rule is a rule that converts one or two input values, such as latitude and
longitude numbers, into a calculated result value, such as a city name. The rule uses ranges
for the input value or values and a matrix to look up the result.
Map value rules are instances of the Rule-Obj-MapValue rule type. This rule type is part of
the Decision category.
Declaratives:
Declarative rule is an instance of a class derived from Rule-Declared-
They allow for automatic processing of Property values.
No need to be called Explicitly.
No need to run in sequential fashion.
System manages re-evaluation when it detects change.
1. Name some declarative rules?
Rule-Declare-Expressions, OnChange , Contraints, Trigger, Index.
What is Declare-Expression? Explain?
An Expression executed automatically in response to a property value change in with the
expression.
Declare Expression rules are instances of the Rule-Declare-Expressions rule type. They are
part of the Decision category.
We can create Declare-Expression rule instead of using a property set method in an Activity.
0
What is the use of PageContext?
PageContext is used if target property is in PageList or PageGroup.
If target property has mode single value and appears directly on the page of applied to class,
PageContext should be blank. This called Context-Free expression.
1
What is Forward Chaining?
Forward Chaining provides the automatic calculation of the property by executing the
declarative rule, when any one of the input property value is changed.
For example, if the area property depends on the length and width property, then Forward
Chaining causes the area property to be recalculated every time either length or width values
changes.
2
What is Backward Chaining?
Back Ward chaining provides the automatic calculation of the property by executing the
declarative rule, when the value is needed for property, rather than when input change.
For example, if the area property depends on length and width property, the back ward
chaining causes the area property to be recalculated each time the area property is required.
Almost all the declarative rules implement only forward chaining, except the Rule-Declare-
Expression.
In rule-Declare-Expression, we have a choice to decide either we should go to Forward
chaining or Backward chaining.
Explain about Rule-Declare Onchange?
Runs an activity automatically when the value of a specified property changes.
It is always Forward Chaining.
If we specified more than one property, they all must be on same page.
How to implement Rule-Declare-Onchange?
0 Create an instance of Rule-declare-onchange
1
Select the properties we want this rule to keep a track of.
2 Optionally enter a when condition rule to be evaluated.
3
Provide the acitivty name of type OnChange.
Explain about Declare Triggers?
Declare Trigger runs an activity when instances of a specific class are created, updated, or
deleted in the DataBase.
Declare Trigger is always Forward Chaining.
Explain about Constraints?
Constraints used to validation purpose.
Define and enforce relationship among property values.
Prevent user from advancing if constraint is not satisfied.
Prevent invalid data entered.
Constrains is always Forward Chaining.
What is the difference between Constraints and Validation Rules?
Constraints are declarative rules triggered automatically when a property value
changes.Validation rules must be told when to run, When a form is submitted or Prior to
running a
Flow Action.
Explain about Declare Index?
Declare Index rules are instances of the Rule-Declare-Index class.
Declare Index Automatically extracts a value from an embedded property when its value has
changed.
They are part of sysadmin category.
How do we implement the Declare Index?
Step 1: Create a class inherits from the Index- class.
Provide these three properties: pxInsIndexedKey, pxIndexCount, pxIndexPurpose.
Step 2: Create Rule-Declare-Index And provide Source Page Context and Source page
context class, Index class to write.
Step 3: In list view, Join tab provide Declare Index name.
0
What is a clipboard and how it is organized?
Each connected Process Commander requestor has an associated temporary memory area on the
server known as the clipboard. The clipboard has a hierarchical structure, consisting of nodes
known as pages, most of which have a name and an associated class. Pages act as buffers or
temporary copies of object instances (of that class) that are copied from, or may later be stored into,
the PegaRULES database or another database.
Explain about Delegating a rule?
A delegated rule is one that appears for a specific group of users so that they may manage these
rules outside the development environment. Delegated rules appear on the My Rules gadget for a
single user or for all the users who are associated with a specific access group.
An application user who has the PegaRULES:WorkMgr4 access role can update the leftmost tab of
existing rules that may change frequently.
Opening a delegated rule
To open a rule delegated to you:
From the WorkManager portal, open the Dashboard workspace, locate the My Business Rules area,
and click the link that labels the delegated rule.
From the Developer portal, select View > My Rules > label.
Delegating a rule
To mark a rule as delegated, click the Favorites toolbar button (
) and complete the Delegated
Rules dialog box.
Withdrawing delegation
To cancel the delegation of a rule that is delegated to you:
Using the Developer portal, select Edit > My Rules. Complete the dialog box and click Submit .
Using the WorkManager portal, click the Edit button in the My Business Rules area of the Process
Work workspace. Complete the dialog box and click Submit .
Notes
Delegation of a rule to a user doesn't eliminate the need for that user to hold an appropriate access
role and privileges to check out the rule, modify the rule, and check it back in.
Rule Resolution:
How the system finds rules through rule resolution?
Rule resolution is an internal search algorithm that the system uses to find the best suitable rule to
apply in a particular situation.
It uses the following as input :
name of the rule.
availability.
date and time of creation.
rule set list.
circumstance, if any.
position in the class hierarchy.
inheritance type, pattern or directed.
access roles and privileges held.
It works as follows:
First rule type is matched.
Then the Class name of the rule instance is matched bottom up in the class
hierarchy and all rules matching this criteria are filtered.
Then the rules are filtered on the basis of ruleset, its versoin and its availability.
If they are time based rules then the one with soonest end adte will be picked.
Then the circumstance values is checked, the property value in the ruke is checked
against the user clipboard value, if match is found then that rule is picked and the
base unqualified rule is dropped.
Then the rules are filtered based on the access roles and privileges.
Te rules that qualifies the above criteria are picked nad the one in lowest in the
class hierarchy is executed.
Many Process Commander applications provide business process management and automation through six functional
capabilities, informally known as the Six R's:
Receiving — Accepting and capturing the essential data describing work from multiple sources in multiple
media and formats, from keyboards, scanners, and external systems.
Routing — Using characteristics of the work and knowledge about the workforce to make intelligent matches
and assignments.
Reporting — Providing real-time visibility of work in progress, work completed, productivity, bottlenecks, and
quality.
Responding — Communicating status, requests for information, and progress to the work originator and to
other people involved in the work, by e-mail, fax, written mail, and other means.
Researching — Accessing external systems and databases through connectors to support analysis and
decisionmaking.
Resolving — Through automated processing and automated support of users, completing the work and
updating downstream systems promptly.
Difference between Work- and Data- classes?
The Work- base class, one of thirteen standard top level abstract classes, is a superclass to all the
classes that define work objects. A work object is the fundamental unit that records processed work
in an application.
The Data- base class is an abstract class above various classes that define and contain static data and
cumulative data. For example, the Data-Admin- classes contain information created by your Process
Commander developers defining who can use the application, their privileges and security, and
where they belong in the organization.
0
What are the different layers in Architecture?
A robust class structure is the foundation of reuse throughout our application. The PRPC
recommended class structure design pattern offers flexibility in our design and provides for more
levels of reuse.
There are 4 distinct layers in the PRPC best practice class structure design pattern:
PRPC Shared Product: The PRPC Shared Product represents the out-of-the-box Process
Commander classes such as Work-, Work-Object-, Work-Folder-, Work-Cover-, and Data-
Enterprise Shared Product Layer: The Enterprise Shared Product Layer is a library of
extensions to the PRPC base functionality. You should always include this layer. It is rare, but
this layer may be omitted in some very small one-off applications.
Generalized Application Layer: The Generalized Application Layer represents a generic base
application to use as a framework for application instances. Here we will define most of the rules
for our base application.
Organizational and Specialized Application Layer: The Organizational and Specialized
Application Layer represents an organizational application instance. Here we will be
implementing the generic application.
The class structure provides the first and most important layer of reuse and specialization in PRPC
due to its precedents in the rule resolution algorithm.
The class structure provides us with a hierarchy in which rules can be placed. The higher a rule is in
the hierarchy, the more potential reuse there is. However, a rule can only reference other rules at the
same level in the hierarchy or higher. For example, a rule X at class A- cannot call Rule Y defined at
A-B if no rule Y exists at A-.
The key to a good class structure is that there are enough layers and classes to hold the most
fundamental levels of reuse but not too many that it becomes cumbersome to navigate and unclear as
to the intent.
Shared RuleSets provide a grouping mechanism for sharing both class resolved and non-class
resolved rules. For example Rule HTML properties and utility functions are non-class resolved.
RuleSets are key to reusability as they are the mechanism by which shared rules are moved to
different rule bases and/or environments.
What is a class group and what are its advantages?
A Class Group is an instance of the Data-Admin-DB-ClassGroup class.
A class group instance causes the system to store the instances corresponding to two or more
concrete classes that have a common key format in a single database table. Class groups are
commonly used to cause the system to store instances of similar or related Work- concrete classes
together in one relational database table.
All the classes who belong to a class group can inherit all the rulesclared and defined at the class
group level.
What are the Inheritance types?
Process Commander provides two kinds of class inheritance, known as directed inheritance and
pattern inheritance.
Pattern inheritance, an optional feature we can set up for a class in the Rule-Obj-Class rule, affects
the first steps in the rule resolution algorithm. This approach is sometimes called "dual" inheritance.
During rule resolution, pattern inheritance causes a class to inherit rules first from classes that match
a prefix of the class name.
Directed inheritance — Allows us to name a parent class, choosing a name that's not related to the
name of this class
How pattern and directed inheritance works?
Pattern Inheritance works as follows:
Rule resolution always looks first for a rule it needs in the class initially provided,
regardless of the state of this check box. If the box is checked and the rule is not found,
it forms a sequence of candidate classes to search by truncating, from the left, portions
of the class name that consist only of a dash character, or consist only of characters other
than a dash. If no class exists for one of these computed names, rule resolution continues
with the next prefix.
For example, a search for a rule in the MyBank-LoanOrg-LoanDept class could
search through these classes, in the order indicated:
0 MyBank-LoanOrg-LoanDept
1 MyBank-LoanOrg-
2 MyBank-LoanOrg
3 MyBank-
4 MyBank
Directed Inheritance works as follows:
If the pattern search finishes without finding a rule, go back to the original class and
use directed inheritance to find the parent of the original class.
What are the types of classes?
A class is an instance of the Rule-Obj-Class rule type.
An abstract class is a rule (an instance of the Rule-Obj-Class class) created to support the definition
of rules, including other classes. Such rules can be inherited by subclasses of the abstract class. Rules
with a class as a key part (such as properties, activities, flows, models, and so on) can apply to an
abstract class.
A concrete class can have instances stored in the database. An abstract class cannot have any
instances.
What are Pega default classes?
A base class is one of twelve standard abstract classes that are immediately below the top class in
the hierarchy. This top class, known as the ultimate base class, is identified by the symbol
@baseclass.
The three base classes of greatest interest to application developers are Data-, Assign- and Work-.
The base classes are:
Assign- Assignment instances, each identifying a step in a workflow that requires human input or
work by an outside organization, person, or system.
Code- Classes that directly reference server program code. Pages belonging to classes derived from
the Code- base class exist only temporarily in memory, and are not saved in the
PegaRULES database.
Data- Parent class of concrete classes containing reference data, including data for system
administration and security.
Embed- Defines the structure of pages embedded within other pages. Pages belonging to classes
derived from the Embed- base class cannot be renamed or directly saved.
History- Append- only instances record the change history of objects in another
class. Index- Secondary access keys defined to provide fast retrieval of other
instances. Link- Instances that record associations between two objects.
Log- Parent of concrete classes containing cumulative logs of important system-wide events.
PegaAccel- Parent of special classes that support the Application Accelerator tool.
Rule- Rule types, for defining applications.
System- Contains operational status information about the entire Process Commander system.
Work- Work objects, covers, and folders.
What is the difference between Work group and Access Group?
A work group is an instance of the Data-Admin-WorkGroup class. A work group can identify a user
who is a supervisor, together with a set of workers and workbaskets that report to that supervisor.
An access group is an instance of the Data-Admin-Operator-AccessGroup class. Access groups
make a set of RuleSet versions available to requestors.
Developers define access groups and associate an access group with each user (each Data-Admin-
Operator-ID instance). Typically, multiple users are associated with or belong to one access group.
The access group associated with a user affects access control by determining:
0 The portal layout that a user sees first after logging in.
1 The local customization RuleSet name and RuleSet version. These usually are defaulted whenever
this user creates a new rule instance.
2 The application rule for this user.
3 Optionally, the access roles available to this user.
How to associate an Operator with a workbasket?
In a work group, we can associate an operator with a manager and a work basket.
3. What are access roles and how they work at run time? Can we create our own Access Roles? If
yes, explain with an example.
An access role is an instance of the Rule-Access-Role-Name class.
Use an access role name to convey permissions (capabilities) to a user or a group of users. Access
roles can be referenced in requestor instances, Operator ID instances, in access group instances, in
activities, and in queries.
At log in, the system assembles a set of roles for a user based on information in a user's requestor
instance, Operator ID instance, and the associated access group instance.
Access roles influence which classes a user can view, update, delete, and so on through the Access of
Role to Object and Access Deny rule types.
Example. Create an instance of Rule-Access-Role-Name. To grant access to a user for a particular
class create an instance of Rule-Access-Role-Obj.
For each of the eight categories in the array, you can enter an Access When rule name, or a numeric
value between 1 and 5.
If at runtime, the production level of your Process Commander system is not greater than the
numeric value, then users with the specified access role can perform the operation (on objects of that
class). If an Access When rule evaluates to True at runtime, the users with the specified access role
can perform the operation.
Production level is set in Data-Admin-System.
What is a portal and how can it be customized for different users?
The Process Commander portals support two user communities:
0 The Developer portal provides an integrated work, test, and development environment to support
application developers. Customization of the Developer portal is typically not necessary and
ordinarily limited to menus and skins.
1 User portals support managers and users of applications workers, as they enter, update, and resolve
work objects. User portals may be customized to reflect the terminology, layout, facilities and styles
appropriate to each user community.
This Developer portal provides quick access to dozens of tools, wizards, reports, and other
capabilities.
The appearance and function of our Process Commander portal depends on information in our access
group which references a portal rule (Rule-Portal rule type)
We can create our own portals and define new gadgets (instances of Data-Gadget).
Data-Gadget contains simple HTML rules.. We can change the Pega Logo as well.
Define access group and its functionality?
Access Group controls the security basing on the job functions.
It is instance of Data-Admin-Operator-AccessGroup.
Various aspects that can be controlled through access group are
a)
d
efault and available types of works( also called as work pools ) ,
b)
P
rimary rulesets ( Access Control to rulesets),
c)
A
ssigned roles,
d)
P
ortal layout
e)
D
efault ruleset for making changes ( Default ruleset whenever the user creates/ saves as the rule
)
What is the order in which Rule set list is constructed?
Requestor, Organization, Division, Access Group is the order in which this list is constructed.
In access group Application rule set list is in bottom and Production Rule set is on top of it. It
follows Top-down approach.
What is RuleSet?
A RuleSet name is an instance of the Rule- RuleSet-Name rule type. Each RuleSet defines a major
subset of rules in the PegaRULES database, because every instance of every rule type references or
"belongs to" a RuleSet. A RuleSet name is a major aspect in:
Access control
Grouping interrelated rules
Managing the rules
Moving applications — sets of rules — from one Process Commander system to another.
Process Commander itself consists of six standard RuleSets:
Pega-AppDefinition — Standard rules supporting Direct Capture of Objectives features
Pega-ProCom — Standard rules that support business process management (BPM) applications
Pega-IntSvcs — Standard rules that support integration
Pega-WB — Standard rules that support the portal infrastructure
Pega-RULES — Standard rules that support business rules engine and rule resolution
CheckInCandidates — Optional. Empty, used by rule check-in processing. Version 01-01-01 is not
locked.
Any application developer who can checked out rules has a private RuleSet.
The system creates each private ruleset automatically named to match the developers operator ID
value.
We create one ruleset per application.
Rule set names are part of SysAdmin category.
What is ruleset versioning ? Explain Major, minor and patch?
A RuleSet version is an instance of the Rule-RuleSet-Version rule type. The version number in the
form AA-AA-AA, defines six digits in three groups that characterize the evolution and development
of a rule instance, and of the application it belongs with. The three segments are known as the major
version, minor version, and patch version.
For eg. LoanAdmin:01- 02-
03 Here, 01: major version
minor version
patch version
Major : for entirely new functionalities or major releases, the first two digits of the version is
incremented.
Minor : for enhancements, middle two digits are incremented.
Patch : for bug fixes, last two digits are incremented.
Rule resolution algorithm uses version numbers to find the most appropriate single rule instances to
execute in a specific situation.
Few rules are non versioned
Application, class, rulset. Ruleset version, Access deny, Library.
Explain about RuleSet types and the priority given in Rule Resolution?
Application RuleSet is a RuleSet that appears in any of the following form fields:
On the General tab of the application rule referenced in the access group for a requestor (when the
current work pool is part of this application)
(Recursively) On the General tab of a 'parent' application rule, if the Include Parent check box on
the General tab of a 'child' application is checked.
In the Local Customization field on the Settings tab of the access group
Production RuleSet is a RuleSet that has the Type field set to Standard (on the Category tab of the
RuleSet form) and that typically has at least one open (not secured) RuleSet Version.
Production RuleSets are listed on the General tab of an application rule and on the Layout tab of
the Access Group form.
The application RuleSet does not include rules in RuleSets listed in the Production RuleSets array of
the Access tab.
During rule resolution, the system:
First priority given to Production Rulesets. First search the rules in Rulesets available in
Production RuleSet.
Next Searches the rules in the Rulesets listed in application Rulesets. first using the topmost
RuleSet name and version on the list, then the next, and so on. Override RuleSet versions (the top
layer are searched first; the Pega-RULES RuleSet is searched last)
Ignores any rule instances that match a RuleSet on the list but contain versions higher than the
version on the list.
Shapes:
The available shapes are
0
Start task
1
Assignment
2
Assignment service
3
Comment
4
Connector
5
Decision
6
Subflow
7
Flow end
8
Fork
9
Integrator
10
Notification
11
Router
12
Spin-off
13
Split-join
14
Split-for each
15
Pool with swin lanes
16
Ticket
17
Utility
Explain about Assignment shape?
An assignment is an instance of a class derived from the Assign- class.
Assignments record a temporary condition of an open work object within an executing
flow. For every Assignment , add at least one flow action .
The assignment normally appears on the work list of the user who executes the flow.
Explain about Connectors?
To connect a shape element in the flow with the next shape
element. To indicate a possible path for the flow execution.
Explain about Notify shape?
A Notify can send an e-mail message to a work party.
Connect the notify shape to the bottom edge of an assignment shape.
Explain about Router shape?
Sends an assignment to a user, workbasket, or agent other than the current user.
Associate a Router task with an assignment task. This activity determines which worklist or
workbasket is to contain the assignment.
Explain about Spin-Off shape?
When a work object advancing through a flow reaches the Spin-Off shape, process
commander starts execution of a different flow, using the current work object or different
work object.
Processing in the current flow rule continues in parallel, without waiting for the other flow
to complete.
Use the Spin-Off shape to start a Synchronous flow execution.
Explain about Split-Join shape?
Split-Join shape is used to multiple subflows of our flow be completed before the current
flow continues execution.
This allows subflows to execute asynchronously, in parallel.
The Split-Join shape must contain at least two called flows.
Explain about Split-ForEach shape?
Split-ForEach shape is used to iterate over the pages of a Page List or Page Group property.
For each page, we can conditionally start a flow execution for the work object.
Processing in the orginal flow pauses while sub flow execute.
We can’t use Split-foreach shape to create work objects.
The embedded page must exist before the Split-foreach shape is reached.
Explain about Fork shape?
The fork shape is used to choose one of a few different paths (connectors) based on tests on
the work object.
At runtime, the system evaluates the conditions on each outgoing connector, starting with
the connector assigned the highest likelihood. The flow execution continues along the first
connector that evaluates to True.
Explain about Decision shape?
Decision shape is used to reference a map value rule, decision table rule, decision tree rule
or a Boolean expression.
At runtime, the system evaluates the decision rule based on inputs from the flow and the
work object, and chooses one of the outgoing connectors based on the result.
0
Explain about Ticket shape?
We can start the execution point in the flow at any point in the flow by using Ticket
shape. The ticket is same as GOTO in programming language.
Ticket creation:
0
Create the Ticket
1
Drag a ticket shape to where we want to jump in the flow and Complete the Ticket
Properties panel
2
To configure the ticket in activity, Call the SetTicket activity and pass Ticket name
3
Create separate flow action and mention above activity as post activity in flow action.
4
Mention this FLOWACTION as LOCAL ACTION in assignment from where we want to
jump.
5
At the time of running the flow By default Connector Action is Displayed.
At the time of run the flow we need to select the local action at that particular
assignment where we mention the ticket activity.
1
Explain about Utility shape?
Each utility task references an activity with an Activity Type of Utility.
Utility activity is defined in a class derived from the Work- or Data- base class and activity
of type Utility.
Explain about Integrator shape?
Integrator activity identifies an activity that connects our process commander system to an
external system to send or receive data.
For example integration task can connect to a customer data base to retrieve account balances
or verify account numbers and status.
Integrator task use activities that call connector rules.
0
Explain about SubFlow shape?
Sub Flow shape may represent any of the following:
A branch to another flow without returning (one or more incoming connectors, no outgoing
connectors)
A call to another flow with return (one or more incoming connectors, one or more outgoing
connectors)
Part of a Split/Join or Split-forEach shape
(at least one incoming and one outgoing
connector)
A flow rule that is branched to or called by another is sometimes informally called a
subflow.
In subflow we can define flow on current work item or another work item.
Explain with an example, the difference between a Decision shape and a Fork?
A decision task is a shape on a flow rule that references a rule of one of three types:
0 A map value rule (Rule-Obj-MapValue rule type)
1 A decision tree rule (Rule-Declare-DecisionTree rule type)
2 A decision table rule (Rule-Declare-DecisionTable rule type)
At runtime, the system evaluates the decision rule to determine how a work object
progresses through the flow. The work object progresses along one of the connectors leading
from this shape, depending on the outcome of the decision rule.
On the other hand fork checks the conditions directly on the object and unlike decision
shape it never asks for a Decision tree, table or map value and two or more connectors can
emanate from a fork shape.
Consider this scenario: After a work object had reached a particular stage in a flow, I
need to run two flows in parallel to each other. How this can be achieved?
This can be achieved by using Spin-Off shape. Just drag the spin off smart shape and fill in
the appropriate values depending upon what you choose among “On Current Work item”,
“On Another Work Item” or “On Embedded Page”.
So the flow started by this shape will be called a subflow and the original flow as
parent flow.
Flows:
Flow rule is the fundamental representation of a business process in process commander.
0
Explain about types of Flows?
A flow rule that containsnoassignments, and so can execute from start to end
A flow rule that consistsonlyof assignments or decisions and meets other
A flow that creates a new work object is called astarter flow .
A flow that is called by another flow is known as asubflow ,the calling flow is
1
What is a screen flow, why it is used?
A series of forms that each require only one or few questions to be answered. After
submitting a form, user receives with another simple forms with more fields that my depend
on previous answers. At any point user can go to previous forms to review or change
previous answers.
To make a screen flow, create a new flow rule and select screen flow in the Template field.
Can we start an application with a screen flow? If yes, how? If no, why?
A screen flow rule can’t be a starter flow rule. Use the regular flow to create WorkObject.
Call the screen flow as sub flow
we can’t start an application with a screen flow because “Create New Object” option is
disabled under process tab.
A screen flow can operate on a temporary work object, this is never saved to Data Base. In
screen flow Flowactions are referenced by assignment shape rather than connectors.
4. How can we call one flow from another flow?
By using subflow shape. Just drag a subflow shape and fill in appropriate values ,depending
upon what we choose among “On Current Work item”, “On Another Work Item” or “On
Embedded Page”.
5. When do we say that a work object is resolved? Can a work object be resolved
manually?
When the flow reached the end shape, the work object gets resolved.
Manually it can be resolved through UpdateStatus activity and provide the values for
“StatusWork” parameter as Resolved.
How to restrict a flow to particular users?
By using privileges and when conditions under process tab of the flow instance.
SOAP:
What is SOAP?
SOAP (Simple Object Access Protocol) is a protocol that is used for the exchange of information in a
decentralized, distributed environment. SOAP is an XML-based protocol with three components:
0 An envelope for describing what is in a message and how to process it
1 Encoding rules for expressing instances of application-defined data types
2 A convention for remote procedure calls and responses
Services implemented using SOAP are often called Web services.
What is WSDL?
WSDL (Web Services Description Language) is an XML format defined by the World Wide Web
Consortium (W3C). Each WSDL file describes network services as a set of endpoints operating on
messages containing either document-oriented or procedure-oriented information.
A WSDL file describes a SOAP service. It includes XML schema information that describes the
input parameter values that need to be sent in a SOAP request message, and the output parameter
values that can be extracted from a SOAP response message.
What is RPC and Document? When they can be used?
SOAP messages are formatted in two different ways:
RPC - Remote procedure call for simple data
exchange.Document - for more complex data structures.
4. What is the difference between HTTP and SOAP?
The HTTP integration interface supports interactions between our Process Commander applications
and other systems through HyperText Transport Protocol.
Using Simple Object Access Protocol (SOAP) over HTTP, the SOAP integration interface in
Process commander supports interactions with external systems through Web services. Use SOAP
connector rules when our Process Commander applications need to call an external Web service.
Integrators and Connectors:
What are the Integrators worked on?
Integration Services are interfaces between Process Commander and external systems.
These consist of services supplied by Process Commander in response to requests from
other systems and connectors, interfaces initiated by Process Commander.
0
What is service?
A service is a Process Commander programmatic component that defines and implements
an interface between an external application acting as a client and a Process Commander
system acting as a server.
A service is implemented through an instance of one of the rule types below, plus
appropriate calling code in the external client system:
Service SOAP (Rule-Service-SOAP rule type)
Service File (Rule-Service-File rule type)
1
What is connector?
A connector is a Process Commander programmatic component that defines and
implements an interface between a Process Commander application acting as a client and an
external system acting as a server.
A connector is implemented by any of these rule types:
Connect SOAP rules (Rule-Connect-SOAP rule type)
Connect SQL rule (Rule-Connect-SQL rule type)
How to integrate with web services?
0 Using apache axis, create WSDL and jar file.
1 Copy the jar file in application server and deploy it.
2 Copy WSDL file in Service Export Directory.
3 Restart Server.
4 Go to integration wizard.
5 Create connector rules.
6 provide the full path of the WSDL and finish the wizard.
7 Run the generated activity.
SQL (DataBase)
How do we connect to external Data base?
0
Copy the DataBase drivers in to the servers lib folder.
1
Create an instance of Data-Admin-DB-Table.
2
Create a class and do the mapping between table and class.
3
Create Rule-Connect-SQL, write a simple SQL query in it.
4
In an activity use RDB-Open or RDB-List to access this SQL query.
How do we map the External data table and class?
Each database may contain one or more relational (SQL) tables.
Instances of database tables in the Data-Admin-DB-Table class determine which concrete class
instances are placed in which database tables.
Create Data-Admin-DB-Table with Class name (To which class this table map)
In this provide the DataBase name and table name.
Generally RDB methods are used for external database, and Obj methods are used for Internal
DataBase. Can they be used vice versa? if not why?
Do not use Connect SQL rules or RDB methods for the PegaRULES database(s). Because not all
properties in the PegaRULES databases are distinct database columns.
use the Obj- methods, not the RDB- methods, with the PegaRULES database to prevent loss of data.